Pioneer EFX 500 Owner's Manual - Page 10
Names Of Parts And Functions - light
 |
UPC - 012562449630
View all Pioneer EFX 500 manuals
Add to My Manuals
Save this manual to your list of manuals |
Page 10 highlights
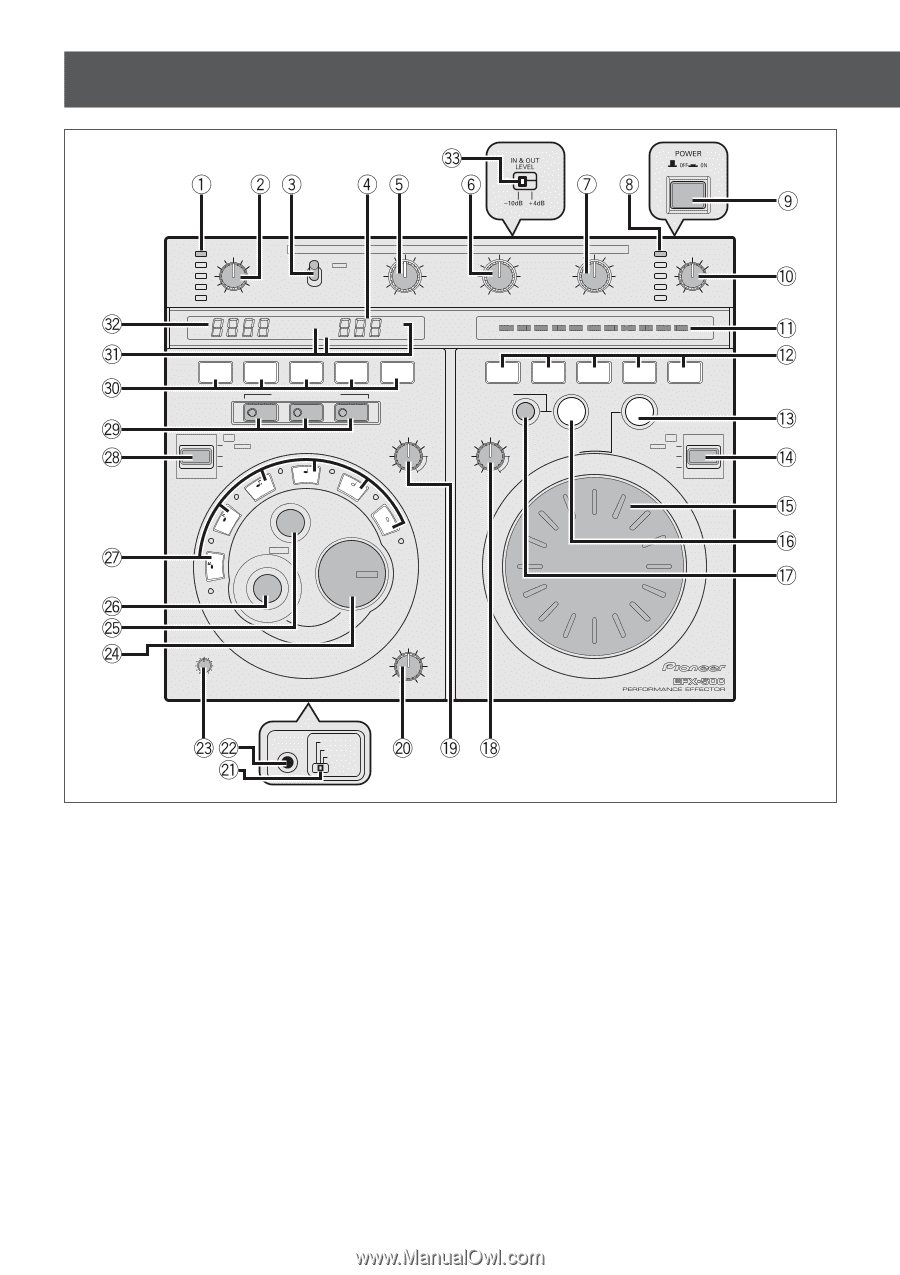
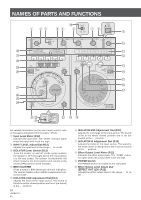
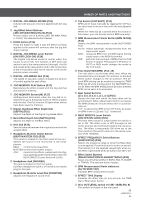
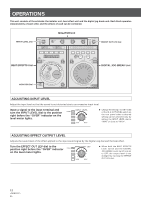
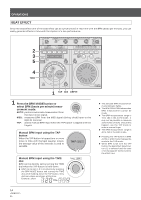
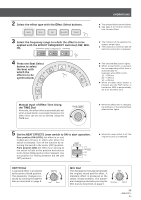
NAMES OF PARTS AND FUNCTIONS OVER INPUT LEVEL ISOLATOR MIN MAX EFFECT TIME mSec ON LOCK OFF ON -∞ BPM COUNTER AUTO TAP MIDI BPM LOW +6dB MID HI OVER EFFECT OUT LEV -∞ +6dB 100 80 0 10 -∞ +6dB DIGITAL JOG BREAK METER 60 40 20 0 20 40 60 20 30 40 50 60 70 80 MIN 80 100 90 100 MAX DELAY ECHO PAN FLANGER EFFECT FREQUENCY BEAT EFFECTS LOW MID HI ON LOCK OFF ON 1/1 3/4 2/1 TRANS DEPTH MIN MAX 1/4 1/2 4/1 BPM MODE TIME/ BPM TAP / SHIFT JET ZIP WAH JOG MEMORY M DEPTH PLAY MIN MAX RING FUZZ HOLD DIGITAL JOG BREAK LOCK ON OFF ON MONITOR MIN MAX BEAT EFFECTS MIX ORIGINAL EFFECT PHONES BEAT MASTER JOG DIGITAL JOG BREAK For related information on the use of each control, refer to the pages indicated within brackets "(P.XX)." 1 Input Level Meter (P.12) Indicates the input level. The "OVER" indicator lights when the input level is set too high. 2 INPUT LEVEL Adjust Dial (P.12) Adjusts the input level in the range -∞ to +6 dB. 3 ISOLATOR Lever Switch (P.13) Turns the isolator on and off. At the center position the isolator is OFF (through) and at the rear position it is ON and locked. The isolator is temporarily ON when moved to the front position and returns to the center (OFF) position when released. 4 BPM COUNTER Gives a numeric BPM (beats per minute) indication. The counter flashes when a BPM measurement cannot be made. 5 ISOLATOR LOW Adjustment Dial (P.13) Adjusts the bass of the input source. The sound is flat at the center clicked position and is cut (no sound) at the - ∞ position. 10 En 6 ISOLATOR MID Adjustment Dial (P.13) Adjusts the mid-range of the input source. The sound is flat at the center clicked position and is cut (no sound) at the -∞ position. 7 ISOLATOR HI Adjustment Dial (P.13) Adjusts the treble of the input source. The sound is flat at the center clicked position and is cut (no sound) at the - ∞ position. 8 Effect Output Level Meter (P.12) Indicates the effect output level. The "OVER" indicator lights when the output level is set too high. 9 POWER Switch The POWER switch is located on the rear panel. 0 Effect Output Level Adjust Dial (EFFECT OUT LEV) (P.12) Adjusts the effect output level in the range -∞ to +6 dB.
-
 1
1 -
2
-
3
-
4
-
 5
5 -
 6
6 -
 7
7 -
 8
8 -
 9
9 -
 10
10 -
 11
11 -
 12
12 -
 13
13 -
 14
14 -
 15
15 -
16
-
17
-
18
-
19
-
20
 |
 |