Pioneer EFX 500 Owner's Manual - Page 4
Quick Operation Guide - midi
 |
UPC - 012562449630
View all Pioneer EFX 500 manuals
Add to My Manuals
Save this manual to your list of manuals |
Page 4 highlights
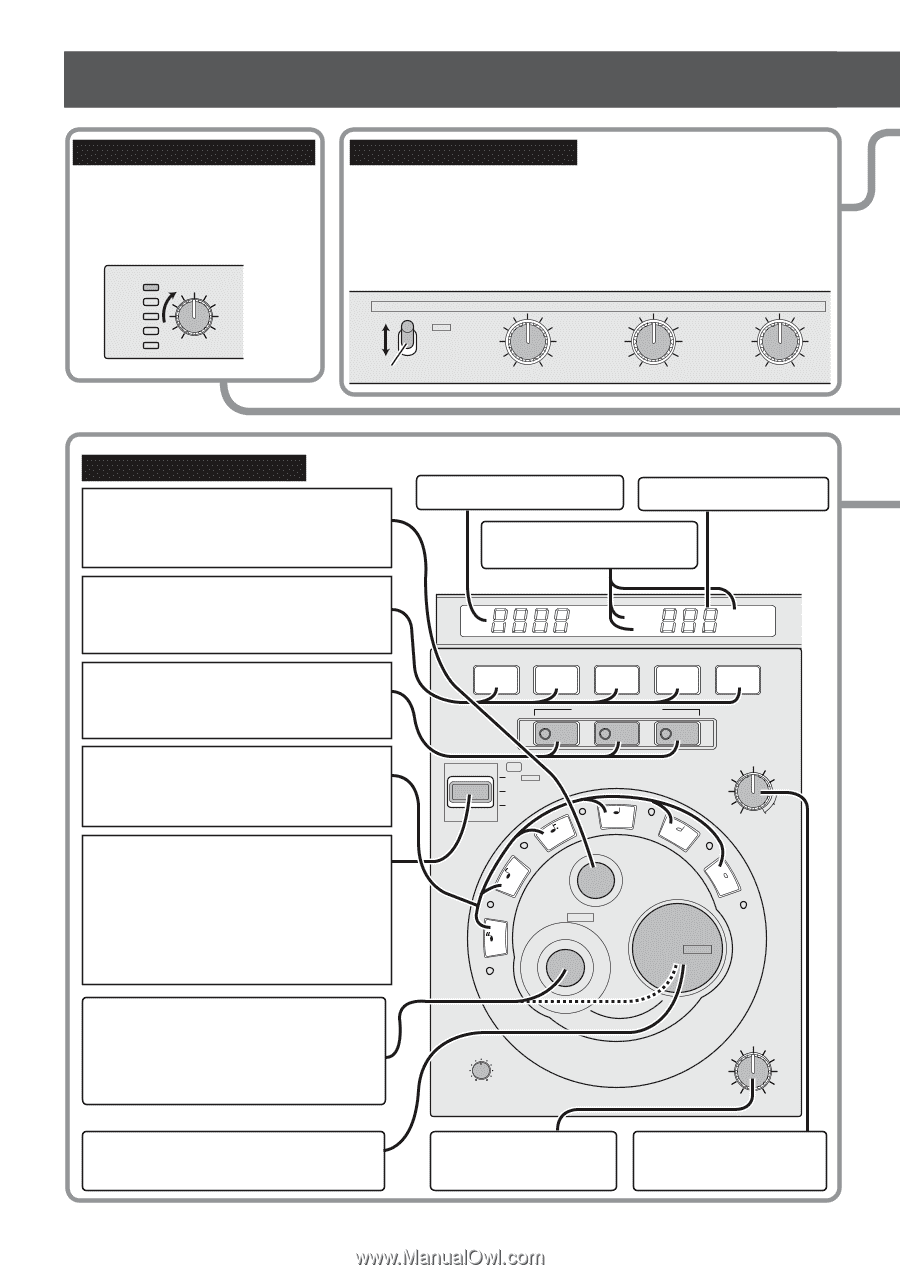
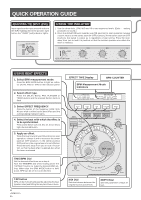
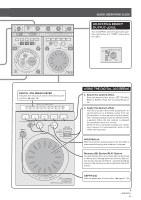
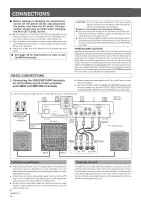
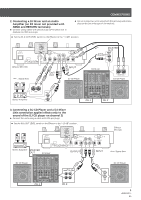
QUICK OPERATION GUIDE ADJUSTING THE INPUT LEVEL Input signals to the input terminal and turn the INPUT LEVEL dial to the position right before the "OVER" (red) indicator lights. OVER INPUT LEVEL MIN MAX USING THE ISOLATOR 1. Use the three dials, LOW, MID and HI to set respective levels. (Each -∞ setting produces no sound.) 2. Press the ISOLATOR lever towards you (ON position) to start operation; release it and it returns to the center position (OFF position). At the center position (OFF position), the signal is output as is regardless of dial setting. Press the lever away from you to lock it in position so that the isolator operates also when the lever is released. ISOLATOR ON LOCK OFF ON ISOLATOR lever LOW -∞ +6dB MID -∞ +6dB HI -∞ +6dB USING BEAT EFFECTS 1. Select BPM measurement mode. Press the BPM MODE button to light an indicator (AUTO, MIDI or TAP) on the indicator panel. 2. Select effect type. Press the DELAY, ECHO, PAN, FLANGER or TRANS button and the pressed button starts to flash. 3. Select EFFECT FREQUENCY. Press the button of the frequency (LOW, MID, HI) you wish to affect by the beat effect and the corresponding indicator lights. 4. Select the beat with which the effect is to be synchronized. Press a beat button (1/4, 1/2, 3/4, 1/1, 2/1 or 4/1) to light the desired button. 5. Apply an effect. Press the lever towards you (ON position) to start operation; release it and it returns to the center position (OFF position). In the center position (OFF position), the original sound is not affected. Press the lever away from you to lock it in position so that the beat effect is applied also when the lever is released. TIME/BPM Dial Set the desired effect time as in step 4. Turn the TIME/BPM dial while holding down the TAP/SHIFT button to make the desired BPM setting. When also the BPM MODE button is held down, BPM can be set in 0.1 increments. TAP button BPM can be manually adjusted by adjusting the beat (quarter notes) and hitting this key two times or more. 4 En EFFECT TIME Display BPM COUNTER BPM Measurement Mode Indicators EFFECT TIME mSec BPM COUNTER AUTO TAP MIDI BPM DELAY ECHO PAN FLANGER EFFECT FREQUENCY BEAT EFFECTS LOW MID HI ON LOCK OFF ON 1/1 3/4 2/1 TRANS DEPTH MIN MAX 1/4 1/2 4/1 BPM MODE TIME/ BPM TAP / SHIFT MONITOR MIN MAX BEAT EFFECTS MIX ORIGINAL EFFECT MIX Dial Sets the balance between the original sound and effects. DEPTH Dial Sets the parameter of each effect.
-
 1
1 -
 2
2 -
 3
3 -
 4
4 -
 5
5 -
 6
6 -
 7
7 -
 8
8 -
 9
9 -
 10
10 -
11
-
12
-
13
-
14
-
15
-
16
-
17
-
18
-
19
-
20
 |
 |