Pioneer PRO-1540HD Owner's Manual - Page 77
Starting the Home Media Gallery function
 |
View all Pioneer PRO-1540HD manuals
Add to My Manuals
Save this manual to your list of manuals |
Page 77 highlights
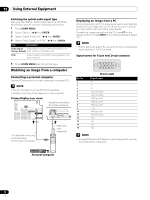
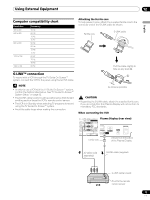
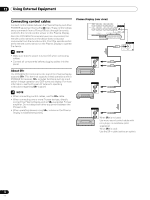
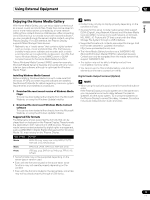
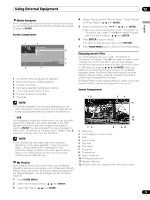
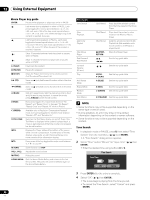
Using External Equipment 12 English 4 Select the desired device ( / then ENTER). • You can select a device only when the Device List is displayed. 5 Press ENTER to navigate to a folder or play a file/content. • To return to the previous screen, press RETURN. 6 Press HOME MENU again to exit the Home Media Gallery. NOTE • If the Home Media Gallery is launched and the "Single Server/USB" box is checked after selecting "Setup" and then "Auto Connection Setup", the system displays the root directory immediately after inserting a USB device. In this case, you can start from step 5. When a multi-card reader is inserted, the Device List appears with the selected device highlighted. In this case, you can start from step 4. Plasma Display USB flash memory Removing a USB device To remove a USB device, exit the Home Media Gallery first and then disconnect the device. NOTE • Be sure to exit the Home Media Gallery screen before removing the USB device. If you remove the USB device while the Home Media Gallery screen is displayed, data inside the memory may be damaged. • Do not insert or remove the USB device immediately after the system is switched On or Off. This action may cause data inside the memory to be damaged. • PIONEER is not liable for any loss or damage to the data inside the USB memory. Starting the Home Media Gallery function 1 Press HOME MENU. 2 Select "Home Media Gallery" ( / then ENTER). 3 Select "Media Navigator", "USB", "My Playlist" or "Setup" ( / then ENTER). • To return to the previous screen, press RETURN. 4 Press HOME MENU again to exit the Home Media Gallery. Digital Camera with USB Mass Storage Class Server XXXXXX Home Media Gallery Media Navigator USB My Playlist Setup 1 Flash media via USB adapter (Multi-card Reader ) Readable memory cards This system reads FAT12, FAT16, FAT32, or VFAT Memory Cards. Readable data files Movie, music and photo files can also be played with the exception of Digital Rights Management for Windows Media 10 (DRM) protected files. Navigating the files and folders By selecting Media Navigator, the previously selected server menu is automatically displayed on the screen by default (page 90). When only one server is found, the system automatically connects the server. You can also use the Tool Menu to switch to another server or manually select a server from the Server List. The display is automatically changed to a server list if there are no previously navigated servers. 1 Press HOME MENU. 2 Select "Home Media Gallery" ( / then ENTER). NOTE • A single USB device can be connected at a time and no USB hub connected. • This system may not be able to display modified or edited content from a PC or other equipment. • This system supports the USB Mass Storage Class. • Some digital cameras may require a setup procedure for Mass Storage Class data transfer. The setup is done on the camera. See the operating instructions supplied with the digital camera. 3 Select "Media Navigator" ( / then ENTER). • A server menu appears. The file/folder configuration may vary depending on the server selected. • After selecting a category, folder or container and navigating on subsequent screens, you can find a file and start the appropriate Player depending on the selected file. 4 Select the desired folder to navigate or file/content to play ( / or / then ENTER). 5 Press ENTER to display a subsequent screen. • Subsequent screen(s) appears. • To return to the previous screen, press RETURN. 6 Press HOME MENU again to exit the Home Media Gallery. 77 En
-
 1
1 -
2
-
3
-
4
-
5
-
6
-
7
-
8
-
9
-
10
-
11
-
12
-
13
-
14
-
15
-
16
-
17
-
18
-
19
-
20
-
21
-
22
-
23
-
24
-
25
-
26
-
27
-
28
-
29
-
30
-
31
-
32
-
33
-
34
-
35
-
36
-
37
-
38
-
39
-
40
-
41
-
42
-
43
-
44
-
45
-
46
-
47
-
48
-
49
-
50
-
51
-
52
-
53
-
54
-
55
-
56
-
57
-
58
-
59
-
60
-
61
-
62
-
63
-
64
-
65
-
66
-
67
-
68
-
69
-
70
-
71
-
 72
72 -
 73
73 -
 74
74 -
 75
75 -
 76
76 -
 77
77 -
 78
78 -
 79
79 -
 80
80 -
 81
81 -
 82
82 -
83
-
84
-
85
-
86
-
87
-
88
-
89
-
90
-
91
-
92
-
93
-
94
-
95
-
96
-
97
-
98
-
99
-
100
-
101
-
102
-
103
-
104
-
105
-
106
-
107
-
108
-
109
-
110
-
111
-
112
-
113
-
114
-
115
-
116
-
117
-
118
-
119
-
120
 |
 |
