Pioneer PRS D1000M Owner's Manual - Page 4
Setting the Unit - amplifier
 |
UPC - 012562821375
View all Pioneer PRS D1000M manuals
Add to My Manuals
Save this manual to your list of manuals |
Page 4 highlights
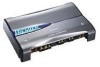
Setting the Unit Terminal Cover Before setting up the unit, unfasten the screws with a 4 mm hexagonal wrench and remove the terminal cover. Power Indicator The power indicator lights when the power is switched on. Subsonic Select Switch The subsonic filter cuts inaudible frequencies below 20 Hz to eliminate unwanted vibrations and minimize power loss. Bass Boost Control You can select a bass boost level from 0, 6, 9 and 12 dB. For instruction of connecting the bass boost remote control to the amplifier, see the "Connection Diagram" section. 3 BFC (Beat Frequency Control) Switch BFC switch is on the bottom of the unit. If you hear a beat while listening to an AM broadcast with your car stereo, change the BFC switch using a small standard tip screwdriver.
-
 1
1 -
 2
2 -
 3
3 -
 4
4 -
 5
5 -
 6
6 -
 7
7 -
 8
8 -
 9
9 -
 10
10 -
11
-
12
-
13
-
14
-
15
-
16
-
17
-
18
-
19
-
20
-
21
-
22
-
23
-
24
-
25
-
26
-
27
-
28
-
29
-
30
-
31
-
32
-
33
-
34
-
35
-
36
-
37
-
38
-
39
-
40
-
41
-
42
-
43
-
44
-
45
-
46
-
47
-
48
-
49
-
50
 |
 |
