Pioneer SC-LX85 Operating Instructions - Page 7
Flow for operating - remote
 |
View all Pioneer SC-LX85 manuals
Add to My Manuals
Save this manual to your list of manuals |
Page 7 highlights
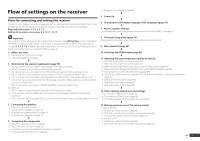
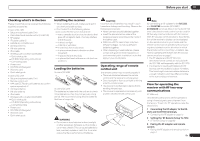
Before you start 01 Checking what's in the box Please check that you've received the following supplied accessories: In case of SC-LX85 ! Setup microphone (cable: 5 m) ! Omni-directional remote control (CU-RF100) ! RF adapter ! IR blaster cable x2 ! AA/LR6 dry cell batteries x4 ! AM loop antenna ! FM wire antenna ! iPod cable ! Wireless LAN converter (AS-WL300) - Quick start guide - CD-ROM (Operating instructions) - Connecting cable ! Power cord ! CD-ROM (AVNavigator) ! Warranty card ! Quick start guide In case of SC-LX75 ! Setup microphone (cable: 5 m) ! Remote control unit ! AAA size IEC R03 dry cell batteries (to confirm system operation) x2 ! AM loop antenna ! FM wire antenna ! iPod cable ! Wireless LAN converter (AS-WL300) - Quick start guide - CD-ROM (Operating instructions) - Connecting cable ! Power cord ! CD-ROM (AVNavigator) ! Warranty card ! Quick start guide Installing the receiver ! When installing this unit, make sure to put it on a level and stable surface. ! Don't install it on the following places: - on a color TV (the screen may distort) - near a cassette deck (or close to a device that gives off a magnetic field). This may interfere with the sound. - in direct sunlight - in damp or wet areas - in extremely hot or cold areas - in places where there is vibration or other movement - in places that are very dusty - in places that have hot fumes or oils (such as a kitchen) CAUTION Incorrect use of batteries may result in such hazards as leakage and bursting. Observe the following precautions: ! Never use new and old batteries together. ! Insert the plus and minus sides of the batteries properly according to the marks in the battery case. ! Batteries with the same shape may have different voltages. Do not use different batteries together. ! When disposing of used batteries, please comply with governmental regulations or environmental public institution's rules that apply in your country/area. Loading the batteries In case of SC-LX85 In case of SC-LX75 The batteries included with the unit are to check initial operations; they may not last over a long period. We recommend using alkaline batteries that have a longer life. Operating range of remote control unit The remote control may not work properly if: ! There are obstacles between the remote control and the receiver's remote sensor. ! Direct sunlight or fluorescent light is shining onto the remote sensor. ! The receiver is located near a device that is emitting infrared rays. ! The receiver is operated simultaneously with another infrared remote control unit. WARNING ! Do not use or store batteries in direct sunlight or other excessively hot place, such as inside a car or near a heater. This can cause batteries to leak, overheat, explode or catch fire. It can also reduce the life or performance of batteries. 30° 30° 7 m Note By connecting an RF adapter to the RS-232C and CU-RF100 terminals (SC-LX85) / EXTENSION terminals (SC-LX75), the CU-RF100 omni-directional remote control can be used for RF two-way communications with the receiver. With RF two-way communications, the information of the receiver's display can be displayed on the remote control in your hands and the remote control can be operated without worrying about obstacles or the direction in which the remote control is pointing. For details, see Flow for operating the receiver with RF two-way communications on page 7. ! The RF adapter and CU-RF100 omni- directional remote control are included with the SC-LX85, sold separately with the SC-LX75. ! The maximum line-of-sight distance for RF two-way communications is about 10 meters. This line-of-sight communications distance is a rough indication, and may differ according to the surrounding environment. Flow for operating the receiver with RF two-way communications SC-LX85 only This remote control unit is set for operations using infrared signals upon shipment from the factory. To set it for RF operations, take the steps below. 1 Connecting the RF adapter to the RS232C and CU-RF100 terminals. ! Connecting the RF adapter on page 15 2 Setting the 'RF Remote Setup' to 'ON'. ! RF Remote Setup on page 92 3 Pairing the RF adapter and remote control. ! Pairing the RF adapter and remote control on page 71 En 7
-
 1
1 -
 2
2 -
 3
3 -
 4
4 -
 5
5 -
 6
6 -
 7
7 -
 8
8 -
 9
9 -
 10
10 -
 11
11 -
 12
12 -
13
-
14
-
15
-
16
-
17
-
18
-
19
-
20
-
21
-
22
-
23
-
24
-
25
-
26
-
27
-
28
-
29
-
30
-
31
-
32
-
33
-
34
-
35
-
36
-
37
-
38
-
39
-
40
-
41
-
42
-
43
-
44
-
45
-
46
-
47
-
48
-
49
-
50
-
51
-
52
-
53
-
54
-
55
-
56
-
57
-
58
-
59
-
60
-
61
-
62
-
63
-
64
-
65
-
66
-
67
-
68
-
69
-
70
-
71
-
72
-
73
-
74
-
75
-
76
-
77
-
78
-
79
-
80
-
81
-
82
-
83
-
84
-
85
-
86
-
87
-
88
-
89
-
90
-
91
-
92
-
93
-
94
-
95
-
96
-
97
-
98
-
99
-
100
-
101
-
102
-
103
-
104
-
105
-
106
-
107
-
108
-
109
-
110
-
111
-
112
-
113
-
114
-
115
-
116
-
117
-
118
-
119
-
120
-
121
-
122
 |
 |
