Pioneer SX-A9MK2-K Owner's Manual
Pioneer SX-A9MK2-K Manual
 |
View all Pioneer SX-A9MK2-K manuals
Add to My Manuals
Save this manual to your list of manuals |
Pioneer SX-A9MK2-K manual content summary:
- Pioneer SX-A9MK2-K | Owner's Manual - Page 1
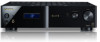
A9 SX-A9MK2-K Stereo Receiver SX-A9MK2-K Ampli-Tuner Stéréo Register your product on: http://www.pioneerelectronics.com (US) http://www.pioneerelectronics.ca (Canada) • Protect your new investment The details of your purchase will be on file for reference in the event of an insurance claim such as - Pioneer SX-A9MK2-K | Owner's Manual - Page 2
to the presence of important operating and maintenance (servicing) instructions in the literature accompanying the appliance. D3-4-2-1- following measures: - Reorient or relocate the receiving antenna. - Increase the separation between the equipment and receiver. - Connect the equipment into an - Pioneer SX-A9MK2-K | Owner's Manual - Page 3
any ventilation openings. Install in accordance with the manufacturer's instructions. 8) Do not install near any heat sources such as received, including interference that may cause undesired operation. Product Name: Stereo Receiver Model Number: A9 Responsible Party Name: PIONEER ELECTRONICS SERVICE - Pioneer SX-A9MK2-K | Owner's Manual - Page 4
Selecting fine audio equipment such as the unit you've just purchased is only the start of your musical enjoyment. Now it's time to consider how you can maximize the fun and excitement your equipment offers. This manufacturer and the Electronic Industries Association's Consumer Electronics Group - Pioneer SX-A9MK2-K | Owner's Manual - Page 5
21 Connecting an additional amplifier 22 Connecting an IR receiver 23 Operating other Pioneer components with this unit's sensor 23 Switching components on and off using the 12 volt trigger 24 07 Additional information Troubleshooting 25 XM radio messages 26 Specifications 26 Cleaning the - Pioneer SX-A9MK2-K | Owner's Manual - Page 6
Twin-mono symmetrical construction This receiver offers a new advancement in stereo imaging with the completely independent this receiver. • XM Radio ready The XM Radio terminal on this receiver provides a quick and easy connection to XM Radio, the leading provier of satellite radio service in - Pioneer SX-A9MK2-K | Owner's Manual - Page 7
a heater. This can cause batteries to leak, overheat, explode or catch fire. It can also reduce the life or performance of batteries. Installing the receiver • When installing this unit, make sure to put it on a level and stable surface. Don't install it on the following places: - on a color TV - Pioneer SX-A9MK2-K | Owner's Manual - Page 8
IN IN IR CONTROL OUT IN OUT SIGNAL GND L L 12V PRE TRIGGER OUT REC PLAY OUT IN TAPE AUX1 AUX2 R R MM/MC CD PHONO This receiver L 2 R IN OUT REC PLAY AUDIO IN/OUT 1 OUT R L AUDIO OUT D6 Tape deck, etc. CD player, etc. 1 Connect the analog audio outputs of your - Pioneer SX-A9MK2-K | Owner's Manual - Page 9
. Then connect the audio inputs on the tape deck to the TAPE outputs (OUT) on this receiver. This will allow you to make recordings from the components connected to this receiver. Use stereo RCA phono cables as shown. 3 Turntables only: Connect the audio outputs of your turntable to the PHONO - Pioneer SX-A9MK2-K | Owner's Manual - Page 10
terminal. Also make sure the positive and negative (+/-) terminals on the receiver match those on the speakers. You can use speakers with a 18 ft.) Indoor antenna (vinyl-coated wire) AM LOOP ANTENNA For the best possible reception, suspend horizontally outdoors. CONTROL OUT OUT SIGNAL GND L MM/MC - Pioneer SX-A9MK2-K | Owner's Manual - Page 11
fig. B 10 mm (3/8 in.) fig. C Important • Please refer to the manual that came with your speakers for details on how to connect the other end of the exposed speaker wire is touching the rear panel, this may cause the receiver to turn off automatically. Plugging in Make sure to complete all - Pioneer SX-A9MK2-K | Owner's Manual - Page 12
03 Controls and displays Chapter 3: Controls and displays Front panel 1 2 3 POWER STANDBY OFF ON PHONES 4 5 DIRECT INPUT SELECTOR 6 A9 VOLUME 7 8 1 POWER OFF ON1 2 STANDBY indicator 3 Display (page 14) 4 DIRECT Press to switch the Direct listening feature on or off (page 15). 5 - Pioneer SX-A9MK2-K | Owner's Manual - Page 13
TUNE CLASS PRESET ENTER PRESET D.ACCESS TUNE RETURN CD PLAYER 7 8 9 10 11 12 STEREO RECEIVER 1 AMP Switches the receiver between standby and on. 2 Input select buttons Press to select an input source. 3 Number (page 17). 12 CD PLAYER control buttons Use to control Pioneer CD player. 13 En - Pioneer SX-A9MK2-K | Owner's Manual - Page 14
MONO XM FM AM TREBLE BASS dB MHz KHz 56 7 8 1 Tuner Indicators TUNED - Lights when a broadcast is being received. STEREO - Lights when a stereo FM broadcast is being received in auto stereo mode. MONO - Lights when the MPX button is used to select mono mode. 2 Tone control indicators TREBLE - Pioneer SX-A9MK2-K | Owner's Manual - Page 15
off), press L/- and R/+ at the same time. Playing other sources 1 Turn on the power of the playback component. 2 Turn on the power of the receiver. 3 Select the source you want to playback. Use the input select buttons (or INPUT SELECTOR dial). 4 Start playback of the component you selected in step - Pioneer SX-A9MK2-K | Owner's Manual - Page 16
can make an audio recording from any audio source connected to the receiver. 1 Select the source you want to record. Use the input select MD, etc. into the recording device and set the recording levels.1 Refer to the instructions that came with the recorder if you are unsure how to do this. 4 Start - Pioneer SX-A9MK2-K | Owner's Manual - Page 17
/ for about a second. Searching automatically stops at the next station. Manual tuning - To change the frequency one step at a time, press TUNED or STEREO indicators don't light when tuning to an FM station because the signal is weak, press the MPX button to switch the receiver into mono reception - Pioneer SX-A9MK2-K | Owner's Manual - Page 18
is stored. Press repeatedly to cycle through classes A, B and C. 3 Press / to select the station preset you want. Note 1 Station memories will be lost if the receiver is left disconnected from the AC power outlet for an extended period. 18 En - Pioneer SX-A9MK2-K | Owner's Manual - Page 19
instructions are provided with the satellite tuners. There are a variety of programming packages available, including the option of adding "The Best of SIRIUS" programming. The "Best of SIRIUS" service is not available to XM Canada is available for XM radio receivers by calling 1-800-XMRADIO. - Pioneer SX-A9MK2-K | Owner's Manual - Page 20
subscription sold separately. Taxes and a one-time activation fee may apply. XM tuner and home dock required (each sold separately) to receive the XM service. All programming and fees subject to change. It is prohibited to copy, decompile, disassemble, reverse engineer, hack, manipulate or otherwise - Pioneer SX-A9MK2-K | Owner's Manual - Page 21
stereo audio source through the speaker setup you've connected to this receiver manual that came with the software to make these settings. 6 Turn up the volume control on your computer and this receiver. You may want to start with a fairly low volume on this receiver problems. 2 If your - Pioneer SX-A9MK2-K | Owner's Manual - Page 22
your computer during playback. • Pioneer is not responsible for computer system damage, software crashes or failures, or any other possible computer problems due to this configuration. Microsoft®, TAPE AUX1 AUX2 R R MM/MC CD PHONO This receiver Stereo amplifier INPUT R L ANALOG 22 En - Pioneer SX-A9MK2-K | Owner's Manual - Page 23
jack on the rear of this receiver to link it to the IR receiver. Please see the manual supplied with your IR receiver for the type of cable necessary for the connection. • If you want to link a Pioneer component to the IR receiver, see Operating other Pioneer components with this unit's sensor below - Pioneer SX-A9MK2-K | Owner's Manual - Page 24
a 12 volt trigger. If you turn the power to a connected component on, the power to this receiver is also turned on. This receiver will not turn on if you turn a connected component off while this receiver is currently off.1 12V TRIGGER FM UNBAL 75 R SPEAKER 12V PR TRIGGER OU • Connect the 12V - Pioneer SX-A9MK2-K | Owner's Manual - Page 25
used. If the trouble cannot be rectified even after exercising the checks listed below, ask your nearest Pioneer authorized service center or your loose strands of speaker wire touching the rear panel. This could cause the receiver to shut off automatically. • If you're trying to switch on using the - Pioneer SX-A9MK2-K | Owner's Manual - Page 26
07 Additional information Problem Can't operate the remote control. The display is dark or off. Remedy • Replace stopped Select another channel. broadcasting. You have selected a channel that does not The receiver will automatically switch to exist, or that you have not subscribed to. channel 001 - Pioneer SX-A9MK2-K | Owner's Manual - Page 27
) Stereo: 70 dB (at 85 dBf) Distortion Stereo: 0.5 % (1 kHz) Alternate Channel Selectivity . . . 60 dB (400 kHz) Stereo Separation cord 1 Warranty card 1 Operating instructions (This document) Note • Pioneer Corporation. Copyright © 2009 Pioneer Corporation. All rights reserved. 27 En - Pioneer SX-A9MK2-K | Owner's Manual - Page 28
numérique de la Classe B est conforme à la norme NMB-003 du Canada. D8-10-1-3_A1_Fr AVERTISSEMENT Avant de brancher l'appareil pour la première, cordon d'alimentation de cet appareil doivent être effectués par un personnel de service qualifié. En cas de branchement sur une prise secteur, la fiche de - Pioneer SX-A9MK2-K | Owner's Manual - Page 29
abîmé peut provoquer un risque d'incendie ou un choc électrique. Vérifier le câble d'alimentation de temps en temps. Contacter le service après-vente PIONEER le plus proche ou le revendeur pour un remplacement. S002*_Fr PRÉCAUTION DE VENTILATION Lors de l'installation de l'appareil, veillez - Pioneer SX-A9MK2-K | Owner's Manual - Page 30
Merci d'avoir acheté ce produit Pioneer. Veuillez lire entièrement ce mode d'emploi 20 Raccordement d'un amplificateur supplémentaire 21 Raccordement d'un récepteur IR 22 Fonctionnement d'autres composants Pioneer avec le capteur de cette unit 22 Mise sous et hors tension de composants à l'aide - Pioneer SX-A9MK2-K | Owner's Manual - Page 31
XM, le premier fournisseur de radio par satellite aux États-Unis. Rendez-vous sur le site www.xmradio.com pour davantage de détails sur ce service. • Ajusté aux normes de niveau international Avec la coopération des ingénieurs du son de niveau international de AIR Studios, cet ampli-tuner - Pioneer SX-A9MK2-K | Owner's Manual - Page 32
01 Préparatifs Insertion de la pile Attention Toute utilisation incorrecte des piles peut entraîner des accidents, par exemple une fuite ou une explosion. Respectez les précautions suivantes : • N'utilisez jamais des piles neuves et des piles usagées ensemble. • Insérez correctement les pôles - Pioneer SX-A9MK2-K | Owner's Manual - Page 33
Raccordement 02 Français Chapitre 2 : Raccordement Raccordements des câbles Assurez-vous de ne pas plier les câbles par dessus cette unité (comme indiqué dans l'illustration). Si cela se produit, le champ magnétique produit par les transformateurs dans cette unité peut provoquer un ronflement - Pioneer SX-A9MK2-K | Owner's Manual - Page 34
ensuite les languettes pour fixer les fils de l'antenne AM. 3 Fixez l'antenne cadre AM au support intégré. Pour fixer le support à l'antenne, pliez-la dans le sens indiqué par la flèche puis attachez le cadre au support (fig. a). • Si vous souhaitez fixer l'antenne AM sur un mur ou une autre surface - Pioneer SX-A9MK2-K | Owner's Manual - Page 35
Raccordement 02 Français 4 Placez l'antenne AM sur une surface plane et dans le sens qui offre la meilleure réception. 5 Raccordez l'antenne à fil FM de la même manière que l'antenne cadre AM. Pour obtenir les meilleurs résultats, déployez l'antenne FM au maximum et fixez-la à un mur ou à un - Pioneer SX-A9MK2-K | Owner's Manual - Page 36
02 Raccordement Pour raccorder une borne, dévissez la borne de quelques tours jusqu'à ce qu'il y ait assez de place pour insérer le fil dénudé (fig. B). Une fois que le fil est bien positionné, serrez la borne jusqu'à ce que le fil soit fermement fixé (fig. C). fig. A 10 mm fig. B fig. C - Pioneer SX-A9MK2-K | Owner's Manual - Page 37
Commandes et afficheur 03 Français Chapitre 3 : Commandes et afficheur Panneau avant 1 2 3 POWER STANDBY OFF ON PHONES 4 5 DIRECT INPUT SELECTOR 6 A9 VOLUME 7 8 1 POWER OFF ON1 2 Voyant STANDBY 3 Afficheur (page 13) 4 DIRECT Permet d'activer ou de désactiver la fonction d'écoute - Pioneer SX-A9MK2-K | Owner's Manual - Page 38
4 VOLUME 5 MUTE L R TONE/BAL 6 MPX T.EDIT CATEGORY BAND TUNE CLASS PRESET ENTER PRESET D.ACCESS TUNE RETURN CD PLAYER 7 8 9 10 11 12 STEREO RECEIVER 1 AMP Cette touche permet d'allumer l'ampli-tuner et de le mettre en veille. 2 Touches de sélection des entrées Appuyez sur l'une de ces - Pioneer SX-A9MK2-K | Owner's Manual - Page 39
MONO XM FM AM TREBLE BASS dB MHz KHz 56 7 8 1 Indicateurs du syntoniseur TUNED - S'allume lors de la réception d'une émission. STEREO - S'allume lors de la réception d'une émission FM stéréo en mode stéréo automatique. MONO - S'allume lorsque la touche MPX est utilisée pour sélectionner le - Pioneer SX-A9MK2-K | Owner's Manual - Page 40
04 Écoute de votre système Chapitre 4 : Écoute de votre système Utilisation de l'écoute en mode direct Utilisez la fonction d'écoute en mode direct lorsque vous souhaitez écouter la reproduction la plus fidèle possible d'une source. Tous les traitements de signaux1 inutiles sont ignorés et il ne - Pioneer SX-A9MK2-K | Owner's Manual - Page 41
l'enregistreur. Insérez une cassette, un MD vierge, etc. dans l'appareil d'enregistrement et réglez les niveaux d'enregistrement.1 Consultez les instructions livrées avec l'enregistreur si vous n'êtes pas sûr de comment procéder. 4 Commencez l'enregistrement, puis commencez la lecture du composant - Pioneer SX-A9MK2-K | Owner's Manual - Page 42
les touches numérotées pour saisir la fréquence (par exemple, pour sélectionner 106.00 (FM), appuyez sur 1, 0, 6, 0, 0).1 Si les indicateurs TUNED ou STEREO ne s'allument pas lors de la sélection d'une station FM, en raison de la pauvreté du signal, appuyez sur la touche MPX pour faire basculer - Pioneer SX-A9MK2-K | Owner's Manual - Page 43
Utilisation du syntoniseur 05 Français Écoute de stations préréglées Pour faire cela, vous devez avoir des stations préréglées en mémoire. Voir Enregistrement des stations préréglées ci-dessus si ce n'est pas encore fait.1 1 Appuyez sur TUNER pour sélectionner le syntoniseur. 2 Appuyez sur CLASS - Pioneer SX-A9MK2-K | Owner's Manual - Page 44
vous faudra l'activer et vous abonner pour profiter de ce service. Des instructions faciles pour l'installation et la configuration sont fournies avec les programme "The Best of SIRIUS". Le service "Best of SIRIUS" n'est en ce moment pas disponible aux abonnés XM du Canada. Des forfaits - Pioneer SX-A9MK2-K | Owner's Manual - Page 45
ou de rendre disponible toute technologie ou logiciel intégré aux ampli-tuners compatibles avec le système de radio par satellite XM. Service non disponible en Alaska ou à Hawaii. Remarque 1 Après avoir débranché l'ampli-tuner, LOADING s'affiche pendant environ 1 minute lors de sa remise sous - Pioneer SX-A9MK2-K | Owner's Manual - Page 46
06 Autres raccordements Utilisation de l'interface USB Il est possible d'écouter deux canaux audio à partir de votre ordinateur en le raccordant à l'interface USB situé à l'arrière de cet ampli-tuner. Selon le modèle de votre ordinateur et le logiciel installé, vous pouvez écouter la source audio - Pioneer SX-A9MK2-K | Owner's Manual - Page 47
ou débrancher le câble USB pendant la lecture. • Pour éviter les bruits, n'utilisez pas d'autre logiciel sur votre ordinateur pendant la lecture. • Pioneer n'est pas responsable en cas de dommages du système informatique, de plantage ou de panne de logiciel ou d'autres problèmes informatiques - Pioneer SX-A9MK2-K | Owner's Manual - Page 48
.1 1 Raccordez le capteur du récepteur IR à la prise IR IN à l'arrière de cet ampli-tuner. Armoire ou étagère Composant autre que IR Pioneer IN CONTROL Pioneer component IN OUT USB XM AUDIO IN IN IR CONTROL OUT IN OUT SIGNAL GND R R AUX1 AUX2 L MM/MC CD L PHONO Cet ampli-tuner - Pioneer SX-A9MK2-K | Owner's Manual - Page 49
Autres raccordements 06 Français Mise sous et hors tension de composants à l'aide du déclencheur de 12 volts Vous pouvez raccorder les composants de votre système à cet ampli-tuner à l'aide d'un déclencheur de 12 volts. Si vous mettez sous tension l'un des composants connectés, cet ampli-tuner - Pioneer SX-A9MK2-K | Owner's Manual - Page 50
supplémentaires Chapitre 7 : Informations supplémentaires Guide de dépannage Des opérations incorrectes sont souvent avant est activée. • Si le récepteur s'arrête automatiquement, apportez-le au service après-vente Pioneer ou à votre revendeur le plus proche pour le faire réviser. Aucun son n'est - Pioneer SX-A9MK2-K | Owner's Manual - Page 51
Informations supplémentaires 07 Français Problèmes Solutions Impossible de faire fonctionner la télécommande. • Remplacez les piles (voir page 6). • Utilisez à moins de 7 m, 30° du capteur de télécommande du panneau avant (voir page 13). • Eliminez tout obstacle ou faites-la fonctionner d'une - Pioneer SX-A9MK2-K | Owner's Manual - Page 52
utiliser de diluants, benzine, insecticides en bombe ou autres produits chimiques sur ou près de cet appareil au risque d'entraîner une corrosion. Publication de Pioneer Corporation. © 2009 Pioneer Corporation. Tous droits de reproduction et de traduction réservés. 26 Fr - Pioneer SX-A9MK2-K | Owner's Manual - Page 53
, or if you wish to purchase replacement parts, operating instructions, service manuals, or accessories, please call the number shown below. 1 - 8 0 0 - 4 2 1 - 1 4 0 4 Please do not ship your product to Pioneer without first calling the Customer Support at the above listed number for assistance
-
 1
1 -
 2
2 -
 3
3 -
 4
4 -
 5
5 -
 6
6 -
 7
7 -
8
-
9
-
10
-
11
-
12
-
13
-
14
-
15
-
16
-
17
-
18
-
19
-
20
-
21
-
22
-
23
-
24
-
25
-
26
-
27
-
28
-
29
-
30
-
31
-
32
-
33
-
34
-
35
-
36
-
37
-
38
-
39
-
40
-
41
-
42
-
43
-
44
-
45
-
46
-
47
-
48
-
49
-
50
-
51
-
52
-
53
 |
 |
SX-A9MK2-K Stereo Receiver
SX-A9MK2-K Ampli-Tuner Stéréo
A9
Operating Instructions
Mode d’emploi
Register your product on:
http://www.pioneerelectronics.ca (Canada)
http://www.pioneerelectronics.ca (Canada)
• Protect your new investment
The details of your purchase will be on file for reference in the event of an insurance claim such as loss or theft.
• Improve product development
Your input helps us continue to design products that meet your needs.
• Receive a free Pioneer newsletter
Registered customers can opt in to receive a monthly newsletter.
• Receive free tips, updates and service bulletins on your new product