Pioneer SX-A9MK2-K Owner's Manual - Page 21
Other connections, Using the USB interface
 |
View all Pioneer SX-A9MK2-K manuals
Add to My Manuals
Save this manual to your list of manuals |
Page 21 highlights
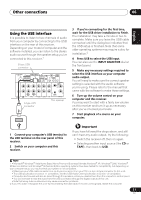
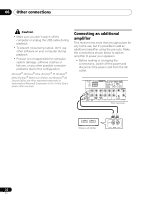
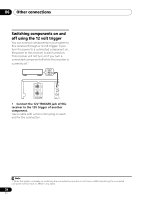
Other connections 06 English Using the USB interface It is possible to listen to two channels of audio from your computer by connecting to the USB interface on the rear of this receiver. Depending on your model of computer and the software installed, you can listen to the stereo audio source through the speaker setup you've connected to this receiver.1 B-type USB connector FM UNBAL 75 AM LOOP ANTENNA USB XM AUDIO IN IN IR CONTROL OUT IN OUT SIGNAL GND L L 12V PRE TRIGGER OUT REC PLAY OUT IN TAPE AUX1 AUX2 A-type USB connector R R MM/MC CD PHONO This receiver 3 If you're connecting for the first time, wait for the USB driver installation to finish. The installation may take a minute or two to complete. Make sure you leave the USB cable connected until the dialog box indicates that the USB setup is finished. Note that some older operating systems may require a disc for installation.2 4 Press USB to select the USB input. You can also use the INPUT SELECTOR dial on the front panel. 5 Make any necessary settings required to select the USB interface as your computer audio output. You will need to make sure the correct speaker setting is selected with the audio software you're using. Please refer to the manual that came with the software to make these settings. 6 Turn up the volume control on your computer and this receiver. You may want to start with a fairly low volume on this receiver and turn it up as necessary after you've checked your levels. 7 Start playback of a source on your computer. 1 Connect your computer's USB terminal to the USB terminal on the rear panel of this receiver. 2 Switch on your computer and this receiver. Important If you have followed the steps above, and still can't hear any audio output, try the following: • Switch the receiver off, then on again. • Selecting another input source (like CD or TAPE), then back to USB. Note 1 • Microsoft® Windows® Vista Home Basic/Home Premium/Business/Ultimate,Windows® XP, Windows® 2000, Windows® Millennium Edition and Windows® 98 Second Edition operating systems have been tested for compatibility, but depending on your computer setup, you may find that your system is not compatible. • Make sure your USB cable connects from an A-type connector (from your PC) to a 4-pin B-type connector (to this unit). • The USB specification is version 1.1 compatible, and the USB Audio Class specification is version 1.0 compatible. • Computer alert sounds will also be heard through the speakers unless you disable them from the computer's control panel. • You won't be able to hear the audio from the USB connection through the digital outputs of this unit. • Note that using hubs or extensions may cause connection problems. 2 If your PC doesn't recognize this unit, try reconnecting the USB cable. If it is still unrecognized, restart the computer. 21 En
-
 1
1 -
2
-
3
-
4
-
5
-
6
-
7
-
8
-
9
-
10
-
11
-
12
-
13
-
14
-
15
-
 16
16 -
 17
17 -
 18
18 -
 19
19 -
 20
20 -
 21
21 -
 22
22 -
 23
23 -
 24
24 -
 25
25 -
 26
26 -
27
-
28
-
29
-
30
-
31
-
32
-
33
-
34
-
35
-
36
-
37
-
38
-
39
-
40
-
41
-
42
-
43
-
44
-
45
-
46
-
47
-
48
-
49
-
50
-
51
-
52
-
53
 |
 |
