Pioneer VSX-1016TXV Owner's Manual - Page 34
The System Setup menu, Manual MCACC setup - k specifications
 |
UPC - 012562810911
View all Pioneer VSX-1016TXV manuals
Add to My Manuals
Save this manual to your list of manuals |
Page 34 highlights
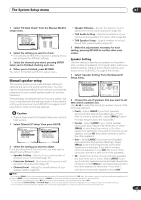
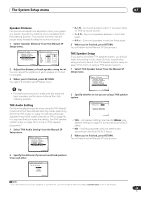
07 The System Setup menu Manual MCACC setup You can use the settings in the Manual MCACC setup menu to make detailed adjustments when you're more familiar with the system. Before making these settings, you should have already completed Automatically setting up for surround sound (MCACC) on page 8. You only need to make these settings once (unless you change the placement of your current speaker system or add new speakers). Important • For some of the settings below, you'll have to connect the setup microphone to the front panel and place it about ear level at your normal listening position. See Automatically setting up for surround sound (MCACC) on page 8 if you're unsure how to do this. Also see Problems when using the Auto MCACC Setup on page 10 for notes regarding background noise and other possible interference. • If you're using a subwoofer, switch it on and turn up the volume as necessary. Caution • The test tones used in the MCACC setup are output at high volume. 1 Select 'Manual MCACC' from the System Setup menu. See Making receiver settings from the System Setup menu above if you're not already at this screen. System Setup 1.Surr Back System 2.Auto MCACC 3.Manual MCACC 4.Manual SP Setup 5.Input Assign 6.Other Setup : Exit 3.Manual MCACC a.Fine Ch Level b.Fine SP Distance c.EQ Auto Setting d.EQ Data Copy e.EQ CUSTOM1 Adjust f .EQ CUSTOM2 Adjust g.EQ Data Check :Return 2 Select the setting you want to adjust. If you're doing this for the first time, you might want to make these settings in order. • Fine Ch Level - Make fine adjustments to the overall balance of your speaker system (see Fine Channel Level below). • Fine SP Distance - Make precise delay settings for your speaker system (see Fine Speaker Distance on page 35). The last five settings are specifically for customizing the parameters explained in Acoustic Calibration EQ below: • EQ Auto Setting - Measure the acoustic characteristics of your room and automatically adjust the frequency balance of your speaker system (see Setting the Acoustic Calibration EQ automatically below). • EQ Data Copy - Copy Acoustic Calibration EQ settings for manual adjustment (see Copying your Acoustic Calibration EQ settings on page 36). • EQ CUSTOM1/2 Adjust - Make detailed manual adjustments to your custom Acoustic Calibration EQ settings (see Setting the Acoustic Calibration EQ manually on page 36). • EQ Data Check - Check the ALL CH ADJUST, FRONT ALIGN and custom settings using the onscreen display (see Checking your Acoustic Calibration EQ settings on page 36). Fine Channel Level • Default setting: 0.0dB (all channels) You can achieve better surround sound by properly adjusting the overall balance of your speaker system. The following setting can help you make detailed adjustments that you may not achieve using the Manual speaker setup on page 37. 1 Select 'Fine Ch Level' from the Manual MCACC setup menu. After the volume increases to the reference level, test tones will be output. 3.Manual MCACC a.Fine Ch Level b.Fine SP Distance c.EQ Auto Setting d.EQ Data Copy e.EQ CUSTOM1 Adjust f .EQ CUSTOM2 Adjust g.EQ Data Check :Return 3a.Fine Channel Level Please Wait... 20 Caution! Loud test tones will be output. :Cancel 2 Select each channel in turn and adjust the levels (+/- 10 dB) as necessary. Use / to adjust the volume of the speaker you selected to match the reference speaker. • The level of the left channel (the primary reference speaker) is fixed at 0.0dB so that you'll have plenty of room to adjust the other speaker levels. When it sounds like both tones are the same volume, press ENTER to confirm and continue to the next channel. 3a.Fine Channel Level L R C SL SR SBL SBR SW + 0.0dB (Reference) [ 0.0dB ] + 1.0dB [ -3.0dB ] [+ 10.0dB ] [- 10.0dB ] [+ 9.5dB ] [- 1.5dB ] :Finish • For comparison purposes, the reference speaker will change depending on which speaker you select. • If you want to go back and adjust a channel, simply use / to select it. 3 When you're finished, press RETURN. You return to the Manual MCACC setup menu. 34 En
-
 1
1 -
2
-
3
-
4
-
5
-
6
-
7
-
8
-
9
-
10
-
11
-
12
-
13
-
14
-
15
-
16
-
17
-
18
-
19
-
20
-
21
-
22
-
23
-
24
-
25
-
26
-
27
-
28
-
 29
29 -
 30
30 -
 31
31 -
 32
32 -
 33
33 -
 34
34 -
 35
35 -
 36
36 -
 37
37 -
 38
38 -
 39
39 -
40
-
41
-
42
-
43
-
44
-
45
-
46
-
47
-
48
-
49
-
50
-
51
-
52
-
53
-
54
-
55
-
56
-
57
-
58
-
59
-
60
-
61
-
62
-
63
-
64
-
65
-
66
-
67
-
68
 |
 |
