Pioneer VSX-1016TXV Owner's Manual - Page 44
Normal SB, 2nd Zone, To bi-wire a speaker, connect two speaker cords to, the speaker terminal on
 |
UPC - 012562810911
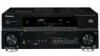
View all Pioneer VSX-1016TXV manuals
Add to My Manuals
Save this manual to your list of manuals |
Page 44 highlights
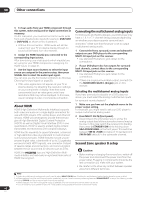
08 Other connections Bi-wiring your speakers The reasons for bi-wiring are basically the same as biamping, but additionally, interference effects within the wire could be reduced, producing better sound. Again, to do this your speakers must be bi-wireable (that is they must have separate terminals for the high and low frequencies). When bi-wiring, make sure you've selected Normal (SB) or 2nd Zone in Surround back speaker setting on page 33. • To bi-wire a speaker, connect two speaker cords to the speaker terminal on the receiver. Using a banana plug for the second connection is recommended. • You can use the additional amplifier on the surround back channel pre-outs for a single speaker as well. In this case plug the amplifier into the left (L (Single)) terminal only. • The sound from the surround back terminals will depend on how you have configured the Surround back speaker setting on page 33. • To hear sound only from the pre-outs, switch the speaker system to OFF, or simply disconnect any speakers that are connected directly to the receiver. • If you're not using a subwoofer, change the front speaker setting (see Speaker Setting on page 37) to LARGE. Caution • Make sure you use a parallel (not series, which are fairly uncommon) connection when bi-wiring your speakers. • Don't connect different speakers from the same terminal in this way. Using this receiver with a Pioneer plasma display If you have a Pioneer plasma display, you can use an SR+ cable1 to connect it to this unit and take advantage of various convenient features, such as automatic video input switching of the plasma display when the input is changed.2 CONTROL Connecting additional amplifiers This receiver has more than enough power for any home use, but it's possible to add additional amplifiers to every channel of your system using the pre-outs. Make the connections shown below to add amplifiers to power your speakers. • Before making or changing the connections, switch off the power and disconnect the power cord from the AC outlet. AM LOOP L OUT PRE OUT CENTER L L (Single) IN 3 R R SUB R SUR- SURROUND FRONT WOOFER ROUND BACK OUT IN MONITOR OUT ANALOG INPUT L R ANALOG INPUT ANALOG INPUT L R Front channel amplifier Center channel amplifier (mono) Surround channel amplifier OUT VSX-1016TXV Pioneer plasma display OPTICAL IN 1 DIGITAL OUT ANTENNA IN 1 IN 2 (DVR/ VCR1) IN 2 (TV/SAT) OUT HDMI IN 3 (CD) ASSIGNABLE 13 CONTROL OUT XM IN IN AUDIO IN L IN 1 (DVD/LD) R IN 2 (DVR/VCR2) CD COAXIAL ASSIGNABLE 12 COMPONENT VIDEO Y PB PR IN 1 Y PB PR IN 2 Y PB PR Y PB PR ASSIGNABLE 1 3 S-VIDEO IN IN OUT IN VIDEO OUT IN IN IN OUT IN CD-R/TAPE/MD DVD/LD TV/SAT DVR/VCR1 AM LOOP L OUT IN 3 R FRONT OUT IN OUT IN DVR/VCR2 OUT IN L CENTER L L DVR/VCR2 R R R FRONT SUB SUR- SURROUND WOOFER ROUND BACK MULTI CH IN ANALOG INPUT L R ANALOG INPUT Surround back channel amplifier Powered subwoofer VSX-1016TXV Note 1 The 3-ringed SR+ cable from Pioneer is commercially available under the part number ADE7095. Contact the Pioneer Customer Support division for more information on obtaining an SR+ cable (you can also use a commercially available 3-ringed mini phone plug for the connection). 2 This receiver is compatible with all SR+ equipped Pioneer plasma displays from 2003 onward. 44 En
-
 1
1 -
2
-
3
-
4
-
5
-
6
-
7
-
8
-
9
-
10
-
11
-
12
-
13
-
14
-
15
-
16
-
17
-
18
-
19
-
20
-
21
-
22
-
23
-
24
-
25
-
26
-
27
-
28
-
29
-
30
-
31
-
32
-
33
-
34
-
35
-
36
-
37
-
38
-
 39
39 -
 40
40 -
 41
41 -
 42
42 -
 43
43 -
 44
44 -
 45
45 -
 46
46 -
 47
47 -
 48
48 -
 49
49 -
50
-
51
-
52
-
53
-
54
-
55
-
56
-
57
-
58
-
59
-
60
-
61
-
62
-
63
-
64
-
65
-
66
-
67
-
68
 |
 |
