Pioneer VSX-31 Owner's Manual - Page 41
Basic Setup - user manual
 |
UPC - 884938109253
View all Pioneer VSX-31 manuals
Add to My Manuals
Save this manual to your list of manuals |
Page 41 highlights
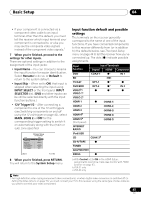
Basic Setup 04 Chapter 4: Basic Setup Changing the OSD display language (OSD Language) The language used on the Graphical User Interface (GUI) screen can be changed. • The explanations in these operating instructions are for when English is selected for the GUI screen. 1 Switch on the receiver and your TV. 2 Press RECEIVER on the remote control, then press HOME MENU. A GUI screen appears on your TV. Use and ENTER to navigate through the screens and select menu items. Press RETURN to exit the current menu. 3 Select 'System Setup' from the Home Menu. 4 Select 'OSD Language' from the System Setup menu. 4.System Setup A/V RECEIVER a. Manual SP Setup b. Input Setup c. OSD Language d. Network Setup e. Other Setup Exit Return 5 Select the desired language. • English • French • German • Italian • Spanish • Dutch • Russian 6 Select 'OK' to change the language. The setting is completed and the System Setup menu reappears automatically. Automatically conducting optimum sound tuning (Auto MCACC The Auto MCACC Setup measures the acoustic characteristics of your listening area, taking into account ambient noise, speaker connection and speaker size, and tests for both channel delay and channel level. After you have set up the microphone provided with your system, the receiver uses the information from a series of test tones to optimize the speaker settings and equalization for your particular room. Make sure you do this before moving on to Playing a source on page 46. Important • Make sure the microphone and speakers are not moved during the Auto MCACC Setup. • Using the Auto MCACC Setup will overwrite any existing settings for the MCACC preset you select. • Before using the Auto MCACC Setup, the headphones should be disconnected. CAUTION • The test tones used in the Auto MCACC Setup are output at high volume. 41 En
-
 1
1 -
2
-
3
-
4
-
5
-
6
-
7
-
8
-
9
-
10
-
11
-
12
-
13
-
14
-
15
-
16
-
17
-
18
-
19
-
20
-
21
-
22
-
23
-
24
-
25
-
26
-
27
-
28
-
29
-
30
-
31
-
32
-
33
-
34
-
35
-
 36
36 -
 37
37 -
 38
38 -
 39
39 -
 40
40 -
 41
41 -
 42
42 -
 43
43 -
 44
44 -
 45
45 -
 46
46 -
47
-
48
-
49
-
50
-
51
-
52
-
53
-
54
-
55
-
56
-
57
-
58
-
59
-
60
-
61
-
62
-
63
-
64
-
65
-
66
-
67
-
68
-
69
-
70
-
71
-
72
-
73
-
74
-
75
-
76
-
77
-
78
-
79
-
80
-
81
-
82
-
83
-
84
-
85
-
86
-
87
-
88
-
89
-
90
-
91
-
92
-
93
-
94
-
95
-
96
-
97
-
98
-
99
-
100
-
101
-
102
-
103
-
104
-
105
-
106
-
107
-
108
-
109
-
110
-
111
-
112
-
113
-
114
-
115
-
116
-
117
-
118
-
119
-
120
-
121
-
122
-
123
-
124
-
125
-
126
-
127
-
128
-
129
-
130
-
131
-
132
-
133
-
134
-
135
-
136
 |
 |
