Pioneer VSX-815-S Owner's Manual - Page 10
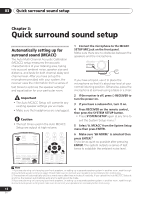
Multi Jog, Enter, Dvd/ld - set up
 |
View all Pioneer VSX-815-S manuals
Add to My Manuals
Save this manual to your list of manuals |
Page 10 highlights
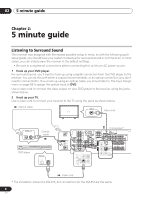
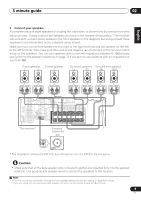
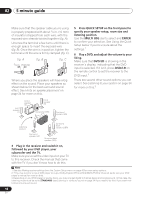
02 5 minute guide Make sure that the speaker cable you're using is properly prepared with about 3/8 in. (10 mm) of insulator stripped from each wire, with the exposed wire strands twisted together (fig. A). Unscrew the terminal a few turns until there is enough space to insert the exposed wire (fig. B). Once the wire is in position, tighten the terminal until the wire is firmly clamped (fig. C). fig. A 3/8 in. (10mm) fig. B fig. C Where you place the speakers will have a big effect on the sound. Place your speakers as shown below for the best surround sound effect. See Hints on speaker placement on page 24 for more on this. 5 Press QUICK SETUP on the front panel to specify your speaker setup, room size and listening position. Use the MULTI JOG dial to select and ENTER to confirm your selection. See Using the Quick Setup below if you're unsure about the settings.1 6 Play a DVD, and adjust the volume to your liking. Make sure that DVD/LD is showing in the receiver's display, indicating that the DVD input is selected. If it isn't, press DVD/LD on the remote control to set the receiver to the DVD input.2 There are several other sound options you can select. See Listening to your system on page 34 for more on this.3 Front speaker (L) Center speaker (C) Front speaker (R) Subwoofer (SW) Surround speaker (RS) Listening position Surround back speaker (SBR) Surround speaker (LS) Surround back speaker (SBL) 4 Plug in the receiver and switch it on, followed by your DVD player, your subwoofer and the TV. Make sure you've set the video input on your TV to this receiver. Check the manual that came with the TV if you don't know how to do this. Note 1 See also Making receiver settings from the System Setup menu on page 43 for more setup options. 2 • You may need to set your DVD player to output Dolby Digital, DTS and 88.2/96kHz PCM (2 channel) audio (see your DVD player's manual for more on this). 3 Depending on your DVD player or source discs, you may only get digital 2 channel stereo and analog sound. In this case, the listening mode must be set to STANDARD (see Listening in surround sound on page 34 if you need to do this) if you want multichannel surround sound. 10 En
-
 1
1 -
2
-
3
-
4
-
 5
5 -
 6
6 -
 7
7 -
 8
8 -
 9
9 -
 10
10 -
 11
11 -
 12
12 -
 13
13 -
 14
14 -
 15
15 -
16
-
17
-
18
-
19
-
20
-
21
-
22
-
23
-
24
-
25
-
26
-
27
-
28
-
29
-
30
-
31
-
32
-
33
-
34
-
35
-
36
-
37
-
38
-
39
-
40
-
41
-
42
-
43
-
44
-
45
-
46
-
47
-
48
-
49
-
50
-
51
-
52
-
53
-
54
-
55
-
56
-
57
-
58
-
59
-
60
-
61
-
62
-
63
-
64
-
65
-
66
-
67
-
68
-
69
-
70
-
71
-
72
-
73
-
74
-
75
-
76
 |
 |
