Pioneer VSX-D508 Owner's Manual - Page 16
Setting, Surround, Sound
 |
View all Pioneer VSX-D508 manuals
Add to My Manuals
Save this manual to your list of manuals |
Page 16 highlights
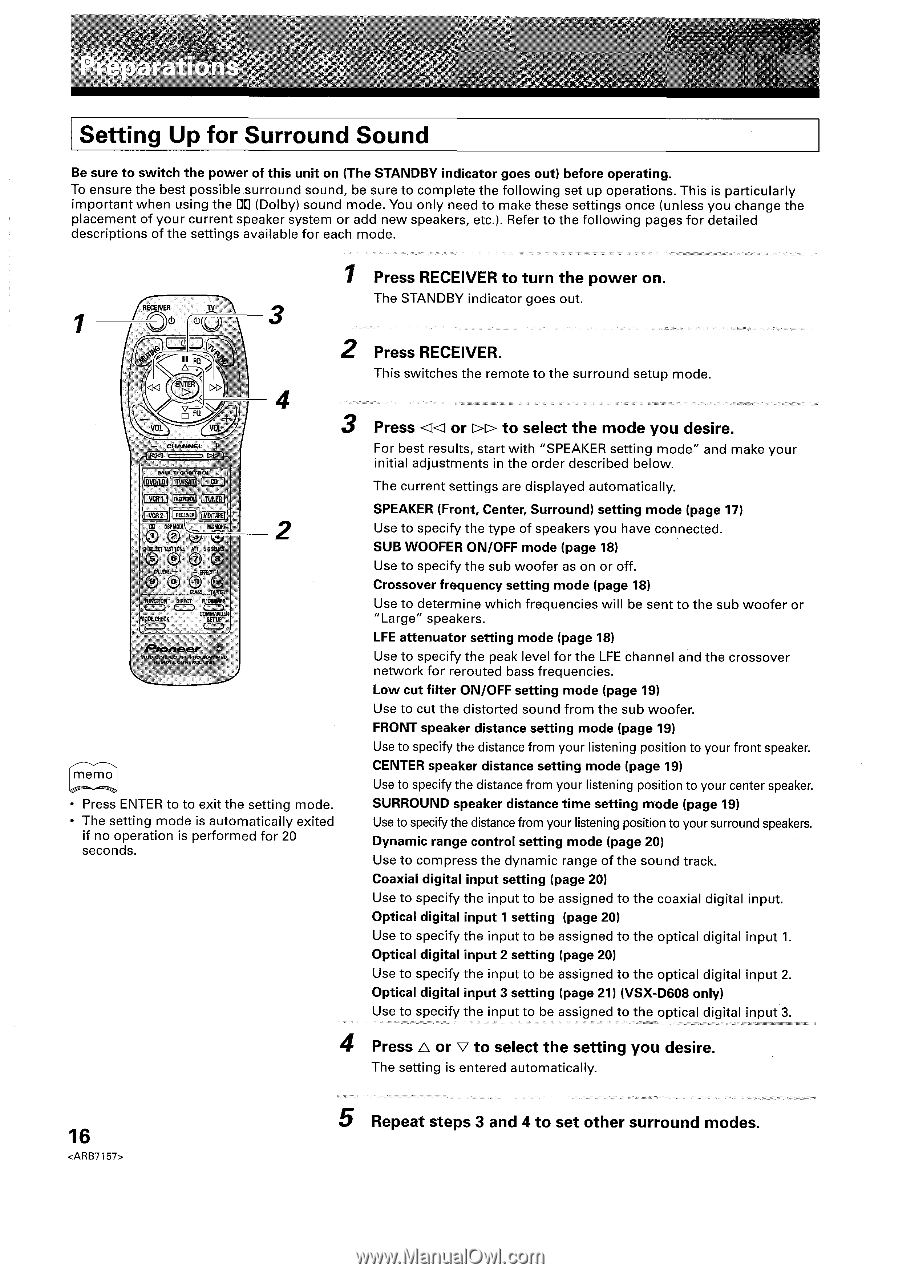
Setting Up for Surround Sound Be sure to switch the power of this unit on (The STANDBY indicator goes out) before operating. To ensure the best possible surround sound, be sure to complete the following set up operations. This is particularly important when using the DO (Dolby) sound mode. You only need to make these settings once (unless you change the placement of your current speaker system or add new speakers, etc.). Refer to the following pages for detailed descriptions of the settings available for each mode. 1 RE IVER 3 EN VOL VOL - CHANNEL + la< MUL TI CONTROL IDVDADI 1VISATI CO WTI TUNER I Field [MI W/ A-IQ a] WM Bg%1GRii 0 14/ 2, rss 61 SE SEDUCE - CN.VVE. 0 ® 0c,„ss FULMAN SECT FT ISMER MUSE CHECK CEOP,ISEEIES SET UP ( ) ipsonoser MOM/VW. NIENICOMMMFD REMOTE CONTROL LIN, 4 2 1 2 3 memo • Press ENTER to to exit the setting mode. • The setting mode is automatically exited if no operation is performed for 20 seconds. Press RECEIVER to turn the power on. The STANDBY indicator goes out. Press RECEIVER. This switches the remote to the surround setup mode. Press as or >> to select the mode you desire. For best results, start with "SPEAKER setting mode" and make your initial adjustments in the order described below. The current settings are displayed automatically. SPEAKER (Front, Center, Surround) setting mode (page 17) Use to specify the type of speakers you have connected. SUB WOOFER ON/OFF mode (page 18) Use to specify the sub woofer as on or off. Crossover frequency setting mode (page 18) Use to determine which frequencies will be sent to the sub woofer or "Large" speakers. LFE attenuator setting mode (page 18) Use to specify the peak level for the LFE channel and the crossover network for rerouted bass frequencies. Low cut filter ON/OFF setting mode (page 19) Use to cut the distorted sound from the sub woofer. FRONT speaker distance setting mode (page 19) Use to specify the distance from your listening position to your front speaker. CENTER speaker distance setting mode (page 19) Use to specify the distance from your listening position to your center speaker. SURROUND speaker distance time setting mode (page 19) Use to specify the distance from your listening position to your surround speakers. Dynamic range control setting mode (page 20) Use to compress the dynamic range of the sound track. Coaxial digital input setting (page 20) Use to specify the input to be assigned to the coaxial digital input. Optical digital input 1 setting (page 20) Use to specify the input to be assigned to the optical digital input 1. Optical digital input 2 setting (page 20) Use to specify the input to be assigned to the optical digital input 2. Optical digital input 3 setting (page 21) (VSX-D608 only) Use to specify the input to be assigned to the optical digital input 3. 4 Press A or o to select the setting you desire. The setting is entered automatically. 16 5 Repeat steps 3 and 4 to set other surround modes.
-
 1
1 -
2
-
3
-
4
-
5
-
6
-
7
-
8
-
9
-
10
-
 11
11 -
 12
12 -
 13
13 -
 14
14 -
 15
15 -
 16
16 -
 17
17 -
 18
18 -
 19
19 -
 20
20 -
 21
21 -
22
-
23
-
24
-
25
-
26
-
27
-
28
-
29
-
30
-
31
-
32
-
33
-
34
-
35
-
36
-
37
-
38
-
39
-
40
-
41
-
42
-
43
-
44
-
45
-
46
-
47
-
48
-
49
-
50
-
51
-
52
-
53
-
54
-
55
-
56
-
57
-
58
-
59
-
60
 |
 |