Pioneer VSX-D508 Owner's Manual - Page 9
Mmeer
 |
View all Pioneer VSX-D508 manuals
Add to My Manuals
Save this manual to your list of manuals |
Page 9 highlights
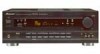
Audio Components Connections Be sure to switch power to standby and remove the power cord from the wall outlet when you make or change connections. Connect your audio components as shown below. Refer to "Digital Connections" on page 11 when making digital connections from your DVD or LD player. r-- PEITENNA DIGITAL IN MEER 7qt7;),,f :„C. Li OPT PCNI/ DO /OTS M7 ( H '14. 'ITC' Th . S2' MONITOR R N DPI 22 S2 52 01 0, cL) OFT DIGITAL OUT e- CONTROL GIO . VIDEO OUT IN IN rCit OUT IN OUT IN IN OLR O O VIDEO nuT IN atD MD PE ZED CO -•"- TAPE 54TH JNROR✓~ LD e VCR 2 POINT SPEAXERS CD R O O L Th VSX-D608 0 CENTER PRECUT SUB WOOFER PREOUT gUERE-, - %LAMP, SCAPUATRIOEPN: RD 02;1 CAUTION: mixmurnwwxuu r :L1ETS/T7:87/ IMPEDANCE SELECTORS V ■ RC D PLAY REC MD recorder or Cassette deck CD player *The arrows indicate the direction of the audio signal. Cassette deck • Audio cords Use audio cords (not supplied) to connect the audio components. Connect red plugs to R (right) and white plugs to L (left). 07 Be sure to insert completely. Cassette Deck Installment Depending on where the cassette deck is placed, noise may occur during playback of your cassette deck which is caused by leakage flux from the transformer in the receiver. If you experience noise, move the cassette deck farther away from the receiver. 9
-
 1
1 -
2
-
3
-
 4
4 -
 5
5 -
 6
6 -
 7
7 -
 8
8 -
 9
9 -
 10
10 -
 11
11 -
 12
12 -
 13
13 -
 14
14 -
15
-
16
-
17
-
18
-
19
-
20
-
21
-
22
-
23
-
24
-
25
-
26
-
27
-
28
-
29
-
30
-
31
-
32
-
33
-
34
-
35
-
36
-
37
-
38
-
39
-
40
-
41
-
42
-
43
-
44
-
45
-
46
-
47
-
48
-
49
-
50
-
51
-
52
-
53
-
54
-
55
-
56
-
57
-
58
-
59
-
60
 |
 |
