Poulan PR4016 Owner Manual - Page 13
Maintenance - parts list
 |
View all Poulan PR4016 manuals
Add to My Manuals
Save this manual to your list of manuals |
Page 13 highlights
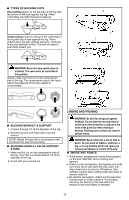
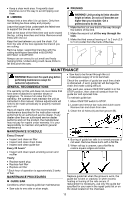
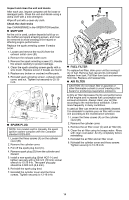
• Keep a clear work area. Frequently clear branches out of the way to avoid tripping over them. LIMBING Always limb a tree after it is cut down. Only then can limbing be done safely and properly. Leave the larger limbs underneath the felled tree to support the tree as you work. Start at the base of the felled tree and work toward the top, cutting branches and limbs. Remove small limbs with one cut. Keep the tree between you and the chain. Cut from the side of the tree opposite the branch you are cutting. Remove larger, supporting branches with the cutting techniques described in BUCKING WITHOUT A SUPPORT. Always use an overcut to cut small and freely hanging limbs. Undercutting could cause limbs to fall and pinch the saw. PRUNING WARNING! Limit pruning to limbs shoulder height or below. Do not cut if branches are higher than your shoulder. Get a professional to do the job. 1. Make the first cut one-third of the way through the bottom of the limb. 2. Make the second cut all the way through the limb. 3. Make the third overcut leaving a 1 to 2 inch (2.5 to 5 cm) collar from the trunk of the tree. 2 1 3 MAINTENANCE WARNING! Disconnect the spark plug before performing maintenance except for carburetor adjustments. GENERAL RECOMMENDATIONS The warranty on this unit does not cover items that have been subjected to operator abuse or negligence. To receive full value from the warranty, the operator must maintain the unit as instructed in this manual. Various adjustments will need to be made periodically to properly maintain your unit. Have all repairs other than the recommended maintenance described in the instruction manual performed by an authorized service dealer. If any dealer other than an authorized service dealer performs work on the product, the manufacturer may not pay for repairs under warranty. It is your responsibility to maintain and perform general maintenance. MAINTENANCE SCHEDULE • Saw has to be forced through the cut. • Inadequate supply of oil to bar/chain. Check the condition of guide bar each time chain is sharpened. A worn guide bar will damage the chain and make cutting difficult. After each use, ensure ON/STOP switch is in the STOP position, then clean all sawdust from the guide bar and sprocket hole. To maintain guide bar: 1. Move ON/STOP switch to STOP. 2. Loosen and remove bar nuts and clutch cover. Remove bar and chain from saw. 3. Clean the oil holes (A) and bar groove (B). Every 5 hours* • Inspect and clean air filter • Inspect and clean chain brake • Inspect and clean guide bar Every 25 hours* 4. Burring of guide bar rails is a normal process of rail wear. Remove these burrs with a flat file. 5. When rail top is uneven, use a flat file to restore square edges and sides. • Inspect and clean spark arresting screen and muffler Yearly • Replace spark plug • Replace fuel filter • Replace air filter * Each hour of operation is approximately 2 tanks of fuel. MAINTENANCE PROCEDURES GUIDE BAR Conditions which require guide bar maintenance: • Saw cuts to one side or at an angle. Replace guide bar when the groove is worn, the guide bar is bent or cracked, or when excess heating or burring of the rails occurs. If replacement is necessary, use only the guide bar specified for your saw in the repair parts list or on the decal located on the chainsaw. 13
-
 1
1 -
2
-
3
-
4
-
5
-
6
-
7
-
 8
8 -
 9
9 -
 10
10 -
 11
11 -
 12
12 -
 13
13 -
 14
14 -
 15
15 -
 16
16 -
 17
17 -
 18
18 -
19
-
20
-
21
-
22
-
23
-
24
-
25
-
26
-
27
-
28
-
29
-
30
-
31
-
32
-
33
-
34
-
35
-
36
-
37
-
38
-
39
-
40
-
41
-
42
-
43
-
44
-
45
-
46
-
47
-
48
-
49
-
50
-
51
-
52
-
53
-
54
-
55
-
56
-
57
-
58
-
59
-
60
 |
 |
