Pyle PPDM2 PPDM2 Manual 1 - Page 19
Distance, Press, Running?
 |
View all Pyle PPDM2 manuals
Add to My Manuals
Save this manual to your list of manuals |
Page 19 highlights
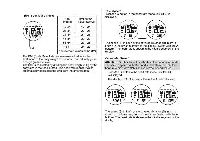
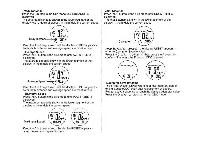
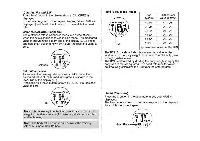
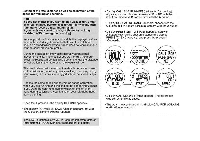
Setting of the total distance as well as calibration of the speed for walking and running. Note: It does not matter if you want to only walk or run, under all circumstances perform a calibration for walking AND running to receive a meaningful result. If you really only want to walk, calibrate for walking (walking) AND running (fast walking). In case you do not calibrate your watch, the displayed values have only limited significance. In that case the watch falls back on a standard calibration, wtlich does not correspond to your personal movement profile. During the calibration the watch rerords your personal movement profile. The steadier you walk or run, the more exact the results will be. It is also true: the longer the distance for calibration is, the more exact the results will be. The heart rate monitor watch automatically perceives, based on the calibration, whether you are walking or running during your training, and correspondingly displays the speed, steps, etc.. Choose the same speed and rhythm as during calibration when you are running and walking, to get a meaningful result. If you wore the heart rate monitor watch on the left (right) hand during calibration, wear it also on your left (right) hand during training. • Keep the A pressed - the display SETTING appears. • The display ODOMETER SAVE function appears, set with the C button, confirm with the A button. The SAVE function allows you to keep the important data of total distance (000) even after replacement of battery. • Display CAli. FOR RUNNING (calibration for running ) appears, you can choose between YES or NO with the C button.Choose YES and confirm with the A button. • Display SET CALI DISTANCE appears, choose with the C button (0. 1 to 1.0 km possible), confirm with the A button. • Display PRESS SET TO START appears, start with A button.Now run the chosen distance (the display PRESS TO END appears) and press the A button afterwards. -·"'0"- HOLD TO SET/-~, ----~ S-E-T"'0 CA"L-I .... _ -0";: PRESS DISTANCE SET TO QIKH /-~, STAAT ----~ C-A·"LI'0F"O-R RUNNING? YES ;-: -"'C0A"L-I OK! SAVED • Display CALI OK! and SAVED appears. The calibration was correct and was saved. • The watch now changes to the display CALI FOR WALKING (calibration for walking).
-
 1
1 -
2
-
3
-
4
-
5
-
6
-
7
-
8
-
9
-
10
-
11
-
12
-
13
-
 14
14 -
 15
15 -
 16
16 -
 17
17 -
 18
18 -
 19
19 -
 20
20 -
 21
21 -
 22
22 -
 23
23
 |
 |
