RCA HSDB2A Quick Start Guide - Page 7
Connect the video doorbell to home power, OPTIONS A & B, Remove the faceplate from the video
 |
View all RCA HSDB2A manuals
Add to My Manuals
Save this manual to your list of manuals |
Page 7 highlights
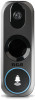
nsert illed th the ng the 8 Remove the faceplate from the video doorbell Before you mount it, take the faceplate off the video doorbell-you'll need access to several items behind the faceplate during setup. 9 Connect the video doorbell to home power (OPTIONS A & B) IF YOU DON'T HAVE A CHIME BOX You must use the resistor provided in this package to connect the video doorbell to your home's wiring. Follow the instructions for OPTION B on the next page, including the resistor instructions in the red box. OPTION A: If your home's doorbell power wires are long enough Terminals Loosen Use the screwdriver provided in this package to loosen the terminal screws on the back of the video doorbell. Doorbell camera back Terminals Home doorbell wires Tighten Connect the doorbell power wires directly to the terminals on the back of the video doorbell. Loop each wire end around each terminal on the back of the video doorbell. Note: It doesn't matter which wire you put on which terminal. Tighten the screws to hold the wires firmly in place. IMPORTANT! Handle the video doorbell carefully! Make sure not to scratch its lens. continues on the next page... 7
-
 1
1 -
 2
2 -
 3
3 -
 4
4 -
 5
5 -
 6
6 -
 7
7 -
 8
8 -
 9
9 -
 10
10 -
 11
11 -
 12
12 -
13
-
14
-
15
-
16
-
17
-
18
-
19
-
20
-
21
-
22
-
23
-
24
-
25
-
26
-
27
-
28
-
29
-
30
-
31
-
32
-
33
-
34
-
35
-
36
-
37
-
38
-
39
-
40
-
41
-
42
-
43
-
44
 |
 |
