RCA HSDB2A Quick Start Guide - Page 9
Install the faceplate of your choice
 |
View all RCA HSDB2A manuals
Add to My Manuals
Save this manual to your list of manuals |
Page 9 highlights
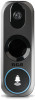
12 Install the video doorbell on the mounting plate Route the power wires and/or wire leads into the wall. Align the holes on the video doorbell's body with the holes in the mounting plate. Insert the screws provided through the video doorbell's body and into the mounting plate. Tighten these screws completely. 13 Peel off the QR code sticker from the front of the video doorbell and store it in a safe place Gently peel off the QR code sticker from the front of the video doorbell. Make sure you put it in a safe place- you'll need it to complete setup! 14 Install the faceplate of your choice Place the faceplate of your choice onto the front of the video doorbell as shown here. Insert the 2 provided set screws into the bottom of the video doorbell to secure the faceplate. QR code sticker Peel off 9
-
 1
1 -
2
-
3
-
 4
4 -
 5
5 -
 6
6 -
 7
7 -
 8
8 -
 9
9 -
 10
10 -
 11
11 -
 12
12 -
 13
13 -
 14
14 -
15
-
16
-
17
-
18
-
19
-
20
-
21
-
22
-
23
-
24
-
25
-
26
-
27
-
28
-
29
-
30
-
31
-
32
-
33
-
34
-
35
-
36
-
37
-
38
-
39
-
40
-
41
-
42
-
43
-
44
 |
 |
