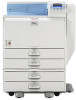
Ricoh Aficio SP 8200DN User Guide - Page 22
Installing The Printer, Driver, To specify the IPv4 Address, press [IP - rpcs
 |
View all Ricoh Aficio SP 8200DN manuals
Add to My Manuals
Save this manual to your list of manuals |
Page 22 highlights
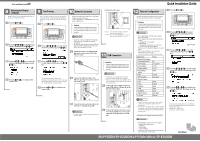
Press the {Menu} key to return to the initial screen. Print a configuration page to confirm the settings. • For details about printing the configuration page, see "Test Printing". ❖ Specifying an IP Address (No DHCP) Press the {Menu} key. Press the {▼} or {▲} key to select [Active] or [Inactive], and then press the {OK} key. Set other protocols you need to set in the same way. • Select [Inactive] for unused protocols. • Enable IPv4 to use the pure IPv4 environment of NetWare 5/5.1, NetWare 6/6.5. Press the {Escape} key until the screen returns to the [Network] menu. If your network uses IPv4, assign the IPv4 address to the printer. Press the {▼} or {▲} key to select [Machine IPv4 Address], and then press the {OK} key. BEK204S Press the {▼} or {▲} key to select [Host Interface], and then press the {OK} key. To get the IP address for the printer, contact your network administrator. To specify the IPv4 Address, press [IP Add]. Press the {▼} or {▲} key to select [Network], and then press the {OK} key. Press the {▼} or {▲} key to select [Effective Protocol], and then press the {OK} key. Press the {▼} or {▲} key to select the appropriate network protocol and then press the {OK} key. If you use IPv4, also assign the subnet mask and gateway address. To assign these, press [Subnet M] or [Gateway]. Press the {▼} or {▲} to enter the address, and then press the {OK} key. Press the {▼} or {▲} key to enter the left-most entry field of the address. After entering the left field, press the {OK} key, and then you can enter the next field. After completing all fields, press the {OK} key. Use the same method to assign the subnet mask and gateway address. • Change the IP address from "11.22.33.44" to an IP address supported by your network. Press the {▼} or {▲} key to select [Specify], and then press the {OK} key. If you do not select [Specify] in this step, the address you set will not be saved. Press the {Menu} key to return to the initial screen. Print a configuration page to confirm the settings. • For details about printing the configuration page, see "Test Printing". Installing The Printer Driver You can install the printer drivers and software easily from the CD-ROM labeled "Printer Drivers and Utilities". Click [Quick Install] in the window of the CD-ROM to install PCL and RPCS printer drivers. To install the PostScript 3 printer driver, click the [PostScript 3 Printer Driver] button. For more information about the PostScript 3 printer driver, see Software Guide on the CD-ROM labeled "Manuals". When the TCP/IP protocol is used, SmartDeviceMonitor for Client will be installed as well. When using the TCP/IP protocol, confirm the following: The printer is connected to the network with Category 5 interface cable. The TCP/IP protocol is enabled. The IP address is set for the printer and the computer. Quit all applications currently running. Insert the CD-ROM into the CD-ROM drive. The installer starts. Auto Run may not work under certain operating system settings. In this case, launch "Setup.exe" in the CD-ROM root directory. Select an interface language, and then click {OK}. The default interface language is English. Click [Quick Install]. The software license agreement appears in the [License Agreement] dialog box. Quick Installation Guide Select the printer model you want to install in the "Select Printer" dialog box. • For a network connection via TCP/IP, select the printer whose IP address is displayed in [Connect to]. In this case, SmartDeviceMonitor for Client will also be installed. • For parallel connection, select the printer whose printer port is displayed in [Connect to]. Click [Install]. The following display appears while installing the printer driver. Click [Finish]. A message about restarting the computer may appear. Restart the computer to complete installation. This is an example when English is selected in step . After reading through all of the contents, click [I accept the agreement] to agree with the License Agreement, and then click [Next >]. Click [Exit] in the first dialog box of the installer, and then take out the CD-ROM. • To install printer drivers under Windows 2000/XP Professional/Vista or Windows Server 2003/2003 R2, you must have an account that has the Manage Printers permission. Log on as an administrator. • For details about installing the printer drivers, see "Preparing for Printing", Software Guide. • When using this printer under parallel connection, only the printer drivers are installed and not SmartDeviceMonitor for Clients. • Quick Install is not available when using this printer under USB connection. If you connect the printer using USB, see Software Guide. • To stop installation of the selected software, click [Cancel] before installation is complete. • Quick Install is not available for parallel connection unless bidirectional communication between the printer and computer is enabled. For details about bidirectional communication between the printer and computer, see "Printing with Parallel Connection", Software Guide. Copyright © 2007 EN USA G179-7536 MLP150DN/SP 8200DN/LP150dn/Aficio SP 8200DN 2/2 Quick Installation Guide
-
 1
1 -
2
-
3
-
4
-
5
-
6
-
7
-
8
-
9
-
10
-
11
-
12
-
13
-
14
-
15
-
16
-
 17
17 -
 18
18 -
 19
19 -
 20
20 -
 21
21 -
 22
22 -
 23
23 -
 24
24 -
 25
25 -
 26
26 -
 27
27 -
28
-
29
-
30
-
31
-
32
-
33
-
34
-
35
-
36
-
37
-
38
-
39
-
40
-
41
-
42
-
43
-
44
-
45
-
46
-
47
-
48
-
49
-
50
-
51
-
52
-
53
-
54
-
55
-
56
-
57
-
58
-
59
-
60
-
61
-
62
-
63
-
64
-
65
-
66
-
67
-
68
-
69
-
70
-
71
-
72
-
73
-
74
-
75
-
76
-
77
-
78
-
79
-
80
-
81
-
82
-
83
-
84
-
85
-
86
-
87
-
88
-
89
-
90
-
91
-
92
-
93
-
94
-
95
-
96
-
97
-
98
-
99
-
100
-
101
-
102
-
103
-
104
-
105
-
106
-
107
-
108
-
109
-
110
-
111
-
112
-
113
-
114
-
115
-
116
-
117
-
118
-
119
-
120
-
121
-
122
-
123
-
124
-
125
-
126
-
127
-
128
-
129
-
130
-
131
-
132
-
133
-
134
-
135
-
136
-
137
-
138
-
139
-
140
-
141
-
142
-
143
-
144
-
145
-
146
-
147
-
148
-
149
-
150
-
151
-
152
-
153
-
154
-
155
-
156
-
157
-
158
-
159
-
160
-
161
-
162
-
163
-
164
-
165
-
166
-
167
-
168
-
169
-
170
-
171
-
172
-
173
-
174
-
175
-
176
-
177
-
178
-
179
-
180
-
181
-
182
-
183
-
184
-
185
-
186
-
187
-
188
-
189
-
190
-
191
-
192
-
193
-
194
-
195
-
196
-
197
-
198
-
199
-
200
-
201
-
202
-
203
-
204
-
205
-
206
-
207
-
208
-
209
-
210
-
211
-
212
-
213
-
214
-
215
-
216
-
217
-
218
-
219
-
220
-
221
-
222
-
223
-
224
-
225
-
226
-
227
-
228
-
229
-
230
-
231
-
232
-
233
-
234
-
235
-
236
-
237
-
238
-
239
-
240
-
241
-
242
-
243
-
244
-
245
-
246
-
247
-
248
-
249
-
250
-
251
-
252
-
253
-
254
-
255
-
256
-
257
-
258
-
259
-
260
-
261
-
262
-
263
-
264
-
265
-
266
-
267
-
268
-
269
-
270
-
271
-
272
-
273
-
274
-
275
-
276
-
277
-
278
-
279
-
280
-
281
-
282
-
283
-
284
-
285
-
286
-
287
-
288
-
289
-
290
-
291
-
292
-
293
-
294
-
295
-
296
-
297
-
298
-
299
-
300
-
301
-
302
-
303
-
304
-
305
-
306
-
307
-
308
-
309
-
310
-
311
-
312
-
313
-
314
-
315
-
316
-
317
-
318
-
319
-
320
-
321
-
322
-
323
-
324
-
325
-
326
-
327
-
328
-
329
-
330
-
331
-
332
-
333
-
334
-
335
-
336
-
337
-
338
-
339
-
340
-
341
-
342
-
343
-
344
-
345
-
346
-
347
-
348
-
349
-
350
-
351
-
352
-
353
-
354
-
355
-
356
-
357
-
358
-
359
-
360
-
361
-
362
-
363
-
364
-
365
-
366
-
367
-
368
-
369
-
370
-
371
-
372
-
373
-
374
-
375
-
376
-
377
-
378
-
379
-
380
-
381
-
382
-
383
-
384
-
385
-
386
-
387
-
388
-
389
-
390
-
391
-
392
-
393
-
394
-
395
-
396
-
397
-
398
-
399
-
400
-
401
-
402
-
403
-
404
-
405
-
406
-
407
-
408
-
409
-
410
-
411
-
412
-
413
-
414
-
415
-
416
-
417
-
418
-
419
-
420
-
421
-
422
-
423
-
424
-
425
-
426
-
427
-
428
-
429
-
430
-
431
-
432
-
433
-
434
-
435
-
436
-
437
-
438
-
439
-
440
-
441
-
442
-
443
-
444
-
445
-
446
-
447
-
448
-
449
-
450
-
451
-
452
-
453
-
454
-
455
-
456
-
457
-
458
-
459
-
460
-
461
-
462
-
463
-
464
-
465
-
466
-
467
-
468
-
469
-
470
-
471
-
472
-
473
-
474
-
475
-
476
-
477
-
478
-
479
-
480
-
481
-
482
-
483
-
484
-
485
-
486
-
487
-
488
-
489
-
490
-
491
-
492
-
493
-
494
-
495
-
496
-
497
-
498
-
499
-
500
-
501
-
502
-
503
-
504
-
505
-
506
-
507
-
508
-
509
-
510
-
511
-
512
-
513
-
514
-
515
-
516
-
517
-
518
-
519
-
520
-
521
-
522
-
523
-
524
-
525
-
526
-
527
-
528
-
529
-
530
-
531
-
532
-
533
-
534
-
535
-
536
-
537
-
538
-
539
-
540
-
541
-
542
-
543
-
544
-
545
-
546
-
547
-
548
-
549
-
550
-
551
-
552
-
553
-
554
-
555
-
556
-
557
-
558
-
559
-
560
-
561
-
562
-
563
-
564
-
565
-
566
-
567
-
568
-
569
-
570
-
571
-
572
-
573
-
574
-
575
-
576
-
577
-
578
-
579
-
580
-
581
-
582
-
583
-
584
-
585
-
586
-
587
-
588
-
589
-
590
-
591
-
592
-
593
-
594
-
595
-
596
-
597
-
598
-
599
-
600
-
601
-
602
-
603
-
604
-
605
-
606
-
607
-
608
-
609
-
610
-
611
-
612
-
613
-
614
-
615
-
616
-
617
-
618
-
619
-
620
-
621
-
622
-
623
-
624
-
625
-
626
-
627
-
628
-
629
-
630
-
631
-
632
-
633
-
634
-
635
-
636
 |
 |
