Ricoh C811DN T1 Hardware Guide - Page 93
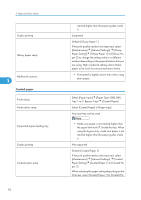
Label paper, Glossy paper, Select [Glossy Paper] in [Paper Type].
 |
UPC - 026649028199
View all Ricoh C811DN T1 manuals
Add to My Manuals
Save this manual to your list of manuals |
Page 93 highlights
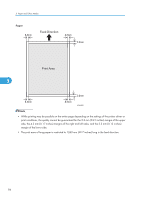
Label paper Printer setup Printer driver setup Supported paper feeding tray Duplex printing Label paper setup Additional cautions Glossy paper Printer setup Printer driver setup Supported paper feeding tray Paper Recommendations Select [Paper Input] [Paper Type: Bypass Tray] [Label Paper]. Select [Label Paper] in [PaperType]. Bypass tray • Make sure paper is not stacked higher than the paper guides inside the bypass tray. Not supported Default: [Labels 1] If the print quality needs to be improved, select 5 [Maintenance] [General Settings] [Label Pa- per Setting] [Labels 1] to [Labels 3] to change the setting value to a different number depending on the paper thickness that you are using. High numbered settings allow thicker paper to be used, but are printed more slowly. • Print speed is slightly slower than when using plain paper. • Shuffle paper before loading the stack onto the tray, so multiple sheets are not fed in together. Select [Paper Input] [Paper Type: XXX] (XXX: Tray 1 to 5, Bypass Tray) [Glossy Paper]. Select [Glossy Paper] in [Paper Type]. Any input tray can be used. • Make sure paper is not stacked higher than the upper limit mark ( ) inside the tray. When using the bypass tray, make sure paper is not 91
-
 1
1 -
2
-
3
-
4
-
5
-
6
-
7
-
8
-
9
-
10
-
11
-
12
-
13
-
14
-
15
-
16
-
17
-
18
-
19
-
20
-
21
-
22
-
23
-
24
-
25
-
26
-
27
-
28
-
29
-
30
-
31
-
32
-
33
-
34
-
35
-
36
-
37
-
38
-
39
-
40
-
41
-
42
-
43
-
44
-
45
-
46
-
47
-
48
-
49
-
50
-
51
-
52
-
53
-
54
-
55
-
56
-
57
-
58
-
59
-
60
-
61
-
62
-
63
-
64
-
65
-
66
-
67
-
68
-
69
-
70
-
71
-
72
-
73
-
74
-
75
-
76
-
77
-
78
-
79
-
80
-
81
-
82
-
83
-
84
-
85
-
86
-
87
-
 88
88 -
 89
89 -
 90
90 -
 91
91 -
 92
92 -
 93
93 -
 94
94 -
 95
95 -
 96
96 -
 97
97 -
 98
98 -
99
-
100
-
101
-
102
-
103
-
104
-
105
-
106
-
107
-
108
-
109
-
110
-
111
-
112
-
113
-
114
-
115
-
116
-
117
-
118
-
119
-
120
-
121
-
122
-
123
-
124
-
125
-
126
-
127
-
128
-
129
-
130
-
131
-
132
-
133
-
134
-
135
-
136
-
137
-
138
-
139
-
140
-
141
-
142
-
143
-
144
-
145
-
146
-
147
-
148
-
149
-
150
-
151
-
152
-
153
-
154
-
155
-
156
-
157
-
158
-
159
-
160
-
161
-
162
-
163
-
164
-
165
-
166
-
167
-
168
-
169
-
170
-
171
-
172
-
173
-
174
-
175
-
176
-
177
-
178
-
179
-
180
-
181
-
182
-
183
-
184
-
185
-
186
-
187
-
188
-
189
-
190
-
191
-
192
-
193
-
194
-
195
-
196
-
197
-
198
-
199
-
200
-
201
-
202
-
203
-
204
-
205
-
206
-
207
-
208
-
209
-
210
-
211
-
212
-
213
-
214
-
215
-
216
-
217
-
218
-
219
-
220
-
221
-
222
-
223
-
224
-
225
-
226
-
227
-
228
-
229
-
230
-
231
-
232
-
233
-
234
-
235
-
236
-
237
-
238
-
239
-
240
-
241
-
242
-
243
-
244
-
245
-
246
-
247
-
248
-
249
-
250
-
251
-
252
 |
 |
