Ryobi RTS10G User Manual - Page 14
Installing Batteries For Laser, Danger, Warning, Aligning The Laser Guide Line - assembly
 |
View all Ryobi RTS10G manuals
Add to My Manuals
Save this manual to your list of manuals |
Page 14 highlights
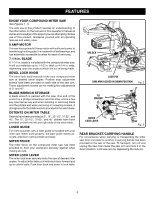
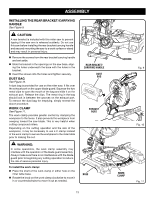
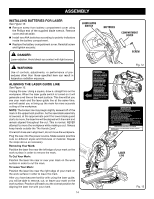
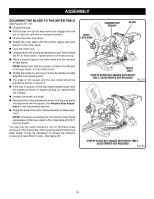
ASSEMBLY INSTALLING BATTERIES FOR LASER See Figure 12. Remove screw from battery compartment cover using the Phillips end of the supplied blade wrench. Remove cover and set aside. Install two AAA batteries according to polarity indicators inside the battery compartment. Replace the battery compartment cover. Reinstall screw and tighten securely. DANGER: Laser radiation. Avoid direct eye contact with light source. LASER GUIDE SWITCH BATTERIES COMPARTMENT COVER SCREW WARNING: Use of controls, adjustments, or performance of procedures other than those specified here can result in hazardous radiation exposure. ALIGNING THE LASER GUIDE LINE See Figure 13. Unplug the saw. Using a square, draw a straight line on the workpiece. When the laser guide switch is turned on it will generate a red line on the work surface. This line will let you see your mark and the laser guide line at the same time, and will assist you in lining up the mark for more accurate cutting of the workpiece. NOTE: The broken line may begin slightly skewed off of the mark in the uppermost position. As the saw blade assembly is lowered, at the approximate point the lower blade guard starts to move, the laser line will be aligned with the mark and remain aligned throughout the cut. This is normal. NEVER attempt to move the workpiece while making a cut. Always keep hands outside the "No Hands Zone". Once both lines are in alignment, do not move the workpiece. Plug the saw into the power source. Make several practice cuts on different styles and thickness of material. Repeat the steps above as necessary. Removing Your Mark: Position the laser line near the left edge of your mark on the work surface in order to remove the mark. To Cut Your Mark: Position the laser line near or over your mark on the work surface in order to cut the mark. To Leave Your Mark: Position the laser line near the right edge of your mark on the work surface in order to leave the mark. After you have become familiar with using the laser guide, you will be able to remove, cut, or leave your mark on the work surface. Practice will teach you the correct position for aligning the laser line with your mark. Lock trigger prior to adjusting laser. AVOID EXPOSURE: Laser radiation emitted from this aperture. Fixer gâchette avant laser est réglagé. EVITER L'EXPOSITION : Rayonnement laser émise de cet orifice. Asegure gatillo antes de ajuste de laser. EVITE LA EXPOSIOCIÔN: Radiactiôn laser se emite por esta abertura. Fig. 12 LASER LINE Fig. 13 14
-
 1
1 -
2
-
3
-
4
-
5
-
6
-
7
-
8
-
 9
9 -
 10
10 -
 11
11 -
 12
12 -
 13
13 -
 14
14 -
 15
15 -
 16
16 -
 17
17 -
 18
18 -
 19
19 -
20
-
21
-
22
-
23
-
24
-
25
-
26
-
27
-
28
-
29
-
30
-
31
-
32
-
33
-
34
-
35
-
36
-
37
-
38
-
39
-
40
-
41
-
42
-
43
-
44
-
45
-
46
-
47
-
48
-
49
-
50
-
51
-
52
-
53
-
54
-
55
-
56
-
57
-
58
-
59
-
60
-
61
-
62
-
63
-
64
-
65
-
66
-
67
-
68
-
69
-
70
-
71
-
72
-
73
-
74
-
75
-
76
-
77
-
78
-
79
-
80
-
81
-
82
-
83
-
84
 |
 |
