Samsung BD-E5300 User Manual Ver.1.0 (English) - Page 10
B. Connecting to an Audio System, C. Connecting to a Network - wireless
 |
View all Samsung BD-E5300 manuals
Add to My Manuals
Save this manual to your list of manuals |
Page 10 highlights
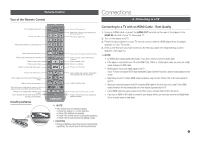
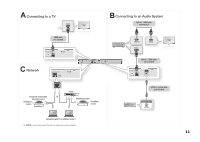
B. Connecting to an Audio System C. Connecting to a Network •• Please turn the volume down when you turn on the AV receiver. A sudden loud sound may cause damage to the speakers and your ears. •• Please set the audio format according to the capabilities of your AV receiver. •• The position of HDMI input terminals may vary depending on your AV receiver. Please refer to the user manual of your AV receiver. This player lets you use network based services such as BD-LIVE and download software upgrades when it is connected to a network. We recommend using a Broadband modem (with integrated router) or IP router for the connection. For more information on router connections, refer to the user manual of the router or contact the router manufacturer for technical assistance. Cable Network Option 1 : Connecting to an Audio System (HDMI supported AV receiver) - Best Quality (Recommended) 111 Using a Direct LAN (UTP) CAT 5 cable, connect the LAN terminal of the player to the LAN terminal of your modem or router. See page 11 222 Set the network options. See page 16. 111 Using an HDMI cable, connect the HDMI OUT terminal on the rear of the player to the HDMI IN terminal of your AV receiver. See page 11. 222 Using an HDMI cable, connect the HDMI OUT terminal of the AV receiver to the HDMI IN terminal of your TV. 333 Turn on the player, TV, and AV receiver. 444 Using the input select button of the AV receiver and TV, select the correct HDMI input or source on each to hear sound and see video from the player. Refer to your AV receiver's user manual to set the AV receiver's audio input. 555 If this is the first time you have turned on the Blu-ray player, the Initial Settings screen appears. See page 12. ✎ NOTE ▪▪ Internet access to Samsung's software update server may not be allowed, depending on the router you use or your ISP's policy. For more information, contact your ISP (Internet Service Provider). ▪▪ DSL users, please use a router to make a network connection. ▪▪ To use the AllShare function, you must connect your PC to your network as shown in the figure. The PC's connection to the network can be wired or wireless. Option 2 : Connecting to an Audio System (AV receiver with Dolby Digital or DTS decoder) - Better Quality 111 Using a coaxial cable, connect the DIGITAL AUDIO OUT (COAXIAL) terminal on the rear of the player to the DIGITAL AUDIO IN (COAXIAL) terminal of your AV receiver. See page 11. 222 Using an HDMI cable, connect the HDMI terminal on the rear of the player to the HDMI terminal of your TV. 333 Turn on the player, TV, and AV receiver. 444 Press the input select button of the AV receiver to select the correct external input and hear sound from the player. Refer to your AV receiver's user manual to set the AV receiver's audio input. 555 Press the input selector on your TV remote control to select the correct HDMI video source. 666 If this is the first time you have turned on the Blu-ray player, the Initial Settings screen appears. See page 12. 10
-
 1
1 -
2
-
3
-
4
-
 5
5 -
 6
6 -
 7
7 -
 8
8 -
 9
9 -
 10
10 -
 11
11 -
 12
12 -
 13
13 -
 14
14 -
 15
15 -
16
-
17
-
18
-
19
-
20
-
21
-
22
-
23
-
24
-
25
-
26
-
27
-
28
 |
 |