Samsung CLP-315 User Manual (ENGLISH) - Page 101
Using SetIP program, Setting Up the Printer, For a Network-connected, Starting the program - driver os x 10 9 2
 |
UPC - 635753721225
View all Samsung CLP-315 manuals
Add to My Manuals
Save this manual to your list of manuals |
Page 101 highlights
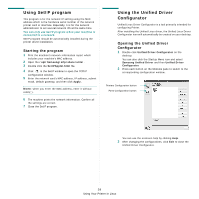
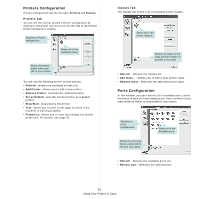
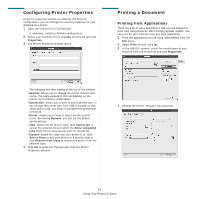
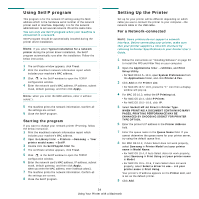
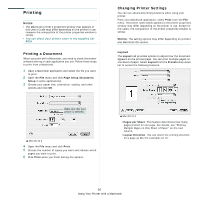
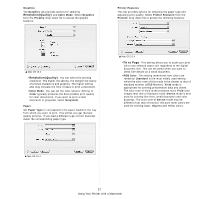
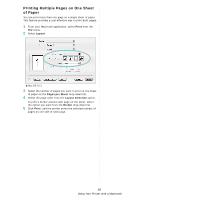
Using SetIP program This program is for the network IP setting using the MAC address which is the hardware serial number of the network printer card or interface. Especially, it is for the network administrator to set several network IPs at the same time. You can only use SetIP program when your machine is connected to a network. SetIP program should be automatically installed during the printer driver installation. NOTE: If you select Typical installation for a network printer during the printer driver installation, the SetIP program automatically runs after the installation. Follow the below instruction. 1 The certificate window appears, click Trust. 2 Print the machine's network information report which includes your machine's MAC address. 3 Click in the SetIP window to open the TCP/IP configuration window. 4 Enter the network card's MAC address, IP address, subnet mask, default gateway, and then click Apply. NOTE: when you enter the MAC address, enter it without colon(:). 5 The machine prints the network information. Confirm all the settings are correct. 6 Close the SetIP program. Starting the program If you want to change your network printer IP setting, follow the below instruction. 1 Print the machine's network information report which includes your machine's MAC address. 2 Open the Library folder → Printers → Samsung → Your printer model name → SetIP. 3 Double click the SetIPApplet.html file. 4 The certificate window appears, click Trust. 5 Click in the SetIP window to open the TCP/IP configuration window. 6 Enter the network card's MAC address, IP address, subnet mask, default gateway, and then click Apply. when you enter the MAC address, enter it without colon(:). 7 The machine prints the network information. Confirm all the settings are correct. 8 Close the SetIP program. Setting Up the Printer Set up for your printer will be different depending on which cable you use to connect the printer to your computer-the network cable or the USB cable. For a Network-connected NOTE: Some printers do not support a network interface. Before connecting your printer, make sure that your printer supports a network interface by referring to Printer Specifications in your Printer User's Guide. 1 Follow the instructions on "Installing Software" on page 33 to install the PPD and Filter files on your computer. 2 Open the Applications folder → Utilities, and Print Setup Utility. • For MAC OS 10.5~10.6, open System Preferences from the Applications folder, and click Printer & Fax. 3 Click Add on the Printer List. • For MAC OS 10.5~10.6, press the "+" icon then a display window will pop up. 4 For MAC OS 10.3, select the IP Printing tab. • For MAC OS 10.4, click IP Printer. • For MAC OS 10.5~10.6, click IP. 5 Select Socket/HP Jet Direct in Printer Type. WHEN PRINTING A DOCUMENT CONTAINING MANY PAGES, PRINTING PERFORMANCE MAY BE ENHANCED BY CHOOSING SOCKET FOR PRINTER TYPE OPTION. 6 Enter the printer's IP address in the Printer Address field. 7 Enter the queue name in the Queue Name field. If you cannot determine the queue name for your printer server, try using the default queue first. 8 For MAC OS 10.3, if Auto Select does not work properly, select Samsung in Printer Model and your printer name in Model Name. • For MAC OS 10.4, if Auto Select does not work properly, select Samsung in Print Using and your printer name in Model. • For MAC OS 10.5~10.6, if Auto Select does not work properly, select Select a driver to use... and your printer name in Print Using. Your printer's IP address appears on the Printer List, and is set as the default printer. 9 Click Add. 34 Using Your Printer with a Macintosh
-
 1
1 -
2
-
3
-
4
-
5
-
6
-
7
-
8
-
9
-
10
-
11
-
12
-
13
-
14
-
15
-
16
-
17
-
18
-
19
-
20
-
21
-
22
-
23
-
24
-
25
-
26
-
27
-
28
-
29
-
30
-
31
-
32
-
33
-
34
-
35
-
36
-
37
-
38
-
39
-
40
-
41
-
42
-
43
-
44
-
45
-
46
-
47
-
48
-
49
-
50
-
51
-
52
-
53
-
54
-
55
-
56
-
57
-
58
-
59
-
60
-
61
-
62
-
63
-
64
-
65
-
66
-
67
-
68
-
69
-
70
-
71
-
72
-
73
-
74
-
75
-
76
-
77
-
78
-
79
-
80
-
81
-
82
-
83
-
84
-
85
-
86
-
87
-
88
-
89
-
90
-
91
-
92
-
93
-
94
-
95
-
 96
96 -
 97
97 -
 98
98 -
 99
99 -
 100
100 -
 101
101 -
 102
102 -
 103
103 -
 104
104 -
 105
105 -
 106
106 -
107
 |
 |