Samsung CLP-315 User Manual (ENGLISH) - Page 30
Machine's basic settings, Altitude adjustment, Using the save modes, Auto continue - driver windows 7
 |
UPC - 635753721225
View all Samsung CLP-315 manuals
Add to My Manuals
Save this manual to your list of manuals |
Page 30 highlights
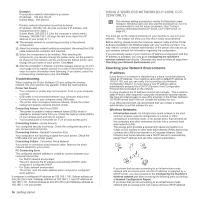
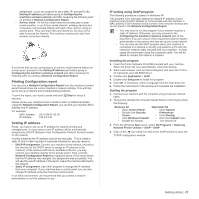
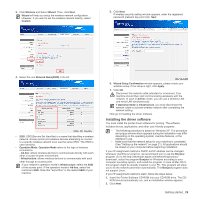
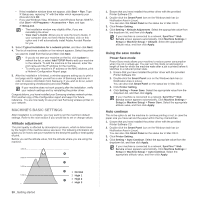
• If the installation window does not appear, click Start > Run. Type X:\Setup.exe, replacing "X" with the letter which represents your drive and click OK. • If you use Windows Vista, Windows 7 and Windows Server 2008 R2, click Start > All Programs > Accessories > Run, and type X:\Setup.exe. • The installation window may slightly differ, if you are reinstalling the driver. • View User's Guide: Allows you to view the User's Guide. If your computer does not have Adobe Acrobat, click on this option and it will automatically install Adobe Acrobat Reader for you. 3. Select Typical installation for a network printer, and then click Next. 4. The list of machines available on the network appears. Select the printer you want to install from the list and then click Next. • If you do not see your machine on the list, click Update to refresh the list, or select Add TCP/IP Port to add your machine to the network. To add the machine to the network, enter the port name and the IP address for the machine. • To verify your machine's IP address or the MAC address, print a Network Configuration Report page. 5. After the installation is finished, a window appears asking you to print a test page and to register yourself as a user of Samsung machines in order to receive information from Samsung. If you wish to do so, select the corresponding checkbox(es) and click Finish. If your machine does not work properly after the installation, verify your network settings and try reinstalling the printer driver. Congratulations, you have installed your Samsung wireless network printer. Print another copy of the Configuration report and keep it for future reference. You are now ready to use your new Samsung wireless printer on your network. MACHINE'S BASIC SETTINGS After installation is complete, you may want to set the machine's default settings. Refer to the next section if you would like to set or change values. Altitude adjustment The print quality is affected by atmospheric pressure, which is determined by the height of the machine above sea level. The following information will guide you on how to set your machine to the best print quality or best quality of print. Before you set the altitude value, find the altitude where you are using the machine. 1. Ensure that you have installed the printer driver with the provided Printer Software CD. 2. Double-click the Smart Panel icon on the Windows task bar (or Notification Area in Linux). You can also click Smart Panel on the status bar in Mac OS X. 3. Click Printer Setting. 4. Click Setting > Altitude Adjustment. Select the appropriate value from the dropdown list, and then click Apply. If your machine is connected to a network, SyncThru™ Web Service screen appears automatically. Click Machine Settings > Setup (or Machine Setup) > Altitude. Select the appropriate altitude value, and then click Apply. Using the save modes Power Save mode Power Save mode allows your machine to reduce power consumption when it is not in actual use. You can turn this mode on and select a length of time for which the machine waits after a job is printed before it switches to a reduced power state. 1. Ensure that you have installed the printer driver with the provided Printer Software CD. 2. Double-click the Smart Panel icon on the Windows task bar (or Notification Area in Linux). You can also click Smart Panel on the status bar in Mac OS X. 3. Click Printer Setting. 4. Click Setting > Power Save. Select the appropriate value from the dropdown list, and then click Apply. If your machine is connected to a network, SyncThru™ Web Service screen appears automatically. Click Machine Settings > Setup (or Machine Setup) > Power Save. Select the appropriate altitude value, and then click Apply. Auto continue This is the option to set the machine to continue printing or not, in case the paper size you have set and the paper within the tray mismatches. 1. Ensure that you have installed the printer driver with the provided Printer Software CD. 2. Double-click the Smart Panel icon on the Windows task bar (or Notification Area in Linux). You can also click Smart Panel on the status bar in Mac OS X. 3. Click Printer Setting. 4. Click Setting > Auto Continue. Select the appropriate value from the dropdown list, and then click Apply. If your machine is connected to a network, SyncThru™ Web Service screen appears automatically. Click Machine Settings > Setup (or Machine Setup) > Auto Continue. Select the appropriate altitude value, and then click Apply. 0 30 _Getting started 1 Normal 2 High 1 3 High 2 4 High 3
-
 1
1 -
2
-
3
-
4
-
5
-
6
-
7
-
8
-
9
-
10
-
11
-
12
-
13
-
14
-
15
-
16
-
17
-
18
-
19
-
20
-
21
-
22
-
23
-
24
-
 25
25 -
 26
26 -
 27
27 -
 28
28 -
 29
29 -
 30
30 -
 31
31 -
 32
32 -
 33
33 -
 34
34 -
 35
35 -
36
-
37
-
38
-
39
-
40
-
41
-
42
-
43
-
44
-
45
-
46
-
47
-
48
-
49
-
50
-
51
-
52
-
53
-
54
-
55
-
56
-
57
-
58
-
59
-
60
-
61
-
62
-
63
-
64
-
65
-
66
-
67
-
68
-
69
-
70
-
71
-
72
-
73
-
74
-
75
-
76
-
77
-
78
-
79
-
80
-
81
-
82
-
83
-
84
-
85
-
86
-
87
-
88
-
89
-
90
-
91
-
92
-
93
-
94
-
95
-
96
-
97
-
98
-
99
-
100
-
101
-
102
-
103
-
104
-
105
-
106
-
107
 |
 |