Samsung CLP-315 User Manual (ENGLISH) - Page 20
Getting started, Setting up the hardware, Printing a demo - print quality
 |
UPC - 635753721225
View all Samsung CLP-315 manuals
Add to My Manuals
Save this manual to your list of manuals |
Page 20 highlights
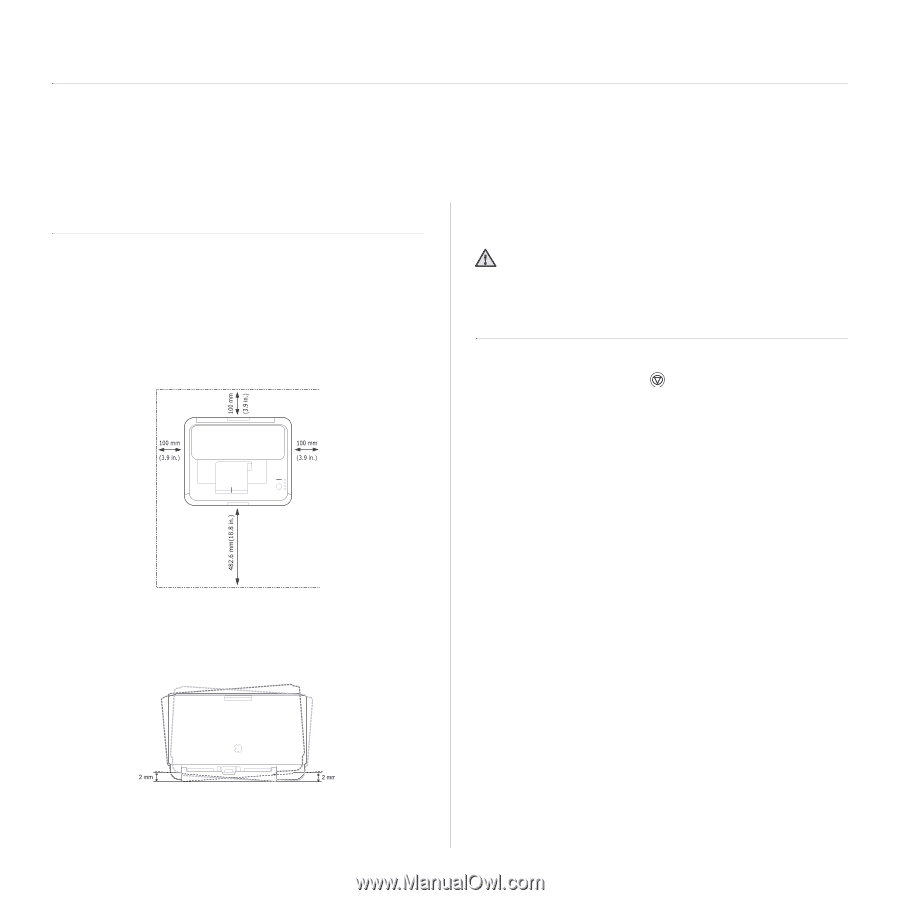
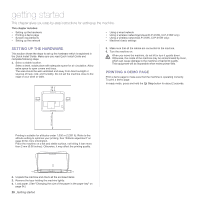
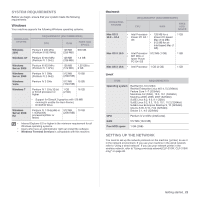
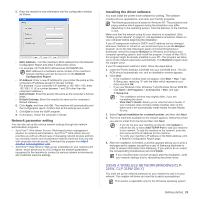
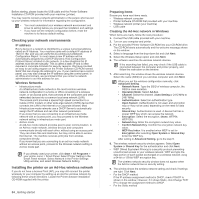
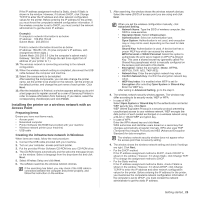
getting started This chapter gives you step-by-step instructions for setting up the machine. This chapter includes: • Setting up the hardware • Printing a demo page • System requirements • Setting up the network • Using a wired network • Using a wireless network(windows/CLP-310W, CLP-315W only) • Using a wireless network(CLP-310W, CLP-315W only) • Machine's basic settings SETTING UP THE HARDWARE This section shows the steps to set up the hardware which is explained in the Quick Install Guide. Make sure you read Quick Install Guide and complete following steps. 1. Select a stable location. Select a level, stable place with adequate space for air circulation. Allow extra space to open covers and trays. The area should be well-ventilated and away from direct sunlight or sources of heat, cold, and humidity. Do not set the machine close to the edge of your desk or table. 5. Make sure that all the cables are connected to the machine. 6. Turn the machine on. When you move the machine, do not tilt or turn it upside down. Otherwise, the inside of the machine may be contaminated by toner, which can cause damage to the machine or bad print quality. This equipment will be inoperable when mains power fails. PRINTING A DEMO PAGE Print a demo page to make sure that the machine is operating correctly. To print a demo page: In ready mode, press and hold the Stop button for about 2 seconds. Printing is suitable for altitudes under 1,000 m (3,281 ft). Refer to the altitude setting to optimize your printing. See "Altitude adjustment" on page 30 for more information. Place the machine on a flat and stable surface, not letting it lean more than 2 mm (0.08 inches). Otherwise, it may affect the printing quality. 2. Unpack the machine and check all the enclosed items. 3. Remove the tape holding the machine tightly. 4. Load paper. (See "Changing the size of the paper in the paper tray" on page 34.) 20 _Getting started
-
 1
1 -
2
-
3
-
4
-
5
-
6
-
7
-
8
-
9
-
10
-
11
-
12
-
13
-
14
-
 15
15 -
 16
16 -
 17
17 -
 18
18 -
 19
19 -
 20
20 -
 21
21 -
 22
22 -
 23
23 -
 24
24 -
 25
25 -
26
-
27
-
28
-
29
-
30
-
31
-
32
-
33
-
34
-
35
-
36
-
37
-
38
-
39
-
40
-
41
-
42
-
43
-
44
-
45
-
46
-
47
-
48
-
49
-
50
-
51
-
52
-
53
-
54
-
55
-
56
-
57
-
58
-
59
-
60
-
61
-
62
-
63
-
64
-
65
-
66
-
67
-
68
-
69
-
70
-
71
-
72
-
73
-
74
-
75
-
76
-
77
-
78
-
79
-
80
-
81
-
82
-
83
-
84
-
85
-
86
-
87
-
88
-
89
-
90
-
91
-
92
-
93
-
94
-
95
-
96
-
97
-
98
-
99
-
100
-
101
-
102
-
103
-
104
-
105
-
106
-
107
 |
 |