Samsung CLX-3175FW User Manual (ENGLISH) - Page 116
Control panel overview, Introduction
 |
UPC - 635753710373
View all Samsung CLX-3175FW manuals
Add to My Manuals
Save this manual to your list of manuals |
Page 116 highlights
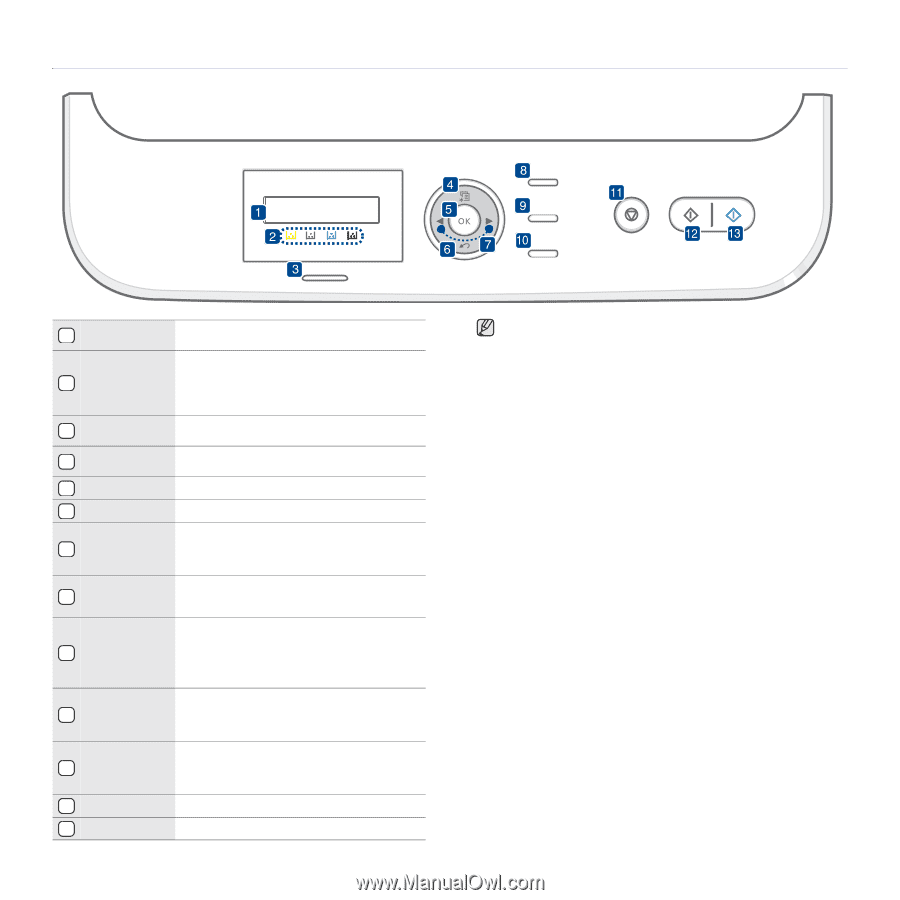
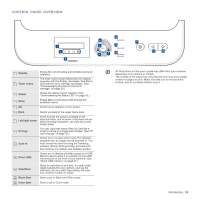
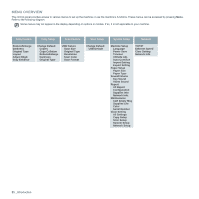
CONTROL PANEL OVERVIEW 1 Display 2 Toner colors 3 Status 4 Menu 5 OK 6 Back 7 Left/right arrow 8 ID Copy 9 Scan to 10 Direct USB 11 Stop/Clear 12 Black Start 13 Color Start Shows the current status and prompts during an operation. The toner colors shown below the LCD display co-works with the display messages. See Status LED with the toner cartridge messages. (See "Acknowledging the status of the toner cartridge" on page 20.) Shows the status of your machine. (See "Understanding the Status LED" on page 20.) Enters Menu mode and scrolls through the available menus. Confirms the selection on the screen. Sends you back to the upper menu level. Scroll through the options available in the selected menu, and increase or decrease values. When entering characters, use right key to add empty space. You can copy both sides of the ID Card like a driver's license to a single side of paper. (See "ID card copying" on page 35.) Allows you to access a list of your PC software programs that an image can be scanned to. You must create the scan list using the Samsung software (Printer Settings Utility) provided with this machine. For details, see Software section. Allows you to directly print files stored on a USB Memory device when it is inserted into the USB memory port on the front of your machine. (See "About USB memory" on page 41.) Stops an operation at any time. In ready mode, clears/cancels the copy options, such as the darkness, the document type setting, the copy size, and the number of copies. Starts a job in Black and White mode. Starts a job in Color mode. • All illustrations on this user's guide may differ from your machine depending on its options or models. • The surface of the output tray may become hot if you print a large number of pages at once. Make sure that you do not touch the surface, and do not allow children near it. Introduction_ 19
-
 1
1 -
2
-
3
-
4
-
5
-
6
-
7
-
8
-
9
-
10
-
11
-
12
-
13
-
14
-
15
-
16
-
17
-
18
-
19
-
20
-
21
-
22
-
23
-
24
-
25
-
26
-
27
-
28
-
29
-
30
-
31
-
32
-
33
-
34
-
35
-
36
-
37
-
38
-
39
-
40
-
41
-
42
-
43
-
44
-
45
-
46
-
47
-
48
-
49
-
50
-
51
-
52
-
53
-
54
-
55
-
56
-
57
-
58
-
59
-
60
-
61
-
62
-
63
-
64
-
65
-
66
-
67
-
68
-
69
-
70
-
71
-
72
-
73
-
74
-
75
-
76
-
77
-
78
-
79
-
80
-
81
-
82
-
83
-
84
-
85
-
86
-
87
-
88
-
89
-
90
-
91
-
92
-
93
-
94
-
95
-
96
-
97
-
98
-
99
-
100
-
101
-
102
-
103
-
104
-
105
-
106
-
107
-
108
-
109
-
110
-
 111
111 -
 112
112 -
 113
113 -
 114
114 -
 115
115 -
 116
116 -
 117
117 -
 118
118 -
 119
119 -
 120
120 -
 121
121 -
122
-
123
-
124
-
125
-
126
-
127
-
128
-
129
-
130
-
131
-
132
-
133
-
134
-
135
-
136
-
137
-
138
-
139
-
140
-
141
-
142
-
143
-
144
-
145
-
146
-
147
-
148
-
149
-
150
-
151
-
152
-
153
-
154
-
155
-
156
-
157
-
158
-
159
-
160
-
161
-
162
-
163
-
164
-
165
-
166
-
167
-
168
-
169
-
170
-
171
-
172
-
173
-
174
-
175
-
176
-
177
-
178
-
179
-
180
-
181
-
182
-
183
-
184
-
185
-
186
-
187
-
188
-
189
-
190
-
191
-
192
-
193
-
194
-
195
-
196
-
197
-
198
-
199
-
200
-
201
-
202
-
203
-
204
-
205
-
206
-
207
-
208
-
209
-
210
-
211
-
212
-
213
-
214
-
215
-
216
-
217
-
218
 |
 |