Samsung CLX-3175FW User Manual (ENGLISH) - Page 27
Using a wireless network(Windows/CLX- 3175FW only), Checking your network environments - wireless setup
 |
UPC - 635753710373
View all Samsung CLX-3175FW manuals
Add to My Manuals
Save this manual to your list of manuals |
Page 27 highlights
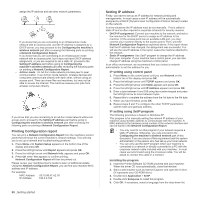
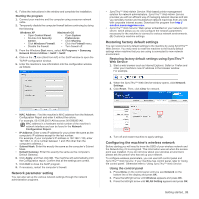
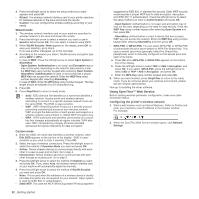
USING A WIRELESS NETWORK(WINDOWS/CLX3175FW ONLY) You must set up the network protocols on your machine to use it on your network. This chapter will show you how this is easily accomplished. This section is applicable only for the Windows operating system. Before starting, please locate the USB cable and the Printer Software Installation CD-ROM provided with your machine (;printer). You may need to contact a network administrator or the person who has set up your wireless network for information regarding the configuration. • You must understand your wireless network environment and know its setting before you proceed the installation and settings. • If you have set the network configuration before, reset the machine to its factory default setting. Checking your network environments IP address Every device in a network is identified by a unique numerical address called an IP Address. Your machine came with a default IP address of 192.0.0.192, and you can verify this by printing out a Network Configuration Report. In most cases a new IP address will be automatically assigned by a DHCP (Dynamic Host Configuration Protocol Server) located on the network. In a few situations the IP address must be set manually. This is called a static IP and is often required in corporate Intranets for security reasons. We have provided an easy to use utility program on the Printer Software CD-ROM named SetIP that can change the address for you. If your machine has a control panel, you may also change the IP address using the control panel. In an office environment, we recommend that you contact a network administrator to set this address for you. Wireless Networks • Infrastructure mode An Infrastructure mode network is the most common wireless network configuration in a home or office consisting of a wireless router, or an access point, that connects all the computers and other networked devices into a common local area network (LAN). The access point provides a special high speed connection to a Cable or DSL modem or other wide area network (WAN) device that connects the LAN to the Internet or a Corporate Intranet. Most Infrastructure mode networks use a DHCP Server to automatically assign the IP address and set other network parameters. If you know that you are connecting to an Infrastructure mode network with an access point, you may proceed to the Wireless network setting in infrastructure mode part. • Ad-hoc mode An Ad-hoc mode network provides peer to peer communication. In an Ad-hoc mode network, wireless devices and computers communicate directly with each other, without using an access point. They can share files and machines, but may not be able to access the Internet. The machine receives print jobs from wireless computers directly. If you know that you are connecting to an ad-hoc mode network without an access point, proceed to the Wireless network setting in Ad-hoc mode part. If you already used your printer, click Start > All Programs > your printer name > Smart Panel. Select Printer Setting in the Smart Panel window. Select Network in the Printer Settings Utility window, and select Wireless Network Setting. Installing the printer on an Ad-Hoc wireless network If you do not have a Access Point (AP), you may still connect the printer wirelessly to your computer by setting up an Ad-Hoc wireless network by following these simple directions. Locate the Printer Sotware installation CD-ROM supplied with the printer. Preparing items Ensure you have next items ready. • Wireless network computer • Printer Software CD-ROM that provided with your machine • Wireless network printer (your machine) • USB cable Creating the Ad-Hoc network in Windows When items are ready, follow the next procedure: 1. Connect the USB cable provided with your machine. 2. Turn on your computer and printer. 3. Put the provided Printer Software CD-ROM into your CD-ROM drive. The CD-ROM starts automatically and the welcome message shows on the window. 4. Select a language from the drop-down list and click Next. 5. Select the Wireless Setup option and click Next. 6. The software searches the wireless network devices. If the searching has failed, you may check if the USB cable is connected between the computer and printer properly, and follow the instruction on the window. 7. After searching, the window shows the wireless network devices. Select the name (SSID) of your wireless computer and click Next. When you set the wireless configuration manually, click Advanced Setting. • Network Name: Type the SSID of wireless computer, the SSID is case-sensitive. • Operation Mode: Select Ad-hoc. • Channel: Select the channel. (Auto Setting or 2412 MHz to 2467 MHz). • Authentication: Select an authentication type. Open System: Authentication is not used, and encryption may or may not be used, depending on the need for data security. Shared Key: Authentication is used. A device that has a proper WEP key which can access the network. • Encryption: Select the encryption. (None, WEP64, WEP128) • Network Key: Enter the encryption network key value. • Confirm Network Key: Confirm the encryption network key value. • WEP Key Index: It is enabled when WEP is set for Encryption after selecting Open System or Shared Key. Enter the WEP key. After setting in Advanced Setting, go to the step 9. 8. The wireless network security window appears. Select Open System or Shared Key for the authentication and click Next. • WEP (Wired Equivalent Privacy) is a security protocol preventing unauthorized access to your wireless network. WEP encrypts the data portion of each packet exchanged on a wireless network using a 64-bit or 128-bit WEP encryption key. The wireless network security window does not appear when the Ad-hoc network has no security setting. Getting started_ 27
-
 1
1 -
2
-
3
-
4
-
5
-
6
-
7
-
8
-
9
-
10
-
11
-
12
-
13
-
14
-
15
-
16
-
17
-
18
-
19
-
20
-
21
-
 22
22 -
 23
23 -
 24
24 -
 25
25 -
 26
26 -
 27
27 -
 28
28 -
 29
29 -
 30
30 -
 31
31 -
 32
32 -
33
-
34
-
35
-
36
-
37
-
38
-
39
-
40
-
41
-
42
-
43
-
44
-
45
-
46
-
47
-
48
-
49
-
50
-
51
-
52
-
53
-
54
-
55
-
56
-
57
-
58
-
59
-
60
-
61
-
62
-
63
-
64
-
65
-
66
-
67
-
68
-
69
-
70
-
71
-
72
-
73
-
74
-
75
-
76
-
77
-
78
-
79
-
80
-
81
-
82
-
83
-
84
-
85
-
86
-
87
-
88
-
89
-
90
-
91
-
92
-
93
-
94
-
95
-
96
-
97
-
98
-
99
-
100
-
101
-
102
-
103
-
104
-
105
-
106
-
107
-
108
-
109
-
110
-
111
-
112
-
113
-
114
-
115
-
116
-
117
-
118
-
119
-
120
-
121
-
122
-
123
-
124
-
125
-
126
-
127
-
128
-
129
-
130
-
131
-
132
-
133
-
134
-
135
-
136
-
137
-
138
-
139
-
140
-
141
-
142
-
143
-
144
-
145
-
146
-
147
-
148
-
149
-
150
-
151
-
152
-
153
-
154
-
155
-
156
-
157
-
158
-
159
-
160
-
161
-
162
-
163
-
164
-
165
-
166
-
167
-
168
-
169
-
170
-
171
-
172
-
173
-
174
-
175
-
176
-
177
-
178
-
179
-
180
-
181
-
182
-
183
-
184
-
185
-
186
-
187
-
188
-
189
-
190
-
191
-
192
-
193
-
194
-
195
-
196
-
197
-
198
-
199
-
200
-
201
-
202
-
203
-
204
-
205
-
206
-
207
-
208
-
209
-
210
-
211
-
212
-
213
-
214
-
215
-
216
-
217
-
218
 |
 |