Samsung CLX-3175FW User Manual (ENGLISH) - Page 19
Control panel overview, On Hook Dial - toner cartridge
 |
UPC - 635753710373
View all Samsung CLX-3175FW manuals
Add to My Manuals
Save this manual to your list of manuals |
Page 19 highlights
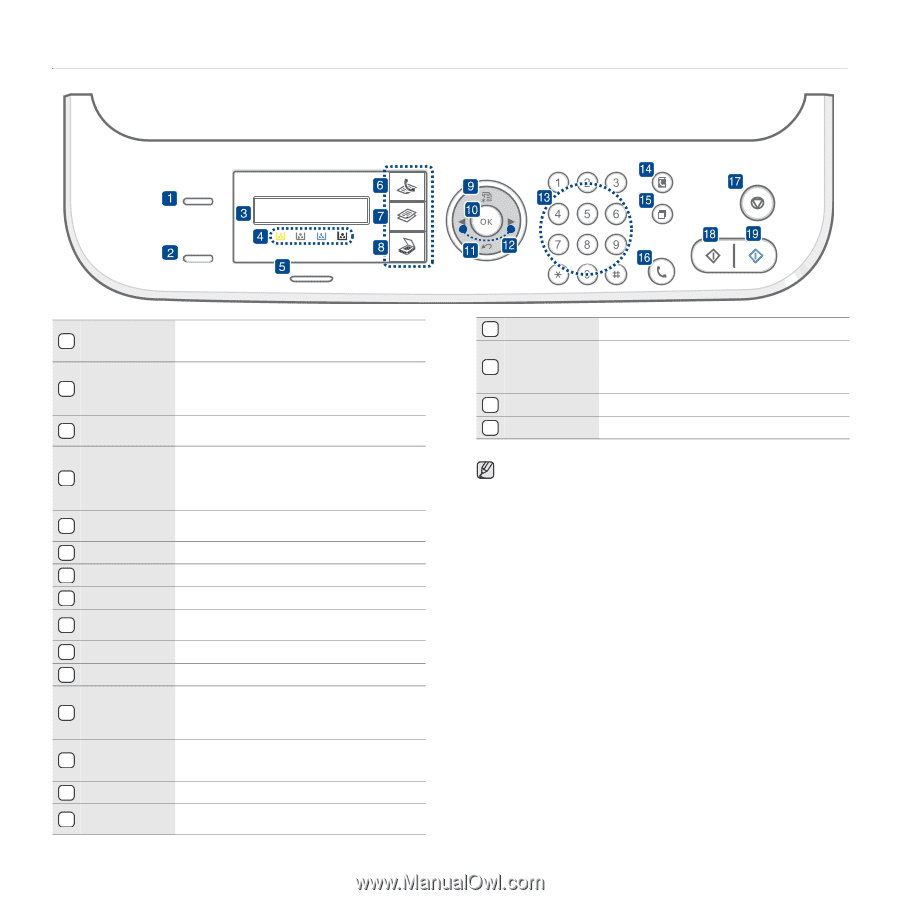
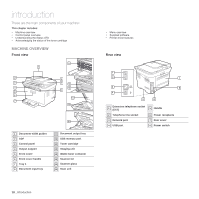
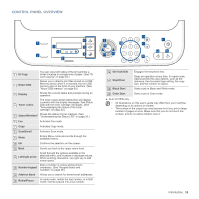
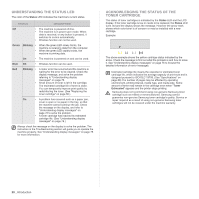
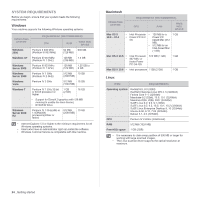
CONTROL PANEL OVERVIEW 1 ID Copy You can copy both sides of the ID Card like a driver's license to a single side of paper. (See "ID card copying" on page 45.) 2 Direct USB Allows you to directly print files stored on a USB Memory device when it is inserted into the USB memory port on the front of your machine. (See "About USB memory" on page 60.) 3 Display Shows the current status and prompts during an operation. 4 Toner colors The toner colors shown below the LCD display co-works with the display messages. See Status LED with the toner cartridge messages. (See "Acknowledging the status of the toner cartridge" on page 20.) 5 Status/Wirelessa Shows the status of your machine. (See "Understanding the Status LED" on page 20.) 6 Fax Activates Fax mode. 7 Copy Activates Copy mode. 8 Scan/Email Activates Scan mode. 9 Menu Enters Menu mode and scrolls through the available menus. 10 OK Confirms the selection on the screen. 11 Back Sends you back to the upper menu level. 12 Left/right arrow Scroll through the options available in the selected menu, and increase or decrease values. When entering characters, use right key to add empty space. Dials a number or enters alphanumeric 13 Number keypad characters. (See "Keypad letters and numbers" on page 36.) 14 Address Book Allows you to search for stored email addresses. 15 Redial/Pause In ready mode, redials the last number, or in Edit mode, inserts a pause into a fax number. 16 On Hook Dial 17 Stop/Clear Engages the telephone line. Stops an operation at any time. In ready mode, clears/cancels the copy options, such as the darkness, the document type setting, the copy size, and the number of copies. 18 Black Start Starts a job in Black and White mode. 19 Color Start Starts a job in Color mode. a. CLX-3175FW only. • All illustrations on this user's guide may differ from your machine depending on its options or models. • The surface of the output tray may become hot if you print a large number of pages at once. Make sure that you do not touch the surface, and do not allow children near it. Introduction_ 19
-
 1
1 -
2
-
3
-
4
-
5
-
6
-
7
-
8
-
9
-
10
-
11
-
12
-
13
-
 14
14 -
 15
15 -
 16
16 -
 17
17 -
 18
18 -
 19
19 -
 20
20 -
 21
21 -
 22
22 -
 23
23 -
 24
24 -
25
-
26
-
27
-
28
-
29
-
30
-
31
-
32
-
33
-
34
-
35
-
36
-
37
-
38
-
39
-
40
-
41
-
42
-
43
-
44
-
45
-
46
-
47
-
48
-
49
-
50
-
51
-
52
-
53
-
54
-
55
-
56
-
57
-
58
-
59
-
60
-
61
-
62
-
63
-
64
-
65
-
66
-
67
-
68
-
69
-
70
-
71
-
72
-
73
-
74
-
75
-
76
-
77
-
78
-
79
-
80
-
81
-
82
-
83
-
84
-
85
-
86
-
87
-
88
-
89
-
90
-
91
-
92
-
93
-
94
-
95
-
96
-
97
-
98
-
99
-
100
-
101
-
102
-
103
-
104
-
105
-
106
-
107
-
108
-
109
-
110
-
111
-
112
-
113
-
114
-
115
-
116
-
117
-
118
-
119
-
120
-
121
-
122
-
123
-
124
-
125
-
126
-
127
-
128
-
129
-
130
-
131
-
132
-
133
-
134
-
135
-
136
-
137
-
138
-
139
-
140
-
141
-
142
-
143
-
144
-
145
-
146
-
147
-
148
-
149
-
150
-
151
-
152
-
153
-
154
-
155
-
156
-
157
-
158
-
159
-
160
-
161
-
162
-
163
-
164
-
165
-
166
-
167
-
168
-
169
-
170
-
171
-
172
-
173
-
174
-
175
-
176
-
177
-
178
-
179
-
180
-
181
-
182
-
183
-
184
-
185
-
186
-
187
-
188
-
189
-
190
-
191
-
192
-
193
-
194
-
195
-
196
-
197
-
198
-
199
-
200
-
201
-
202
-
203
-
204
-
205
-
206
-
207
-
208
-
209
-
210
-
211
-
212
-
213
-
214
-
215
-
216
-
217
-
218
 |
 |