Samsung CLX-3175FW User Manual (ENGLISH) - Page 32
Using SyncThru™ Web Service, Wizard mode, Custom mode, Configuring the printer's wireless network - driver windows 7
 |
UPC - 635753710373
View all Samsung CLX-3175FW manuals
Add to My Manuals
Save this manual to your list of manuals |
Page 32 highlights
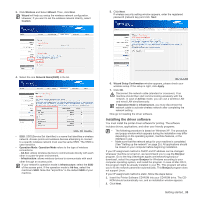
4. Press the left/right arrow to select the setup method you want appears and press OK. • Wizard: The wireless network interface card in your printer searches for wireless networks in the area and shows the results. • Custom: You can configure the wireless settings according to your needs. Wizard mode 1. The wireless network interface card on your machine searches for wireless network in the area and shows the results. 2. Press the left/right arrow to select a network you want to use in Search List and press OK. You can select a network using SSID. 3. When WLAN Security None appears on the display, press OK to save your selection. go to step 6. If you see another messages, go to the next step. 4. According to the network you select, WLAN security encryption type will be WEP or WPA. • In case of WEP, Press the left/right arrow to selcet Open System or SharedKey. - Open System: Authentication is not used, and Encryption may or may not be used, depending on the need for data security. Enter the WEP Key using number keypad after selecting Open System. - SharedKey: Authentication is used. A device that has a proper WEP Key can access the network. Enter the WEP Key using number keypad after selecting SharedKey. • In case of WPA, Enter the WPA Key using number keypad. The Key length should be between 8 to 63 characters long. 5. Press OK. 6. Press Stop/Clear to return to ready mode. • SSID: SSID (Service Set Identifier) is a name that identifies a wireless network. Access points and wireless devices attempting to connect to a specific wireless network must use the same SSID. The SSID is case-sensitive. • WEP : WEP (Wired Equivalent Privacy) is a security protocol preventing unauthorized access to your wireless network. WEP encrypts the data portion of each packet exchanged on a wireless network using a 64-bit or 128-bit WEP encryption key. • WPA : WPA authorizes and identifies users based on a secret key that changes automatically at regular intervals. WPA also uses TKIP (Temporal Key Integrity Protocol) and AES (Advanced Encryption Standard) for data encryption. Custom mode 1. Enter the SSID, the name that identifies a wireless network, when Edit SSID appears on the top line of the display. SSID is casesensitive so you need to enter it carefully. Press OK. 2. Select the type of wireless connections. Press the left/right arrow to select the method of Operation Mode you want and press OK. • Ad-hoc: Allows wireless devices to communicate directly with each other in a peer-to-peer environment. Go to step 4. • Infrastructure: Allows wireless devices to communicate with each other through an access point. Go to step 5. 3. Press the left/right arrow to select the method of Channel you want and press OK. If you select Auto, the wireless network interface card on your machine will automatically adjust the channels. 4. Press the left/right arrow to select the method of WLAN Security you want and press OK. • None: This is used when the validation of a wireless device's identity and data encryption are not required for your network. Open system is used for IEEE 802.11 authentication. • Static WEP: This uses the WEP (Wired Equivalent Privacy) algorithm 32 _Getting started suggested by IEEE 802.11 standard for security. Static WEP security mode requires a proper WEP key for data encryption, decryption, and IEEE 802.11 authentication. Press the left/right arrow to select the setup method you want in Authentication and press OK. - Open System: Authentication is not used, and encryption may or may not be used, depending on the need for data security. Enter the WEP Key using number keypad after selecting Open System and then press OK. - SharedKey: Authentication is used. A device that has a proper WEP key can access the network. Enter the WEP Key using number keypad after selecting SharedKey and then press OK. • WPA-PSK or WPA2-PSK: You can select WPA-PSK or WPA2-PSK to authenticate the print server based on WPA Pre-Shared Key. This uses a shared secret key (generally called Pre Shared Key passphrase) which is manually configured on the access point and each of its clients. a. Press OK when WPA-PSK or WPA2-PSK appears on the bottom line of the display. b. Press the left/right arrow to select TKIP or AES in Encryption and press OK. If you select WPA2-PSK, press the left/right arrow to select AES or TKIP + AES in Encryption and press OK. c. Enter the WPA Key using number keypad and press OK. 5. When you have finished, press Stop/Clear to return to the ready mode. If you do not know about your wireless environment, please ask the network administrator. Now go to Installing the driver software. Using SyncThru™ Web Service Before starting wireless parameter configuration, make sure cable connection status. Configuring the printer's wireless network 1. Start a web browser such as Internet Explorer, Safari or Firefox and enter your machine's new IP address in the browser window. For example, 2. When the SyncThru Web Service window opens, click Network Settings.
-
 1
1 -
2
-
3
-
4
-
5
-
6
-
7
-
8
-
9
-
10
-
11
-
12
-
13
-
14
-
15
-
16
-
17
-
18
-
19
-
20
-
21
-
22
-
23
-
24
-
25
-
26
-
 27
27 -
 28
28 -
 29
29 -
 30
30 -
 31
31 -
 32
32 -
 33
33 -
 34
34 -
 35
35 -
 36
36 -
 37
37 -
38
-
39
-
40
-
41
-
42
-
43
-
44
-
45
-
46
-
47
-
48
-
49
-
50
-
51
-
52
-
53
-
54
-
55
-
56
-
57
-
58
-
59
-
60
-
61
-
62
-
63
-
64
-
65
-
66
-
67
-
68
-
69
-
70
-
71
-
72
-
73
-
74
-
75
-
76
-
77
-
78
-
79
-
80
-
81
-
82
-
83
-
84
-
85
-
86
-
87
-
88
-
89
-
90
-
91
-
92
-
93
-
94
-
95
-
96
-
97
-
98
-
99
-
100
-
101
-
102
-
103
-
104
-
105
-
106
-
107
-
108
-
109
-
110
-
111
-
112
-
113
-
114
-
115
-
116
-
117
-
118
-
119
-
120
-
121
-
122
-
123
-
124
-
125
-
126
-
127
-
128
-
129
-
130
-
131
-
132
-
133
-
134
-
135
-
136
-
137
-
138
-
139
-
140
-
141
-
142
-
143
-
144
-
145
-
146
-
147
-
148
-
149
-
150
-
151
-
152
-
153
-
154
-
155
-
156
-
157
-
158
-
159
-
160
-
161
-
162
-
163
-
164
-
165
-
166
-
167
-
168
-
169
-
170
-
171
-
172
-
173
-
174
-
175
-
176
-
177
-
178
-
179
-
180
-
181
-
182
-
183
-
184
-
185
-
186
-
187
-
188
-
189
-
190
-
191
-
192
-
193
-
194
-
195
-
196
-
197
-
198
-
199
-
200
-
201
-
202
-
203
-
204
-
205
-
206
-
207
-
208
-
209
-
210
-
211
-
212
-
213
-
214
-
215
-
216
-
217
-
218
 |
 |