Samsung FPT5894 User Manual (ENGLISH) - Page 17
Connecting a Digital Audio System, Connecting an Amplifier/DVD Home Theater - problems
 |
UPC - 036725258945
View all Samsung FPT5894 manuals
Add to My Manuals
Save this manual to your list of manuals |
Page 17 highlights
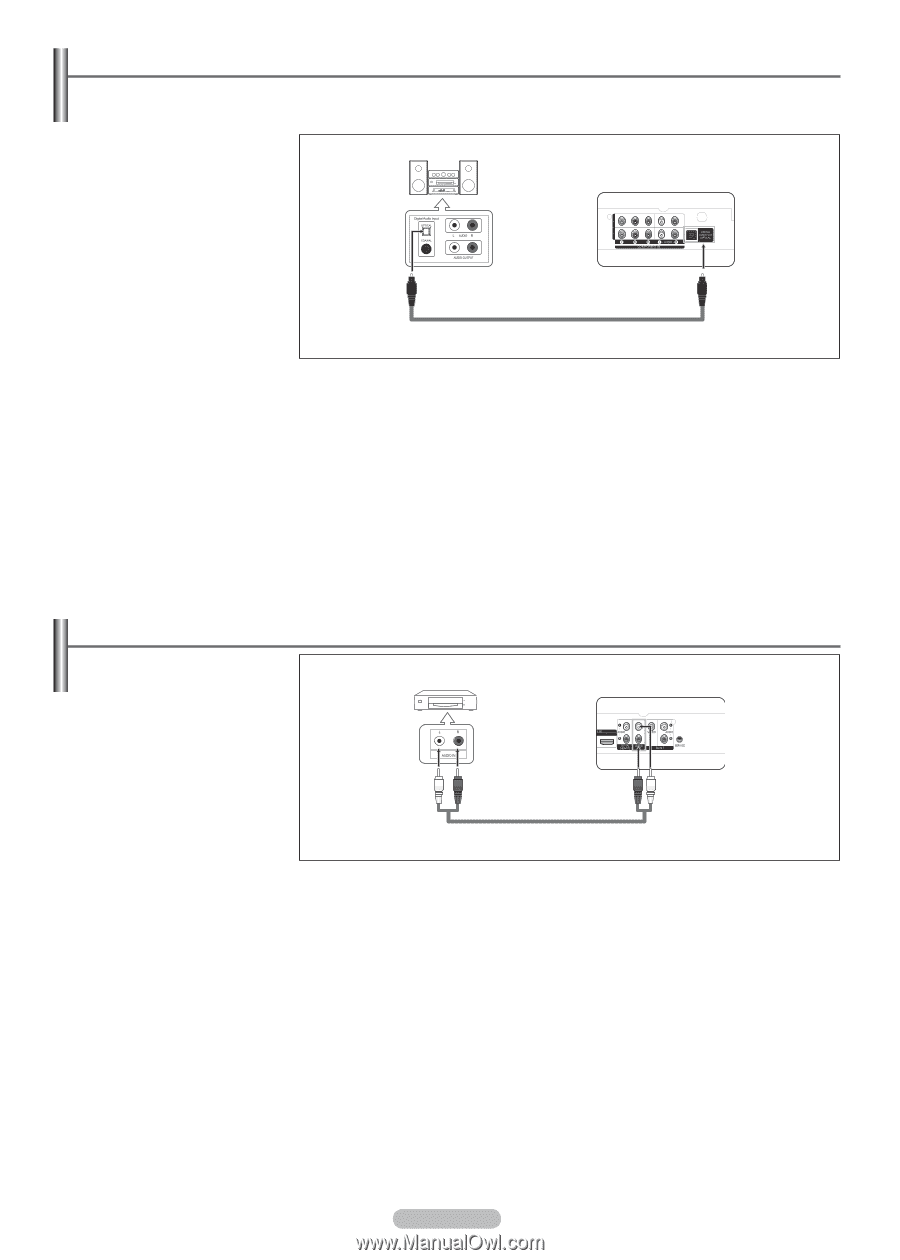
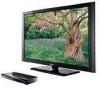
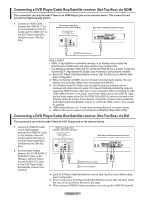
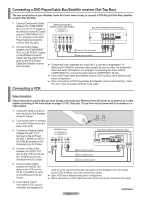
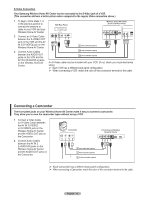
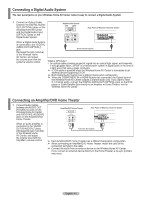
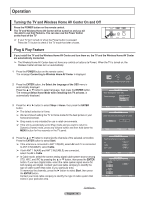
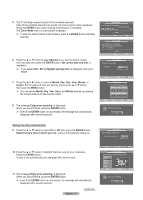
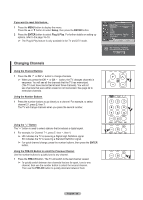
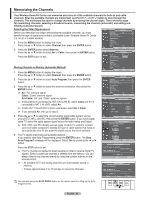
Connecting a Digital Audio System The rear panel jacks on your Wireless Home AV Center make it easy to connect a Digital Audio System. 1 Connect an Optical Cable between the DIGITAL AUDIO OUT (OPTICAL) jacks on the Wireless Home AV Center and the Digital Audio Input (OPTICAL) jacks on the Digital Audio System. Digital Audio System Rear Panel of Wireless Home AV Center When a Digital Audio System is connected to the "DIGITAL AUDIO OUT (OPTICAL)" jack: Decrease the gain (volume) of the Wireless Home AV Center, and adjust the volume level with the system's volume control. Optical Cable (Not supplied) What is OPTICAL? • An optical cable converts an electric signal into an optical light signal, and transmits it through glass fibers. S/PDIF is a transmission system of digital audio in the form of a light wave that uses a glass conductor. ➢ 5.1CH audio is possible when the Wireless Home AV Center is connected to an external device supporting 5.1CH. ➢ Each Digital Audio System has a different back panel configuration. ➢ When the COMPONENT IN or HDMI IN jacks are connected, the Optical jack on the Wireless Home AV Center outputs 2 channel audio only. If you want to hear 5.1 channel audio, connect the DIGITAL AUDIO OUT (OPTICAL) jack on the DVD player or Cable/Satellite Box directly to an Amplifier or Home Theater, not the Wireless Home AV Center. Connecting an Amplifier/DVD Home Theater 1 Connect Audio Cables between the AUDIO OUT [R-AUDIO-L] jacks on the Wireless Home AV Center and AUDIO IN [L-AUDIO-R] jacks on the Amplifier/DVD Home Theater. Amplifier/DVD Home Theater Rear Panel of Wireless Home AV Center When an audio amplifier is connected to the "AUDIO OUT [R-AUDIO-L]" jacks: Decrease the gain (volume) of the Wireless Home AV Center, and adjust the volume level with the Amplifier's volume control. Audio Cable (Not supplied) ➢ Each Amplifier/DVD Home Theater has a different back panel configuration. ➢ When connecting an Amplifier/DVD Home Theater, match the color of the connection terminal to the cable. ➢ Connect the audio from an external device to the Wireless Home AV Center. If you connect an external device directly to the Home Theater, a lip-sync problem may occur. English - 17
-
 1
1 -
2
-
3
-
4
-
5
-
6
-
7
-
8
-
9
-
10
-
11
-
 12
12 -
 13
13 -
 14
14 -
 15
15 -
 16
16 -
 17
17 -
 18
18 -
 19
19 -
 20
20 -
 21
21 -
 22
22 -
23
-
24
-
25
-
26
-
27
-
28
-
29
-
30
-
31
-
32
-
33
-
34
-
35
-
36
-
37
-
38
-
39
-
40
-
41
-
42
-
43
-
44
-
45
-
46
-
47
-
48
-
49
-
50
-
51
-
52
-
53
-
54
-
55
-
56
-
57
-
58
-
59
-
60
-
61
-
62
-
63
-
64
-
65
-
66
-
67
-
68
-
69
-
70
-
71
-
72
-
73
-
74
-
75
-
76
-
77
-
78
-
79
-
80
 |
 |