Samsung GT-P7510/M32 User Manual Ver.f3 (English) - Page 88
Viewing Photos with the Image Viewer, to use Social Hub, Picasa
 |
View all Samsung GT-P7510/M32 manuals
Add to My Manuals
Save this manual to your list of manuals |
Page 88 highlights
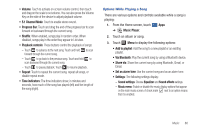
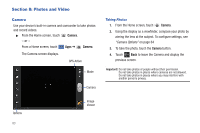
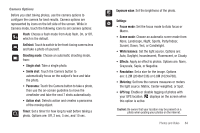
Viewing Photos with the Image Viewer After taking a photo, use the Image Viewer to view, share, delete, or edit photos. 1. Touch Image Viewer to view the photo. 2. Touch the screen to show or hide Image Viewer options. 3. Touch the screen with two fingers or double-tap on the screen to zoom all the way in or out. For more information, refer to "Pinch" on page 17. 4. Sweep across the screen to display the next or previous photo. The current photo is outlined in the thumbnails at the bottom of the screen. Touch a thumbnail to view the photo it represents. 5. Touch Slideshow to view a slideshow of your photos. Touch the screen to stop the slideshow and view the photo being displayed. 6. Touch Share to use Social Hub, Picasa, Bluetooth, Gmail, or Email to share the photo. 7. Touch Delete to delete the photo being displayed. Touch Confirm Delete to delete the photo or Cancel to exit. 85 8. Touch Menu to display the following options: • Details: Provides details about the photo such as Title, Time, Location, Width, Height, File Size, and so on. Touch the X to close the pop-up. Note: Photos are stored in the /Root/DCIM/Camera folder as jpg files. • Show on map: This option displays if a Location exists for the photo. A Location is added to the photo if GPS tag is set On in the Camera settings. Touch this option to open the Map app and display the Location where the photo was taken. For more information, refer to "Camera Options" on page 84. Caution!: Be aware that your location may be present on a photo when posting your photos on the internet. • Rotate Left: Allows you to rotate the picture counterclockwise 90 degrees. • Rotate Right: Allows you to rotate the picture clockwise 90 degrees. • Set picture as: Assign the photo as a Contact icon or Wallpaper. • Crop: Allows you to crop the image. Touch and drag the crop box or the sides or corners of the crop box to create the crop area, then touch Ok. Touch X to stop without cropping the picture. • Print: Print the current photo to a Samsung printer. • Copy: Copy the current photo to the clipboard.
-
 1
1 -
2
-
3
-
4
-
5
-
6
-
7
-
8
-
9
-
10
-
11
-
12
-
13
-
14
-
15
-
16
-
17
-
18
-
19
-
20
-
21
-
22
-
23
-
24
-
25
-
26
-
27
-
28
-
29
-
30
-
31
-
32
-
33
-
34
-
35
-
36
-
37
-
38
-
39
-
40
-
41
-
42
-
43
-
44
-
45
-
46
-
47
-
48
-
49
-
50
-
51
-
52
-
53
-
54
-
55
-
56
-
57
-
58
-
59
-
60
-
61
-
62
-
63
-
64
-
65
-
66
-
67
-
68
-
69
-
70
-
71
-
72
-
73
-
74
-
75
-
76
-
77
-
78
-
79
-
80
-
81
-
82
-
 83
83 -
 84
84 -
 85
85 -
 86
86 -
 87
87 -
 88
88 -
 89
89 -
 90
90 -
 91
91 -
 92
92 -
 93
93 -
94
-
95
-
96
-
97
-
98
-
99
-
100
-
101
-
102
-
103
-
104
-
105
-
106
-
107
-
108
-
109
-
110
-
111
-
112
-
113
-
114
-
115
-
116
-
117
-
118
-
119
-
120
-
121
-
122
-
123
-
124
-
125
-
126
-
127
-
128
-
129
-
130
-
131
-
132
-
133
-
134
-
135
-
136
-
137
-
138
-
139
-
140
-
141
-
142
-
143
-
144
-
145
-
146
-
147
-
148
-
149
-
150
-
151
-
152
-
153
-
154
-
155
-
156
-
157
-
158
-
159
-
160
-
161
-
162
-
163
-
164
-
165
-
166
-
167
-
168
-
169
-
170
-
171
-
172
-
173
-
174
-
175
-
176
-
177
-
178
-
179
-
180
-
181
 |
 |
