Samsung Galaxy User Manual - Page 48
Camera Settings, Tracking AF
 |
View all Samsung Galaxy manuals
Add to My Manuals
Save this manual to your list of manuals |
Page 48 highlights
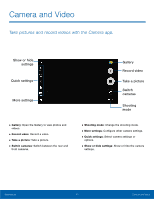
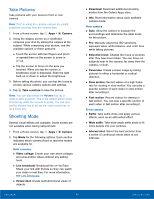
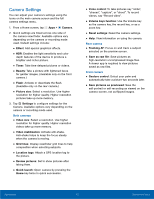
Camera Settings You can adjust your camera's settings using the icons on the main camera screen and the full camera settings menu. 1. From a Home screen, tap Apps > Camera. 2. Quick settings are listed across one side of the camera view finder. Available options vary depending on the camera or recording mode used. Default settings include: • Effect: Add special graphical effects. • HDR: Enables the light sensitivity and color depth features of the device to produce a brighter and richer picture. • Timer: Take time-delayed pictures or videos. • Beauty: Take a picture with lightened faces for gentler images. (Available only on the front camera.) • Flash: Activate or deactivate the flash. (Available only on the rear camera.) • Picture size: Select a resolution. Use higher resolution for higher quality. Higher resolution pictures take up more memory. 3. Tap Settings to configure settings for the Camera. Available options vary depending on the camera or recording mode used. Both cameras • Video size: Select a resolution. Use higher resolution for higher quality. Higher resolution videos take up more memory. • Video stabilization: Activate anti-shake. Anti-shake helps to keep the focus steady when the camera is moving. • Grid lines: Display viewfinder grid lines to help composition when selecting subjects. • Location tags: Attach a GPS location tag to the picture. • Review pictures: Set to show pictures after taking them. • Quick launch: Open camera by pressing the Home key twice in quick succession. • Voice control: To take pictures say "smile", "cheese", "capture", or "shoot". To record videos, say "Record video". • Volume keys function: Use the Volume key as the camera key, the record key, or as a zoom key. • Reset settings: Reset the camera settings. • Help: View information on using the camera. Rear camera • Tracking AF: Focus on and track a subject selected on the preview screen. • Save as raw file: Save pictures as high-resolution uncompressed image files. A viewer app is required to view pictures saved as raw files. Front camera • Gesture control: Detect your palm and automatically take a picture two seconds later. • Save pictures as previewed: Save the self-portrait or self-recording as viewed on the camera screen, not as flipped images. Applications 43 Camera and Video
-
 1
1 -
2
-
3
-
4
-
5
-
6
-
7
-
8
-
9
-
10
-
11
-
12
-
13
-
14
-
15
-
16
-
17
-
18
-
19
-
20
-
21
-
22
-
23
-
24
-
25
-
26
-
27
-
28
-
29
-
30
-
31
-
32
-
33
-
34
-
35
-
36
-
37
-
38
-
39
-
40
-
41
-
42
-
 43
43 -
 44
44 -
 45
45 -
 46
46 -
 47
47 -
 48
48 -
 49
49 -
 50
50 -
 51
51 -
 52
52 -
 53
53 -
54
-
55
-
56
-
57
-
58
-
59
-
60
-
61
-
62
-
63
-
64
-
65
-
66
-
67
-
68
-
69
-
70
-
71
-
72
-
73
-
74
-
75
-
76
-
77
-
78
-
79
-
80
-
81
-
82
-
83
-
84
-
85
-
86
-
87
-
88
-
89
-
90
-
91
-
92
-
93
-
94
-
95
-
96
-
97
-
98
-
99
-
100
-
101
-
102
-
103
-
104
-
105
-
106
-
107
-
108
-
109
-
110
-
111
-
112
-
113
-
114
-
115
-
116
-
117
-
118
-
119
-
120
-
121
-
122
 |
 |