Samsung Galaxy User Manual - Page 9
Assemble Your Device, This helps you - note 6
 |
View all Samsung Galaxy manuals
Add to My Manuals
Save this manual to your list of manuals |
Page 9 highlights
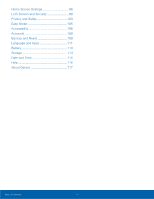
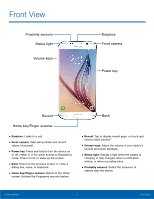
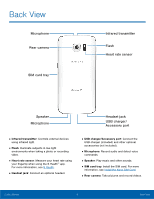
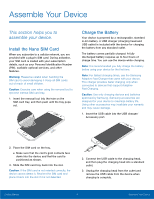
Assemble Your Device This section helps you to assemble your device. Install the Nano SIM Card When you subscribe to a cellular network, you are provided with a plug-in SIM card. During activation, your SIM card is loaded with your subscription details, such as your Personal Identification Number (PIN), available optional services, and other features. Warning: Please be careful when handling the SIM card to avoid damaging it. Keep all SIM cards out of reach of small children. Caution: Exercise care when using the removal tool to eject the internal SIM card tray. 1. Insert the removal tool into the hole on the SIM card tray, and then push until the tray pops out. Charge the Battery Your device is powered by a rechargeable, standard Li-Ion battery. A USB charger (charging head and USB cable) is included with the device for charging the battery from any standard outlet. The battery comes partially charged. A fully discharged battery requires up to four hours of charge time. You can use the device while charging. Note: It is recommended you fully charge the battery before using your device for the first time. Note: For fastest charging times, use the Samsung Adaptive Fast Charger that came with your device. This charger provides faster charging only when connected to devices that support Adaptive Fast Charging. Caution: Use only charging devices and batteries approved by Samsung. Samsung accessories are designed for your device to maximize battery life. Using other accessories may invalidate your warranty and may cause damage. 1. Insert the USB cable into the USB charger/ Accessory port. 2. Place the SIM card on the tray. • Make sure that the card's gold contacts face down into the device and that the card is positioned as shown. 3. Slide the SIM card tray back into the slot. Caution: If the SIM card is not inserted correctly, the device cannot detect it. Reorient the SIM card and place it back into the slot if it is not detected. 2. Connect the USB cable to the charging head, and then plug the charging head into a standard outlet. 3. Unplug the charging head from the outlet and remove the USB cable from the device when charging is complete. Getting Started 4 Assemble Your Device
-
 1
1 -
2
-
3
-
 4
4 -
 5
5 -
 6
6 -
 7
7 -
 8
8 -
 9
9 -
 10
10 -
 11
11 -
 12
12 -
 13
13 -
 14
14 -
15
-
16
-
17
-
18
-
19
-
20
-
21
-
22
-
23
-
24
-
25
-
26
-
27
-
28
-
29
-
30
-
31
-
32
-
33
-
34
-
35
-
36
-
37
-
38
-
39
-
40
-
41
-
42
-
43
-
44
-
45
-
46
-
47
-
48
-
49
-
50
-
51
-
52
-
53
-
54
-
55
-
56
-
57
-
58
-
59
-
60
-
61
-
62
-
63
-
64
-
65
-
66
-
67
-
68
-
69
-
70
-
71
-
72
-
73
-
74
-
75
-
76
-
77
-
78
-
79
-
80
-
81
-
82
-
83
-
84
-
85
-
86
-
87
-
88
-
89
-
90
-
91
-
92
-
93
-
94
-
95
-
96
-
97
-
98
-
99
-
100
-
101
-
102
-
103
-
104
-
105
-
106
-
107
-
108
-
109
-
110
-
111
-
112
-
113
-
114
-
115
-
116
-
117
-
118
-
119
-
120
-
121
-
122
 |
 |