Samsung HT-C6930W User Manual (user Manual) (ver.2.0) (English) - Page 43
Setting Up the Wireless Network, Connection - PBCWPS, Connection - Auto Network Search, IP Address - remote code
 |
UPC - 036725617292
View all Samsung HT-C6930W manuals
Add to My Manuals
Save this manual to your list of manuals |
Page 43 highlights
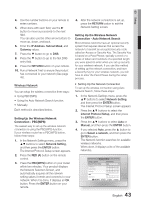
4. Use the number buttons on your remote to enter numbers. 5. When done with each field, use the ► button to move successively to the next field. You can also use the other arrow buttons to move up, down, and back. 6. Enter the IP Address, Subnet Mask, and Gateway values. 7. Press the ▼ button to go to DNS. 8. Press the ▼ button to go to the first DNS entry field. 9. Press the RETURN button on your remote. 10. Run a Network Test to ensure the product has connected to your network (See page 45). Wireless Network You can setup the wireless connection three ways: • Using PBC(WPS) • Using the Auto Network Search function. • Manually. Each method is described below. Setting Up the Wireless Network Connection - PBC(WPS) The easiest way to set up the wireless network connection is using the PBC(WPS) function. If your wireless router has a PBC(WPS) button, follow these steps: 1. In the Network Settings menu, press the ▲▼ buttons to select Network Setting, and then press the ENTER button. The Internet Protocol Setup screen appears. 2. Press the RED (A) button on the remote control. 3. Press the PBC(WPS) button on your router within two minutes. Your product displays the Network Selection Screen, and automatically acquires all the network setting values it needs and connects to your network. When it is done, it displays an OK button. Press the ENTER button on your remote. 4. After the network connection is set up, press the RETURN button to exit the Network Setting screen. Setting Up the Wireless Network Connection - Auto Network Search Most wireless networks have an optional security system that requires devices that access the network to transmit an encrypted security code called an Access or Security Key. The Security Key is based on a Pass Phrase, typically a word or a series of letters and numbers of a specified length you were asked to enter when you set up security for your wireless network. If you use this method of setting up the network connection, and have a Security Key for your wireless network, you will have to enter the Pass Phrase during the setup process. Setting Up the Network Connection To set up the wireless connection using Auto Network Search, follow these steps: 1. In the Network Settings menu, press the ▲▼ buttons to select Network Setting, and then press the ENTER button. The Internet Protocol Setup screen appears. 2. Press the ▲▼ buttons to select the Internet Protocol Setup, and then press the ENTER button. 3. Press the ▲▼ buttons to select Auto or Manual, and then press the ENTER button. 4. If you selected Auto, press the ▲ button to go to Select a network, and then press the ENTER button. The Network function searches for available wireless networks. When done, it displays a list of the available networks. Network Setting Select a network Internet Protocol Setup IP Address Subnet Mask Gateway : Not Selected : Auto \ :0 0 0 0 :0 0 0 0 :0 0 0 0 DNS : Auto DNS Server :0 0 0 0 a PBC(WPS) > Move " Enter ' Return 43 English 03 Setup
-
 1
1 -
2
-
3
-
4
-
5
-
6
-
7
-
8
-
9
-
10
-
11
-
12
-
13
-
14
-
15
-
16
-
17
-
18
-
19
-
20
-
21
-
22
-
23
-
24
-
25
-
26
-
27
-
28
-
29
-
30
-
31
-
32
-
33
-
34
-
35
-
36
-
37
-
 38
38 -
 39
39 -
 40
40 -
 41
41 -
 42
42 -
 43
43 -
 44
44 -
 45
45 -
 46
46 -
 47
47 -
 48
48 -
49
-
50
-
51
-
52
-
53
-
54
-
55
-
56
-
57
-
58
-
59
-
60
-
61
-
62
-
63
-
64
-
65
-
66
-
67
-
68
-
69
-
70
-
71
-
72
-
73
-
74
 |
 |
