Samsung HT-C6930W User Manual (user Manual) (ver.2.0) (English) - Page 44
Setting Up the Wireless Network, Connection - Manual
 |
UPC - 036725617292
View all Samsung HT-C6930W manuals
Add to My Manuals
Save this manual to your list of manuals |
Page 44 highlights
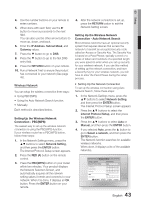
Setup 5. In the list of networks, press the ▲▼ buttons to select a network, and then press the ENTER button. 6. If the PIN/Security pop-up appears, go to Step 7. If the Network Connecting Screen appears, go to Step 11. 7. Press the ▲▼ buttons to select PIN or Security. For most home networks, you would select Security (for Security Key). 8. On the Security screen, enter your network's Pass Phrase. ✎ NOTE You should be able to find the Pass Phrase on one of the set up screens you used to set up your router or modem. Security Key - ABC HIJ OPQ VWX Network Setting DEFG K LMN RSTU YZ 0 entered 0~9 Number a Lower case b Delete space Move " Enter ' Return 9. To enter the Pass Phrase, follow these general directions: • Press the number keys on your remote to enter numbers. • Use the arrow keys on your remote to move from button to button on the Security Key screen. • Pressing the RED (A) button on the remote lets you change the text displayed on the buttons to lower case, upper case, numbers, or icons. To enter a letter or symbol, move the cursor to the letter or symbol, and then press the ENTER button. • To delete the last letter or number you entered, press the GREEN (B) button. 10. When done, press the BLUE (D) button on your remote, and then press the ENTER button. 11. Wait until the connection confirmation message is displayed, and then press the ENTER button. The Network Settings screen reappears. 12. To test the connection, press the ▼ button to select Network Test, and then press the ENTER button. Setting Up the Wireless Network Connection - Manual If the Auto Setting does not work, you need to enter the Network settng values manually. To get the Network setting values from most Windows computers, follow these steps: 1. Right click the Network icon on the bottom right of the screen. 2. In the pop-up menu, click Status. 3. On the dialog that appears, click the Support tab. 4. On the Support tab, click the Details button. The Network settings are displayed. To Enter the Network settings into your product, follow these steps: 1. On the Internet Protocol Setup screen, press the ENTER button. 2. Press the ▲▼ buttons to select Manual, and then press the ENTER button. 3. Press the ▼ button to go to the first entry field (IP Address). Network Setting Select a network : Not Selected Internet Protocol Setup : Manual \ IP Address :0 0 0 0 Subnet Mask : 255 255 255 0 Gateway :0 0 0 0 DNS DNS Server : Manual :0 0 0 0 a PBC(WPS) > Move " Enter ' Return 44 English 4. Use the number buttons to enter numbers.
-
 1
1 -
2
-
3
-
4
-
5
-
6
-
7
-
8
-
9
-
10
-
11
-
12
-
13
-
14
-
15
-
16
-
17
-
18
-
19
-
20
-
21
-
22
-
23
-
24
-
25
-
26
-
27
-
28
-
29
-
30
-
31
-
32
-
33
-
34
-
35
-
36
-
37
-
38
-
 39
39 -
 40
40 -
 41
41 -
 42
42 -
 43
43 -
 44
44 -
 45
45 -
 46
46 -
 47
47 -
 48
48 -
 49
49 -
50
-
51
-
52
-
53
-
54
-
55
-
56
-
57
-
58
-
59
-
60
-
61
-
62
-
63
-
64
-
65
-
66
-
67
-
68
-
69
-
70
-
71
-
72
-
73
-
74
 |
 |
