Samsung HT-E350 User Manual - Page 15
Connecting the Video Out to your TV, In case of HT-E350
 |
View all Samsung HT-E350 manuals
Add to My Manuals
Save this manual to your list of manuals |
Page 15 highlights
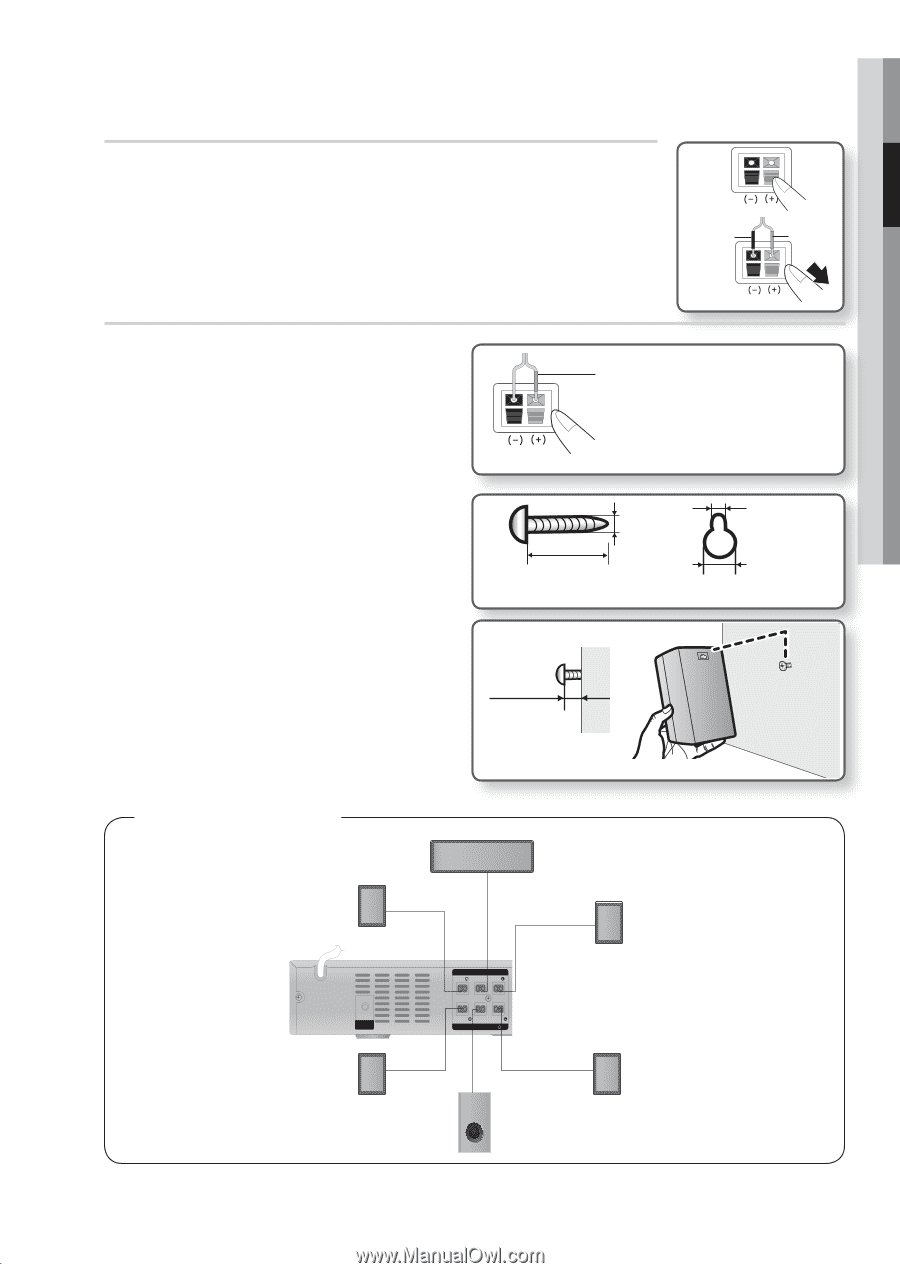
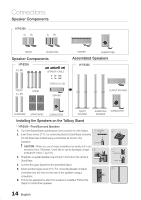
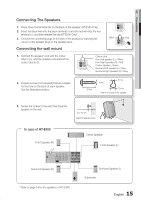
02 Connections Connecting The Speakers 1. Press down the terminal tab on the back of the speaker. (HT-E355 Only) 2. Insert the black wire into the black terminal (-) and the red wire into the red terminal (+), and then release the tab.(HT-E355 Only) 3. Connect the connecting plugs to the back of the product by matching the Black Red colours of the speaker plugs to the speaker jacks. Connecting the wall mount 1. Connect the speaker cord with the colour tube to (+), and the speaker cord without the colour tube to (-). Colour tube Front left speaker (L) : White Front right speaker (R) : Red Center speaker : Green Surround left speaker (L) : Blue Surround right speaker (R) : Gray 2. Prepare screws (not supplied) that are suitable for the hole on the back of each speaker. See the illustrations below. 30 mm 4 mm 5 mm 10 mm Hole on the back of the speaker 3. Fasten the screws to the wall, then hang the speaker on the wall. 8 to 10 mm Depth of fastened screw In case of HT-E350 Front Speaker (R) FA NET (Only For Service) Surround Speaker (R) Center Speaker SPEAKERS OUT AUX FRONT CENTER FRONT IN SURROUND SUBWOOFER SURROUND SPEAKER IMPEDANCE : 3 VIDEO OUT Front Speaker (L) FM ANT HDMI OUT Surround Speaker (L) Subwoofer * Refer to page 14 for the speakers of HT-E355. 15 English
-
 1
1 -
2
-
3
-
4
-
5
-
6
-
7
-
8
-
9
-
 10
10 -
 11
11 -
 12
12 -
 13
13 -
 14
14 -
 15
15 -
 16
16 -
 17
17 -
 18
18 -
 19
19 -
 20
20 -
21
-
22
-
23
-
24
-
25
-
26
-
27
-
28
-
29
-
30
-
31
-
32
-
33
-
34
-
35
-
36
-
37
-
38
-
39
-
40
-
41
-
42
-
43
-
44
-
45
-
46
-
47
-
48
-
49
-
50
-
51
-
52
-
53
-
54
-
55
-
56
-
57
-
58
-
59
-
60
-
61
-
62
-
63
-
64
-
65
-
66
-
67
-
68
-
69
-
70
-
71
-
72
-
73
-
74
-
75
-
76
-
77
-
78
-
79
-
80
-
81
-
82
-
83
-
84
-
85
-
86
-
87
-
88
-
89
-
90
-
91
-
92
-
93
-
94
-
95
-
96
-
97
-
98
-
99
-
100
-
101
-
102
-
103
-
104
-
105
-
106
-
107
-
108
-
109
-
110
-
111
-
112
-
113
-
114
-
115
-
116
-
117
-
118
-
119
-
120
-
121
-
122
-
123
-
124
-
125
-
126
-
127
-
128
-
129
-
130
-
131
-
132
-
133
-
134
-
135
-
136
-
137
-
138
-
139
-
140
-
141
-
142
-
143
-
144
-
145
-
146
-
147
-
148
-
149
-
150
-
151
-
152
-
153
-
154
-
155
-
156
-
157
-
158
-
159
-
160
-
161
-
162
-
163
-
164
 |
 |