Samsung LS40BHPNB/XAA User Manual (ENGLISH) - Page 119
Custom, Color Tone, Color Control, Image Lock
 |
View all Samsung LS40BHPNB/XAA manuals
Add to My Manuals
Save this manual to your list of manuals |
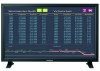
Page 119 highlights
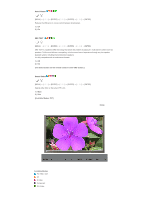
[The direct button on the remote control is the 'M/B' button.] Custom [MENU ENTER ENTER] → [ENTER ENTER] By using the on-screen menus, the contrast and brightness can be changed to your personal preference. 1) Contrast Adjusts the Contrast. 2) Brightness Adjusts the Brightness. Note • By adjusting the picture using the Custom function, MagicBright will change to Custom mode. Color Tone [MENU ENTER ENTER ENTER] The color tones can be changed. 1) Cool 3) Normal 4) Warm 5) Custom (Available in PC, BNC mode only) Color Control [MENU ENTER ENTER] → [ENTER ENTER] Adjusts the individual R, G, B color controls. (Available in PC, BNC mode only) 1) Red 2) Green 3) Blue Note • If you adjust the picture by using the Custom function, Color Tone will turn to the Cusome mode. Image Lock Image Lock is used to fine-tune and get the best image by removing noise that creates unstable images with jitters and shakiness. If satisfactory results are not obtained using the Fine adjustment, use the Coarse adjustment and then use Fine again. (Available in PC, BNC mode only) 1) Coarse [MENU ENTER ENTER] → [ENTER ENTER] Removes noise such as vertical stripes. Coarse adjustment may move the screen image area. You may relocate it to the center using the horizontal control menu. 2) Fine [MENU ENTER ENTER ENTER ENTER] Removes noise such as horizontal stripes. If the noise persists even after fine tuning, repeat it after adjusting the frequency (clock speed). 3) Position
-
 1
1 -
2
-
3
-
4
-
5
-
6
-
7
-
8
-
9
-
10
-
11
-
12
-
13
-
14
-
15
-
16
-
17
-
18
-
19
-
20
-
21
-
22
-
23
-
24
-
25
-
26
-
27
-
28
-
29
-
30
-
31
-
32
-
33
-
34
-
35
-
36
-
37
-
38
-
39
-
40
-
41
-
42
-
43
-
44
-
45
-
46
-
47
-
48
-
49
-
50
-
51
-
52
-
53
-
54
-
55
-
56
-
57
-
58
-
59
-
60
-
61
-
62
-
63
-
64
-
65
-
66
-
67
-
68
-
69
-
70
-
71
-
72
-
73
-
74
-
75
-
76
-
77
-
78
-
79
-
80
-
81
-
82
-
83
-
84
-
85
-
86
-
87
-
88
-
89
-
90
-
91
-
92
-
93
-
94
-
95
-
96
-
97
-
98
-
99
-
100
-
101
-
102
-
103
-
104
-
105
-
106
-
107
-
108
-
109
-
110
-
111
-
112
-
113
-
 114
114 -
 115
115 -
 116
116 -
 117
117 -
 118
118 -
 119
119 -
 120
120 -
 121
121 -
 122
122 -
 123
123 -
 124
124 -
125
-
126
-
127
-
128
-
129
-
130
-
131
-
132
-
133
-
134
-
135
-
136
-
137
-
138
-
139
-
140
-
141
-
142
-
143
-
144
-
145
-
146
-
147
-
148
-
149
-
150
-
151
-
152
-
153
-
154
-
155
-
156
-
157
-
158
-
159
-
160
-
161
-
162
-
163
-
164
-
165
-
166
-
167
-
168
-
169
-
170
-
171
-
172
-
173
-
174
-
175
-
176
 |
 |
