Samsung LS40BHPNB/XAA User Manual (ENGLISH) - Page 81
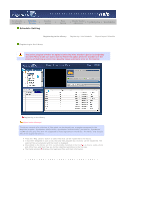
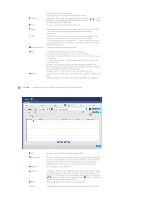
Path : Shows the, Display interval : The time to refresh the monitor screen.
 |
View all Samsung LS40BHPNB/XAA manuals
Add to My Manuals
Save this manual to your list of manuals |
Page 81 highlights
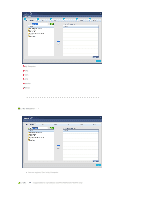
Connect Path Set an address to be registered. (You have to set the shared IP and folder name.) Connect to NFS using the registered nick name and address. If the connection is successfully established, the following ( , ) Open and Add buttons are activated. Shows a successfully connected NFS path. Open Add Registered files File Navigation window appears where you can select a file (TEXT (.txt) data) using the successfully established connection information. Load TEXT(.txt) data of the path set in the File Navigation, copy the data to the server PC and save the data onto the DB. =>In an original text (.txt) data file, "," and "LineFeed" are used as delimeters between cells that are determined during the Multi Screen edit operation. A window that shows DB information. Edit Delete A window appears where you can set Raw data Interval/Interval/Display interval for TEXT(.txt) data. If you select multiple TEXT(.txt) data, only the first data of the list is modified. => Raw data Interval : Time to load original TEXT(.txt) data file into the buffer. Interval : The time to create a file with the data loaded in the buffer by separating the data into the number of columns and rows set during the Multi Screen edit operation. Display interval : The time to refresh the monitor screen. Delete a selected TEXT(.txt) data among the registered TEXT(.txt) data. (Multiple selection by Shift or Ctrl key is supported for deletion) 4. FTP : Supportable for SyncMaster 320PXn/400P(T)Xn/460PXn only FTP Nick Name Address Connect Path Open You can register TEXT(.txt) data through FTP. You can name the nick name of a TEXT(.txt) data to be registered so that it can be used for load and edit operation. (If you register with the same nick name, the existing data, which has been registered with the nick name, is replaced with the new one.) Set an address to be registered. Connect to FTP using the registered nick name and address. A popup window appears where you can enter the ID and password for the FTP. If the connection is successfully established, the following ( , ) Open and Add buttons are activated. ( ) Path : Shows the path of the succefully connected FTP. Shows the path of the succefully connected FTP. File Navigation window appears where you can select a file (TEXT
-
 1
1 -
2
-
3
-
4
-
5
-
6
-
7
-
8
-
9
-
10
-
11
-
12
-
13
-
14
-
15
-
16
-
17
-
18
-
19
-
20
-
21
-
22
-
23
-
24
-
25
-
26
-
27
-
28
-
29
-
30
-
31
-
32
-
33
-
34
-
35
-
36
-
37
-
38
-
39
-
40
-
41
-
42
-
43
-
44
-
45
-
46
-
47
-
48
-
49
-
50
-
51
-
52
-
53
-
54
-
55
-
56
-
57
-
58
-
59
-
60
-
61
-
62
-
63
-
64
-
65
-
66
-
67
-
68
-
69
-
70
-
71
-
72
-
73
-
74
-
75
-
 76
76 -
 77
77 -
 78
78 -
 79
79 -
 80
80 -
 81
81 -
 82
82 -
 83
83 -
 84
84 -
 85
85 -
 86
86 -
87
-
88
-
89
-
90
-
91
-
92
-
93
-
94
-
95
-
96
-
97
-
98
-
99
-
100
-
101
-
102
-
103
-
104
-
105
-
106
-
107
-
108
-
109
-
110
-
111
-
112
-
113
-
114
-
115
-
116
-
117
-
118
-
119
-
120
-
121
-
122
-
123
-
124
-
125
-
126
-
127
-
128
-
129
-
130
-
131
-
132
-
133
-
134
-
135
-
136
-
137
-
138
-
139
-
140
-
141
-
142
-
143
-
144
-
145
-
146
-
147
-
148
-
149
-
150
-
151
-
152
-
153
-
154
-
155
-
156
-
157
-
158
-
159
-
160
-
161
-
162
-
163
-
164
-
165
-
166
-
167
-
168
-
169
-
170
-
171
-
172
-
173
-
174
-
175
-
176
 |
 |
