Samsung SCDC164 User Manual (ENGLISH) - Page 111
Marking Images for Printing(Print Mark), Print Mark
 |
UPC - 036725301528
View all Samsung SCDC164 manuals
Add to My Manuals
Save this manual to your list of manuals |
Page 111 highlights
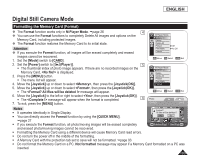
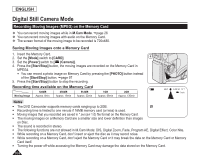
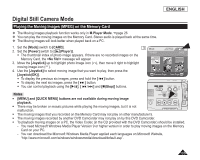
ENGLISH Digital Still Camera Mode Marking Images for Printing (Print Mark) The Print Mark function works only in M.Player Mode. page 26 This DVD Camcorder supports the DPOF (Digital Print Order Format) print format. You can automatically print images recorded on a Memory Card with a printer supporting DPOF. Setting the Print Mark is only available when using a memory card. There are 2 ways to make a Print Mark. - : You can set a print mark on the photo image displayed on the LCD 3 Photo Screen. It can be set up to 999. 100-0001 [1/10] - : To print 1 copy each of all of the stored images. 1. Set the [Mode] switch to [CARD]. 2. Set the [Power] switch to [ (Player)]. The thumbnail index of photo image appears. If there are no recorded images on the Memory Card, the message will appear. 8 3. Use the [Joystick] to search for the photo image that you want to mark. 4. Press the [MENU] button. The menu list will appear. 5. Move the [Joystick] up or down to select , then press the [Joystick(OK)]. 6. Move the [Joystick] up or down to select , then press the [Joystick(OK)]. 7. Move the [Joystick] up or down to select desired option (All Off, All Files or This 9 File), then press the [Joystick(OK)]. 8. If you select , move the [Joystick] up or down to select the quantity, then press the [Joystick(OK)]. 9. To exit, press the [MENU] button. Print Mark icon( ) and number of prints are displayed. Previous Page Next Page M.Player Mode ►Memory Delete Delete All Protect Print Mark Format All Off All Files This File 005 Move OK Select MENU Exit Photo 100-0001 [1/10] 5 Previous Page Next Page 107
-
 1
1 -
2
-
3
-
4
-
5
-
6
-
7
-
8
-
9
-
10
-
11
-
12
-
13
-
14
-
15
-
16
-
17
-
18
-
19
-
20
-
21
-
22
-
23
-
24
-
25
-
26
-
27
-
28
-
29
-
30
-
31
-
32
-
33
-
34
-
35
-
36
-
37
-
38
-
39
-
40
-
41
-
42
-
43
-
44
-
45
-
46
-
47
-
48
-
49
-
50
-
51
-
52
-
53
-
54
-
55
-
56
-
57
-
58
-
59
-
60
-
61
-
62
-
63
-
64
-
65
-
66
-
67
-
68
-
69
-
70
-
71
-
72
-
73
-
74
-
75
-
76
-
77
-
78
-
79
-
80
-
81
-
82
-
83
-
84
-
85
-
86
-
87
-
88
-
89
-
90
-
91
-
92
-
93
-
94
-
95
-
96
-
97
-
98
-
99
-
100
-
101
-
102
-
103
-
104
-
105
-
 106
106 -
 107
107 -
 108
108 -
 109
109 -
 110
110 -
 111
111 -
 112
112 -
 113
113 -
 114
114 -
 115
115 -
 116
116 -
117
-
118
-
119
-
120
-
121
-
122
-
123
-
124
-
125
-
126
-
127
-
128
-
129
-
130
-
131
-
132
-
133
-
134
-
135
-
136
 |
 |
