Samsung SCDC164 User Manual (ENGLISH) - Page 64
Setting the Digital Image Stabilizer(DIS
 |
UPC - 036725301528
View all Samsung SCDC164 manuals
Add to My Manuals
Save this manual to your list of manuals |
Page 64 highlights
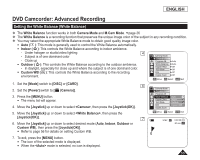
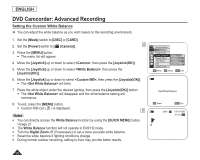
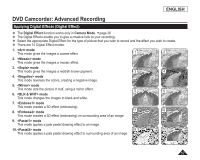
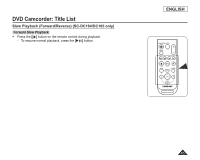
ENGLISH DVD Camcorder: Advanced Recording Setting the Digital Image Stabilizer (DIS) The DIS function works only in Camera Mode. page 26 DIS (Digital Image Stabilizer) is a function that compensates for any shaking or hand movement while holding the DVD Camcorder (within reasonable limits). It provides more stable pictures when: - Recording with the zoom (If the DIS is set, Digital Zoom mode will be released.) - Recording a small object close-up - Recording and walking at the same time - Recording through the window of a vehicle 4 Camera Mode ►Camera Program AE ►Auto 1. Set the [Mode] switch to [DISC]. White Balance ►Auto Digital Effect ►Off 2. Set the [Power] switch to [ (Camera)]. 16:9 Wide DIS ►Off ►Off 3. Press the [MENU] button. Digital Zoom ►Off The menu list will appear. Move OK Select MENU Exit 4. Move the [Joystick] up or down to select , then press the [Joystick(OK)]. 6 5 Move the [Joystick] up or down to select , then press the [Joystick(OK)]. 6. To activate the DIS function, move the [Joystick] up or down to select , then press the [Joystick(OK)]. If you do not want to use the DIS function, set the menu to . 7. To exit, press the [MENU] button. DIS icon ( ) is displayed. Camera Mode ►Camera Program AE White Balance Digital Effect 16:9 Wide DIS Off Digital Zoom On Move OK Select MENU Exit Notes 7 You can directly access the DIS function by using the [QUICK MENU] button. page 27 Digital Zoom, Color Nite, 16:9 Wide, Mosaic, Mirror, Emboss2, or Pastel2 is not available in the DIS mode. It is recommended that you deactivate the DIS function when using a tripod. If you use the DIS function, the picture quality may deteriorate. EASY.Q mode automatically sets the DIS to On. 60 STBY SP 0:00:00 -RW 20 min VR
-
 1
1 -
2
-
3
-
4
-
5
-
6
-
7
-
8
-
9
-
10
-
11
-
12
-
13
-
14
-
15
-
16
-
17
-
18
-
19
-
20
-
21
-
22
-
23
-
24
-
25
-
26
-
27
-
28
-
29
-
30
-
31
-
32
-
33
-
34
-
35
-
36
-
37
-
38
-
39
-
40
-
41
-
42
-
43
-
44
-
45
-
46
-
47
-
48
-
49
-
50
-
51
-
52
-
53
-
54
-
55
-
56
-
57
-
58
-
 59
59 -
 60
60 -
 61
61 -
 62
62 -
 63
63 -
 64
64 -
 65
65 -
 66
66 -
 67
67 -
 68
68 -
 69
69 -
70
-
71
-
72
-
73
-
74
-
75
-
76
-
77
-
78
-
79
-
80
-
81
-
82
-
83
-
84
-
85
-
86
-
87
-
88
-
89
-
90
-
91
-
92
-
93
-
94
-
95
-
96
-
97
-
98
-
99
-
100
-
101
-
102
-
103
-
104
-
105
-
106
-
107
-
108
-
109
-
110
-
111
-
112
-
113
-
114
-
115
-
116
-
117
-
118
-
119
-
120
-
121
-
122
-
123
-
124
-
125
-
126
-
127
-
128
-
129
-
130
-
131
-
132
-
133
-
134
-
135
-
136
 |
 |
