Samsung SNT-1010 User Manual - Page 5
View of SNT-1010 - manual
 |
View all Samsung SNT-1010 manuals
Add to My Manuals
Save this manual to your list of manuals |
Page 5 highlights
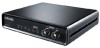
Preparation View of SNT-1010 Front View Rear View Chapter 1 Preparation View of SNT-1010 12 3 4 5 6 7 8 1 Network LED 2 Status LED ( * ) 3 Power LED 4 IP Select Switch 5 Audio IN Port 6 Audio OUT Port 7 Video IN Port 8 Video OUT Port * Status LED (Indicates the operational status of SNT-1010). Green : Normal operation Blinking Green : If the IP setting has failed in DHCP Red : When the file upload is in process or the NTP connection has failed Blinking Red : If SNT-1010 causes a problem or you reset the system to the factory default, the red LED blinks 3 times. Blinking Yellow : When SNT-1010 gets started 8 1 23 4 5 6 7 8 1 FACTORY RESET Button ( * ) 4 Alarm IN Port 2 TX Port 5 Alarm OUT Port 3 RX Port 6 RS-232C Port 7 Ethernet Port 8 Power Port * FACTORY RESET Button : This will return the settings of SNT-1010 to the factory default. Refer to in the user guide. To select an IP address allocation method Slide the [IP Select Switch ] left or right to position it to or . D (Dynamic IP) : Slide the switch to this position for the following cases. - Select this when you install SNT-1010 on the IP sharer and use the DHCP function of the sharer to automatically obtain the IP address. - When SNT-1010 is installed onto an xDSL (e.g.VDSL)or Cable modem supporting DHCP. - When the IP address is automatically allocated by DHCP without manual allocation. S (Static IP) : Slide the switch to this position when you directly enter an IP address using the IP Installer. - The factory default setting is Static IP. - Select this if you are informed of IP address, Gateway and Subnet Mask information. 9
-
 1
1 -
 2
2 -
 3
3 -
 4
4 -
 5
5 -
 6
6 -
 7
7 -
 8
8 -
 9
9 -
 10
10 -
 11
11 -
12
-
13
-
14
-
15
-
16
-
17
-
18
-
19
-
20
-
21
-
22
-
23
-
24
-
25
-
26
-
27
-
28
-
29
-
30
-
31
-
32
-
33
-
34
-
35
-
36
-
37
-
38
-
39
-
40
-
41
-
42
-
43
-
44
-
45
-
46
-
47
-
48
-
49
-
50
-
51
 |
 |
