Sanyo HD2000 Instruction Manual, PLV-HD2000 - Page 46
Troubleshooting
 |
UPC - 086483060502
View all Sanyo HD2000 manuals
Add to My Manuals
Save this manual to your list of manuals |
Page 46 highlights
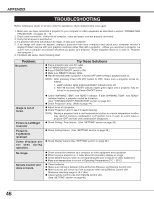
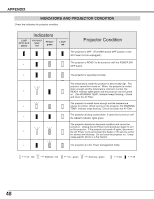
APPENDIX TROUBLESHOOTING Before calling your dealer or service center for assistance, check matters below once again. 1. Make sure you have connected a projector to your computer or video equipment as described in section "CONNECTING PROJECTOR" on pages 13 ~ 16. 2. Check cable connection. Verify that all computer, video and power cord are properly connected. 3. Verify that all power is switched on. 4. If a projector still does not produce an image, re-start your computer. 5. If an image still does not appear, unplug a projector from your computer and check your computer monitor's display.Problem may be with your graphics controller rather than with a projector. (When you reconnect a projector, be sure to turn a computer and monitor off before you power up a projector. Power equipment back on in order of : Projector and computer.) 6. If problem still exists, check following chart. Problem: No power. Try these Solutions G Plug a projector into your AC outlet. G Turn MAIN ON/OFF switch to ON. G Press POWER ON/OFF switch to ON. G Make sure READY Indicator lights. G Wait 90 seconds after a projector is turned OFF when turning a projector back on. NOTE : After pressing Power ON-OFF button to OFF, make sure a projector works as follows: 1. LAMP indicator lights bright and READY indicator turns off. 2. After 90 seconds, READY indicator lights green again and a projector may be turned on by pressing Power ON-OFF button. Image is out of focus. Picture is Left/Right reversed. Picture is Top/Bottom reversed. Some displays are not seen during operation. No image. Remote Control Unit does not work. G Check WARNING TEMP. and READY indicator. If both WARNING TEMP. and READY indicator flashes, a projector cannot be turned on. (See "TURNING ON/OFF PROJECTOR" section on page 23.) G Check Projection Lamp. (Refer to page 44.) G Adjust focus of a projector. G Check Projection Lens to see if it needs cleaning. NOTE : Moving a projector from a cool temperature location to a warm temperature location may result in moisture condensation on Projection Lens. In such an event, leave a projector OFF and wait until condensation disappears. G Check Ceiling / Rear feature. (See "SETTING" section on page 39.) G Check Ceiling feature. (See "SETTING" section on page 39.) G Check Display feature.(See "SETTING" section on page 38.) G Check connection between your computer or video equipment and a projector. G When turning a projector on, it takes about 20 seconds to display an image. G Check system that you select is corresponding with your computer or video equipment. G Make sure temperature is not out of Operating Temperature (5°C ~ 30°C). G Check batteries. G Make sure nothing is between Infrared Remote Receiver and Remote Control Unit. G Make sure you are not too far from a projector when using Remote Control Unit. Maximum operating range is 16.4' (5m). G Check remote control code from Remote Control Unit. (See "SETTING" section on page 40.) 46
-
 1
1 -
2
-
3
-
4
-
5
-
6
-
7
-
8
-
9
-
10
-
11
-
12
-
13
-
14
-
15
-
16
-
17
-
18
-
19
-
20
-
21
-
22
-
23
-
24
-
25
-
26
-
27
-
28
-
29
-
30
-
31
-
32
-
33
-
34
-
35
-
36
-
37
-
38
-
39
-
40
-
 41
41 -
 42
42 -
 43
43 -
 44
44 -
 45
45 -
 46
46 -
 47
47 -
 48
48 -
 49
49 -
 50
50 -
 51
51 -
52
-
53
-
54
-
55
-
56
-
57
-
58
-
59
-
60
-
61
-
62
-
63
-
64
 |
 |