Sanyo HD2000 Instruction Manual, PLV-HD2000 - Page 57
Lens Replacement And Installation Procedure
 |
UPC - 086483060502
View all Sanyo HD2000 manuals
Add to My Manuals
Save this manual to your list of manuals |
Page 57 highlights
LENS REPLACEMENT AND INSTALLATION PROCEDURE NOTE : The installation procedure and needed parts for lens installation depend on the type of the Projection Lens. Check the Model No. of the Projection Lens and be sure to install or replace the lens following procedure below. A 1 Remove Lens Cover. Remove 2 Screws A. Push part B and pull Upper Lens Cover up. (See Fig. 1.) UPPER LENS COVER B 2 Remove 4 Screws C. Pull Lower Lens Cover toward front and remove. (See Fig. 2.) LOWER LENS COVER 3 Remove 2 Screws D and Cover Plate on the back of Upper Lens Cover. (See Fig. 3.) C Fig-1 C Fig-2 D COVER PLATE - 2 - UPPER LENS COVER Fig-3
-
 1
1 -
2
-
3
-
4
-
5
-
6
-
7
-
8
-
9
-
10
-
11
-
12
-
13
-
14
-
15
-
16
-
17
-
18
-
19
-
20
-
21
-
22
-
23
-
24
-
25
-
26
-
27
-
28
-
29
-
30
-
31
-
32
-
33
-
34
-
35
-
36
-
37
-
38
-
39
-
40
-
41
-
42
-
43
-
44
-
45
-
46
-
47
-
48
-
49
-
50
-
51
-
 52
52 -
 53
53 -
 54
54 -
 55
55 -
 56
56 -
 57
57 -
 58
58 -
 59
59 -
 60
60 -
 61
61 -
 62
62 -
63
-
64
 |
 |

- 2 -
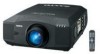
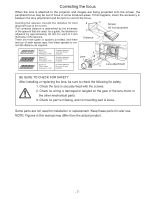
NOTE : The installation procedure and needed parts
for lens installation depend on the type of the
Projection Lens. Check the Model No. of the
Projection Lens and be sure to install or replace the
lens following procedure below.
1
Remove Lens Cover. Remove 2 Screws A. Push
part B and pull Upper Lens Cover up.
(See Fig. 1.)
2
Remove 4 Screws C. Pull Lower Lens Cover
toward front and remove. (See Fig. 2.)
3
Remove 2 Screws D and Cover Plate on the
back of Upper Lens Cover. (See Fig. 3.)
LENS REPLACEMENT AND INSTALLATION PROCEDURE
Fig-1
UPPER LENS
COVER
A
Fig-2
LOWER LENS
COVER
C
COVER PLATE
UPPER LENS
COVER
D
Fig-3
C
B