Sanyo HD2000 Instruction Manual, PLV-HD2000 - Page 62
Correcting the focus
 |
UPC - 086483060502
View all Sanyo HD2000 manuals
Add to My Manuals
Save this manual to your list of manuals |
Page 62 highlights
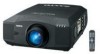
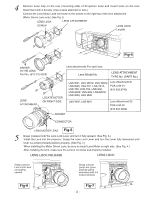
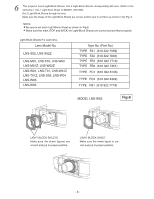
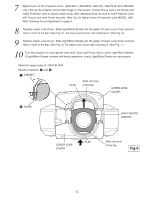
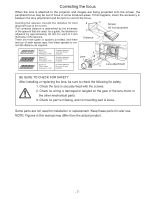
Correcting the focus When the lens is attached to the projector and images are being projected onto the screen, the peripheral focus may be out of focus in some localized areas. If this happens, insert the accessory in between the lens attachment and the lens to correct the focus. Inserting the spacers corrects the distance for best diagonal focus at the screen. The corrected distance is determined by the thickness of the spacers that are used. As a guide, the distance is adjusted by approximately 30 mm for each 0.1-mm thickness of the spacers. There are three types of spacers provided, and there are four of each spacer type. Use these spacers to correct the distance as required. B' D' A' C' Distance Screen 60-inch projection Spacer "1" Color; Clear Thickness; 0.1 mm Spacer "2" Color; Black Thickness; 0.2 mm Spacer "3" Color; Cream Thickness; 0.3 mm Correction distance 30 mm/for 60-inch projection Correction distance 60 mm/for 60-inch projection Correction distance 90 mm/for 60-inch projection Lens A BC D Lens attachment BE SURE TO CHECK FOR SAFETY After installing or replacing the lens, be sure to check the following for safety. 1. Check the lens is securely fixed with the screws. 2. Check no wiring is damaged or tangled on the gear of the lens motor or the other mechanical parts. 3. Check no part is missing, and no mounting part is loose. Some parts are not used for installation or replacement. Keep these parts for later use. NOTE: Figures in this manual may differ from the actual product. - 7 -
-
 1
1 -
2
-
3
-
4
-
5
-
6
-
7
-
8
-
9
-
10
-
11
-
12
-
13
-
14
-
15
-
16
-
17
-
18
-
19
-
20
-
21
-
22
-
23
-
24
-
25
-
26
-
27
-
28
-
29
-
30
-
31
-
32
-
33
-
34
-
35
-
36
-
37
-
38
-
39
-
40
-
41
-
42
-
43
-
44
-
45
-
46
-
47
-
48
-
49
-
50
-
51
-
52
-
53
-
54
-
55
-
56
-
 57
57 -
 58
58 -
 59
59 -
 60
60 -
 61
61 -
 62
62 -
 63
63 -
 64
64
 |
 |
