Sanyo PLC-XR70N Owners Manual - Page 22
Operating On-Screen Menu, HOW TO OPERATE ON-SCREEN MENU, FLOW OF ON-SCREEN MENU
 |
View all Sanyo PLC-XR70N manuals
Add to My Manuals
Save this manual to your list of manuals |
Page 22 highlights
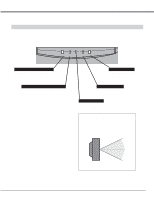
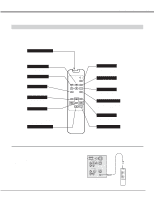
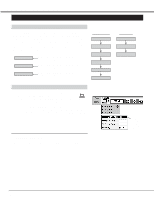
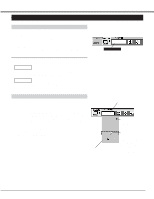
BEFORE OPERATION OPERATING ON-SCREEN MENU HOW TO OPERATE ON-SCREEN MENU You can control and adjust this projector through ONSCREEN MENU. Refer to P18 ~35 to operate ONSCREEN MENU. 1 MOVING THE POINTER Move the pointer (see the NOTE below) by pressing POINT button(S) on the FRONT CONTROL or the REMOTE CONTROL(S). 2 SELECT THE ITEM Select the item by pressing SELECT button. NOTE :Pointer is the icon on the ON-SCREEN Menu to select the item. See the figures on the section "FLOW OF ON-SCREEN MENU" below. WIRELESS REMOTE CONTROL POINT BUTTON Used to move the Pointer to UP/ DOWN/ RIGHT/ LEFT. SELECT BUTTON Used to select the item. WIRED REMOTE CONTROL SELECT FRONT CONTROL SELECT SELECT BUTTON Used to select the item. POINT BUTTON Used to move the Pointer to UP/ DOWN/ RIGHT/ LEFT. SELECT BUTTON Used to select the item. POINT BUTTON Used to move the Pointer to UP/ DOWN/ RIGHT/ LEFT. FLOW OF ON-SCREEN MENU Display ON-SCREEN MENU 1 Press MENU button to display the ON-SCREEN MENU (MENU BAR). The red frame is the POINTER. MENU BAR Select the MENU 2 Move the POINTER (red frame) to the ITEM ICON that you want to select by pressing POINT RIGHT/ LEFT buttons. 3 Select the ITEM by pressing SELECT button. The dialog box of the ITEM appears. POINTER SELECT BUTTON ITEM ICON Control and adjust through ON-SCREEN MENU 4 Move the POINTER downward by pressing POINT DOWN button. (The shape of POINTER become an arrow.) 5 Move the POINTER to the ITEM that you want to adjust and adjust the ITEM by pressing SELECT button. Refer to P24~37 for details of respective adjustments. POINTER POINT DOWN BUTTON MENU 22 POINTER
-
 1
1 -
2
-
3
-
4
-
5
-
6
-
7
-
8
-
9
-
10
-
11
-
12
-
13
-
14
-
15
-
16
-
 17
17 -
 18
18 -
 19
19 -
 20
20 -
 21
21 -
 22
22 -
 23
23 -
 24
24 -
 25
25 -
 26
26 -
 27
27 -
28
-
29
-
30
-
31
-
32
-
33
-
34
-
35
-
36
-
37
-
38
-
39
-
40
-
41
-
42
-
43
-
44
-
45
-
46
 |
 |
