Sanyo PLC-XR70N Owners Manual - Page 40
Mouse / Keyboard Connection, Connecting Mouse/Keyboard to the Projector
 |
View all Sanyo PLC-XR70N manuals
Add to My Manuals
Save this manual to your list of manuals |
Page 40 highlights
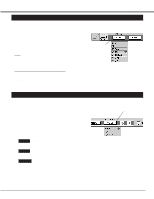
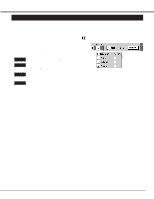
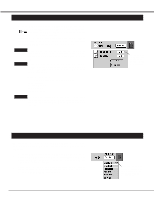
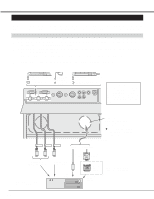
APPENDIX MOUSE/KEYBOARD CONNECTION This projector equips the Mouse/Keyboard Cables in the Storage Cabinet (left side), and the Mouse/Keyboard Terminals on the Front Terminal. Connecting these cables and terminals enable you to control the computer easily. Connecting Mouse/Keyboard to the Projector 1 Connect the Mouse/Keyboard Cable(s) in the Storage Cabinet (left side) to your computer as the figure below. Be sure to connect the cable(s) corresponding with your computer. 2 Connect a Mouse or a Keyboard to the Mouse/Keyboard Terminal on the Front Terminal. Be sure to connect to the terminal corresponding with the input device. 3 Connect the computer to the COMPUTER IN 1 terminal(s). Refer to page 14 and 15 for the connection. 4 When the steps 1, 2, and 3 are finished, switch the projector on before turning the computer on. Keyboard of IBM-Compatible Computer To the IBM-Keyboard Terminal Mouse of IBMCompatible Computer To the IBM-Mouse Terminal Keyboard and Mouse of Macintosh Computer To the Macintosh-Keyboard / Mouse Terminal Caution Be sure to connect the Mouse/Keyboard Cables corresponding with your computer. And be sure to connect to the Mouse/Keyboard Terminals corresponding with your input devices. KEY BOARD MOUSE MAC Cable Slot When Connecting the computer to the Rear Terminal, cut Cable Slot(s) and run through the cables. u Refer to page 14 and 15 for connecting the computer to the projector. To COMPUTER IN 1 terminal To AUDIO 1 To COMPUTER 1 Audio Cable (not supplied) VGA Cable (supplied) To a Keyboard or a Mouse terminal of IBM-Compatible Computer To a Keyboard terminal of Macintosh Computer IBM-Compatible Computer or Macintosh Computer To a Audio Output terminal MAC/VGA Adapter (supplied) To a Monitor Output terminal * Adapter is used for Macintosh computer. Refer to the page 15. 40
-
 1
1 -
2
-
3
-
4
-
5
-
6
-
7
-
8
-
9
-
10
-
11
-
12
-
13
-
14
-
15
-
16
-
17
-
18
-
19
-
20
-
21
-
22
-
23
-
24
-
25
-
26
-
27
-
28
-
29
-
30
-
31
-
32
-
33
-
34
-
 35
35 -
 36
36 -
 37
37 -
 38
38 -
 39
39 -
 40
40 -
 41
41 -
 42
42 -
 43
43 -
 44
44 -
 45
45 -
46
 |
 |
