Sanyo VI 2300 User Manual - Page 245
Assigning Downloaded Ringers, No caller ID
 |
UPC - 086483055652
View all Sanyo VI 2300 manuals
Add to My Manuals
Save this manual to your list of manuals |
Page 245 highlights
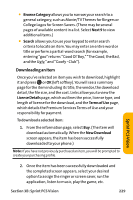
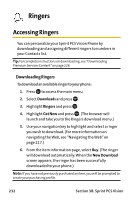
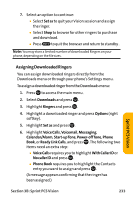
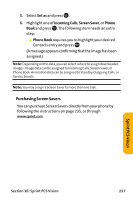
7. Select an option to continue: Ⅲ Select Set as to quit your Vision session and assign the ringer. Ⅲ Select Shop to browse for other ringers to purchase and download. Ⅲ Press to quit the browser and return to standby . Note: You may store a limited number of downloaded Ringers on your phone, depending on the file sizes. Sprint PCSVision Assigning Downloaded Ringers You can assign downloaded ringers directly from the Downloads menu or through your phone's Settings menu. To assign a downloaded ringer from the Downloads menu: 1. Press to access the main menu. 2. Select Downloads and press . 3. Highlight Ringers and press . 4. Highlight a downloaded ringer and press Options (right softkey). 5. Highlight Set as and press . 6. Highlight Voice Calls, Voicemail, Messaging, Calendar/Alarm, Start-up Tone, Power-off Tone, Phone Book, or Ready Link Calls, and press . The following two items need an extra step: Ⅲ Voice Calls requires you to highlight With Caller ID or No caller ID and press . Ⅲ Phone Book requires you to highlight the Contacts entry you want to assign and press . (A message appears confirming that the ringer has been assigned.) Section 3B: Sprint PCS Vision 233
-
 1
1 -
2
-
3
-
4
-
5
-
6
-
7
-
8
-
9
-
10
-
11
-
12
-
13
-
14
-
15
-
16
-
17
-
18
-
19
-
20
-
21
-
22
-
23
-
24
-
25
-
26
-
27
-
28
-
29
-
30
-
31
-
32
-
33
-
34
-
35
-
36
-
37
-
38
-
39
-
40
-
41
-
42
-
43
-
44
-
45
-
46
-
47
-
48
-
49
-
50
-
51
-
52
-
53
-
54
-
55
-
56
-
57
-
58
-
59
-
60
-
61
-
62
-
63
-
64
-
65
-
66
-
67
-
68
-
69
-
70
-
71
-
72
-
73
-
74
-
75
-
76
-
77
-
78
-
79
-
80
-
81
-
82
-
83
-
84
-
85
-
86
-
87
-
88
-
89
-
90
-
91
-
92
-
93
-
94
-
95
-
96
-
97
-
98
-
99
-
100
-
101
-
102
-
103
-
104
-
105
-
106
-
107
-
108
-
109
-
110
-
111
-
112
-
113
-
114
-
115
-
116
-
117
-
118
-
119
-
120
-
121
-
122
-
123
-
124
-
125
-
126
-
127
-
128
-
129
-
130
-
131
-
132
-
133
-
134
-
135
-
136
-
137
-
138
-
139
-
140
-
141
-
142
-
143
-
144
-
145
-
146
-
147
-
148
-
149
-
150
-
151
-
152
-
153
-
154
-
155
-
156
-
157
-
158
-
159
-
160
-
161
-
162
-
163
-
164
-
165
-
166
-
167
-
168
-
169
-
170
-
171
-
172
-
173
-
174
-
175
-
176
-
177
-
178
-
179
-
180
-
181
-
182
-
183
-
184
-
185
-
186
-
187
-
188
-
189
-
190
-
191
-
192
-
193
-
194
-
195
-
196
-
197
-
198
-
199
-
200
-
201
-
202
-
203
-
204
-
205
-
206
-
207
-
208
-
209
-
210
-
211
-
212
-
213
-
214
-
215
-
216
-
217
-
218
-
219
-
220
-
221
-
222
-
223
-
224
-
225
-
226
-
227
-
228
-
229
-
230
-
231
-
232
-
233
-
234
-
235
-
236
-
237
-
238
-
239
-
 240
240 -
 241
241 -
 242
242 -
 243
243 -
 244
244 -
 245
245 -
 246
246 -
 247
247 -
 248
248 -
 249
249 -
 250
250 -
251
-
252
-
253
-
254
-
255
-
256
-
257
-
258
-
259
-
260
-
261
-
262
-
263
-
264
-
265
-
266
-
267
-
268
-
269
-
270
-
271
-
272
-
273
-
274
-
275
-
276
-
277
-
278
-
279
-
280
-
281
-
282
-
283
-
284
-
285
-
286
 |
 |
