Sharp AR-M350 AR-M280 AR-M350 AR-M450 Operation Manual (for multifunction - Page 50
Making Configuration Setting
 |
View all Sharp AR-M350 manuals
Add to My Manuals
Save this manual to your list of manuals |
Page 50 highlights
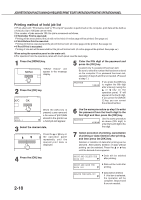
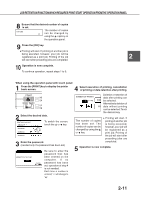
MAKING CONFIGURATION SETTING The printer configuration setting allows basic printer settings to be made. The items set with the printer configuration settings are shown below. G Main program settings Basic settings used in printing (See page xxxx.) G PCL settings Sets a PCL symbol set. (See page xxxx.) G PostScript settings*1 Sets whether a PostScript error page is printed or not when a PostScript error has occurred. (See page xxxx.) *1 An optional PS3 expansion kit is needed. Operation procedure common to all printer configuration settings (items that can be set from the operation panel) When using the operation panel on the main unit: 1 Press the [MENU] key to display the configuration setting menu screen. Press the [MENU] key repeatedly until "CONDITION SETTING" appears. Any print jobs held in the printer and any job currently transmitted to the printer will be printed in the former print conditions. 2 Press the [OK] key. 5 Press the or key to display the desired setting. For the details of each setting item, see the description on and after page xxxx. 6 Press the [OK] key. G will be displayed to the right of the selected item and setting will be registered.To set another item, press the [BACK/C] key to return to step 3 and repeat the procedure to step 6. 7 When setting is complete, press the [MENU] key to return to the basic screen. 3 Press the or key to display the desired setting item. NOTE If the [BACK/C] key is pressed after each setting is complete, the display that has called the setting will appear again. If selection of a number is mistaken during setting operation, press the [BACK/C] key to correct the selected number. 4 Press the [OK] key. 3-2
-
 1
1 -
2
-
3
-
4
-
5
-
6
-
7
-
8
-
9
-
10
-
11
-
12
-
13
-
14
-
15
-
16
-
17
-
18
-
19
-
20
-
21
-
22
-
23
-
24
-
25
-
26
-
27
-
28
-
29
-
30
-
31
-
32
-
33
-
34
-
35
-
36
-
37
-
38
-
39
-
40
-
41
-
42
-
43
-
44
-
 45
45 -
 46
46 -
 47
47 -
 48
48 -
 49
49 -
 50
50 -
 51
51 -
 52
52 -
 53
53 -
 54
54 -
 55
55 -
56
-
57
-
58
-
59
-
60
-
61
-
62
-
63
-
64
-
65
-
66
-
67
-
68
-
69
-
70
-
71
-
72
-
73
-
74
-
75
-
76
-
77
-
78
-
79
-
80
-
81
-
82
-
83
-
84
-
85
-
86
-
87
-
88
-
89
-
90
-
91
-
92
-
93
-
94
-
95
-
96
-
97
-
98
-
99
-
100
-
101
-
102
-
103
-
104
-
105
-
106
-
107
-
108
-
109
-
110
-
111
-
112
-
113
-
114
-
115
-
116
-
117
-
118
 |
 |
