Sharp AR-RB1 Service Manual - Page 18
C. Others
 |
View all Sharp AR-RB1 manuals
Add to My Manuals
Save this manual to your list of manuals |
Page 18 highlights
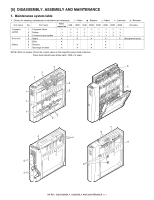
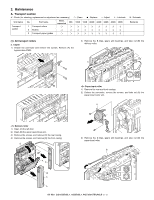
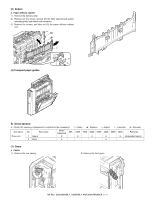
(2) Belts a. Copier 1) Remove the rear casing. C. Others ✕ : Check (for cleaning, replacement or adjustment as necessary) ❍ : Clean v : Replace ∆ : Adjust ✩ : Lubricate Unit name Others No. Part name 1 Sensors 2 Discharge brushes When requested 50K 100K 150K 200K 250K 300K 350K 400K ✕ ✕ ✕ ✕ ✕ ✕ ✕ ✕ ✕ ✕ ❏ : Relocate Remarks (1) Sensors a. Copier 1) Remove the screw, and remove the sensor holder. 2) Remove the screws, and remove the sensor covers. b. Upper open/closed unit 1) Open the upper open/closed unit, remove the E-ring and bearing, and take out (A) the gate unit. 2) Remove the screw, and remove (B) the upper cabinet. B A AR-RB1 DISASSEMBLY, ASSEMBLY AND MAINTENANCE 5 - 5
-
 1
1 -
2
-
3
-
4
-
5
-
6
-
7
-
8
-
9
-
10
-
11
-
12
-
 13
13 -
 14
14 -
 15
15 -
 16
16 -
 17
17 -
 18
18 -
 19
19 -
 20
20 -
 21
21 -
 22
22 -
 23
23 -
24
-
25
-
26
-
27
-
28
-
29
-
30
-
31
-
32
-
33
-
34
-
35
-
36
 |
 |
AR-RB1
DISASSEMBLY, ASSEMBLY AND MAINTENANCE
5 - 5
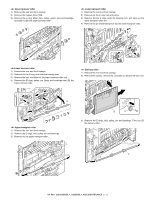
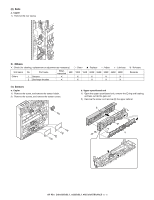
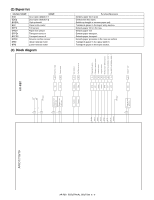
(2) Belts
a. Copier
1)
Remove the rear casing.
C. Others
✕
: Check (for cleaning, replacement or adjustment as necessary)
❍
: Clean
▲
: Replace
∆
: Adjust
✩
: Lubricate
❏
: Relocate
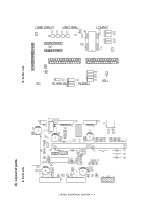
(1) Sensors
a. Copier
1)
Remove the screw, and remove the sensor holder.
2)
Remove the screws, and remove the sensor covers.
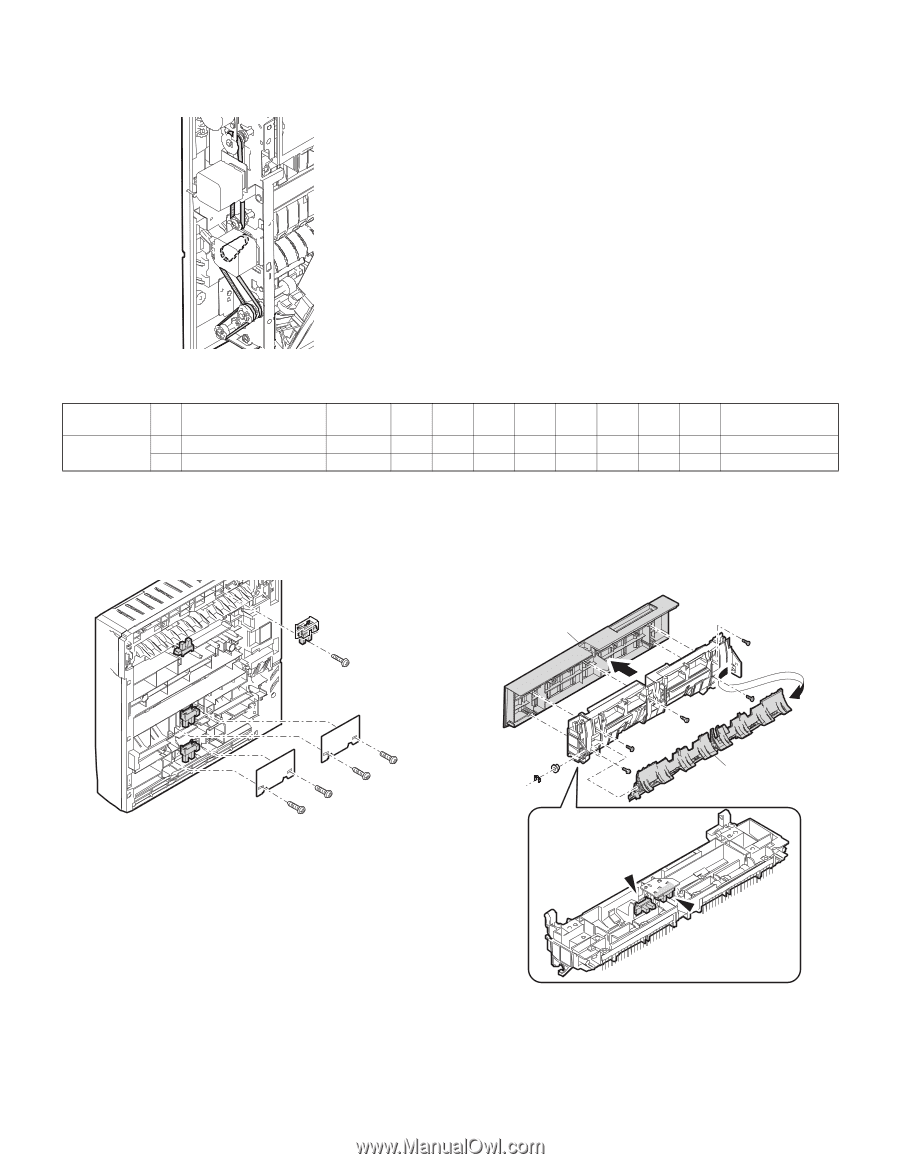
b.
Upper open/closed unit
1)
Open the upper open/closed unit, remove the E-ring and bearing,
and take out (A) the gate unit.
2)
Remove the screw, and remove (B) the upper cabinet.
Unit name
No.
Part name
When
requested
50K
100K
150K
200K
250K
300K
350K
400K
Remarks
Others
1
Sensors
✕
✕
✕
✕
✕
2
Discharge brushes
✕
✕
✕
✕
✕
A
B