Sharp DX-B351PL DX-B351PL User Manual - Page 11
Product View
 |
View all Sharp DX-B351PL manuals
Add to My Manuals
Save this manual to your list of manuals |
Page 11 highlights
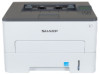
1.3. Product View Side view 1 Output Bin Stores the printed paper. 2 Control Panel Indicate printer status to conduct set operation. 3 Output Tray Prevents the printed paper from falling. 4 Front Cover Open the front cover to take out the laser toner cartridge. 5 Manual feed tray Place mediums to be printed in manual feed tray. 6 Power switch Turn the power on or off and press this button under Ready state to enter energy-saving mode. Press and hold this button for more than 2s to turn the printer power off. 7 Automatic Feeder Tray Place mediums to be printed in the auto feed tray. 8 Paper deflector of manual feed tray Slide paper deflector to adapt to paper width. 3
-
 1
1 -
2
-
3
-
4
-
5
-
 6
6 -
 7
7 -
 8
8 -
 9
9 -
 10
10 -
 11
11 -
 12
12 -
 13
13 -
 14
14 -
 15
15 -
 16
16 -
17
-
18
-
19
-
20
-
21
-
22
-
23
-
24
-
25
-
26
-
27
-
28
-
29
-
30
-
31
-
32
-
33
-
34
-
35
-
36
-
37
-
38
-
39
-
40
-
41
-
42
-
43
-
44
-
45
-
46
-
47
-
48
-
49
-
50
-
51
-
52
-
53
-
54
-
55
-
56
-
57
-
58
-
59
-
60
-
61
-
62
-
63
-
64
-
65
-
66
-
67
-
68
-
69
-
70
-
71
 |
 |

3
1.3.
Product View
Side view
1
Output Bin
Stores the printed paper.
2
Control Panel
Indicate printer status to conduct set operation.
3
Output Tray
Prevents the printed paper from falling.
4
Front Cover
Open the front cover to take out the laser toner cartridge.
5
Manual feed tray
Place mediums to be printed in manual feed tray.
6
Power switch
Turn the power on or off and press this button under
Ready state to enter energy-saving mode.
Press and hold this button for more than 2s to turn the printer
power off.
7
Automatic Feeder Tray
Place mediums to be printed in the auto feed tray.
8
Paper deflector of
manual feed tray
Slide paper deflector to adapt to paper width.