Sharp GX17 User Guide - Page 56
Email, About Email Messaging, Before You Start, Creating a New Email Message
 |
View all Sharp GX17 manuals
Add to My Manuals
Save this manual to your list of manuals |
Page 56 highlights
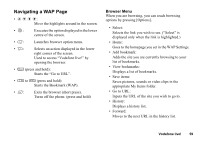
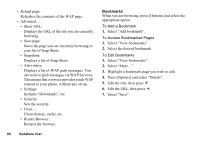
Email (M 4-4) About Email Messaging The Email service allows you to send and receive Email messages and is compatible with most POP3 Email providers. Email messages of up to 2000 characters can be sent. The size of the Email messages to be received depends on Email settings. Before You Start You must input the specific settings for your Email provider. If you do not have a provider, please contact your network operator who may provide the correct POP3 settings. Please note that Email settings may already be installed by your operator. To input settings, go to "Settings", "Network", "Email Settings". If you want to use your own existing POP3 Email provider, select an empty profile and enter the settings. Once the settings are complete, go to "Messages", "Email", "Check Email" to download new messages. The phone will notify you if there are any new messages. Note • You cannot send Email messages with files attached. If you forward Email messages with files attached, the attached files are removed. Creating a New Email Message A → "Email" → "Create Message" 1. Enter the message. 2. Enter the Email address of the recipient. 3. Select "Send". After the message is sent, the message is moved to the Sent box. Note • If a message cannot be sent for some reason, the message stays in the Outbox. To re-send the message, carry out the following: A → "Email" → "Outbox" 1. Highlight the desired message. 2. Press [Options] and select "Re-send". Tip • Select "Save to Drafts" instead in step 3 to save the message without sending. • Select "Subject" in step 3 to enter the subject. Up to 40 characters as the subject can be entered. • Select "Add Contact" instead in step 3 to add more recipients (up to 30 recipients (for To, Cc and Bcc collectively)). Select "To", "Cc" or "Bcc" and select or enter the desired address of the recipients. Messages 55
-
 1
1 -
2
-
3
-
4
-
5
-
6
-
7
-
8
-
9
-
10
-
11
-
12
-
13
-
14
-
15
-
16
-
17
-
18
-
19
-
20
-
21
-
22
-
23
-
24
-
25
-
26
-
27
-
28
-
29
-
30
-
31
-
32
-
33
-
34
-
35
-
36
-
37
-
38
-
39
-
40
-
41
-
42
-
43
-
44
-
45
-
46
-
47
-
48
-
49
-
50
-
 51
51 -
 52
52 -
 53
53 -
 54
54 -
 55
55 -
 56
56 -
 57
57 -
 58
58 -
 59
59 -
 60
60 -
 61
61 -
62
-
63
-
64
-
65
-
66
-
67
-
68
-
69
-
70
-
71
-
72
-
73
-
74
-
75
-
76
-
77
-
78
-
79
-
80
-
81
-
82
-
83
-
84
-
85
-
86
-
87
-
88
-
89
-
90
-
91
-
92
-
93
-
94
-
95
-
96
-
97
-
98
-
99
-
100
-
101
-
102
-
103
-
104
-
105
-
106
-
107
-
108
-
109
-
110
-
111
-
112
-
113
-
114
-
115
-
116
-
117
-
118
-
119
-
120
-
121
-
122
-
123
-
124
-
125
-
126
-
127
-
128
 |
 |
